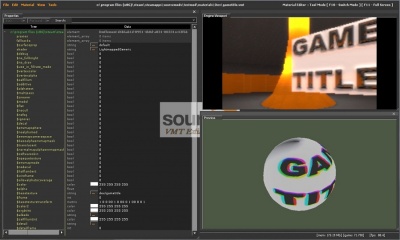
VMTEDIT/UI overview
< VMTEDIT
Jump to navigation
Jump to search
This article or section needs to be cleaned up to conform to a higher standard of quality because:
incomplete
For help, see the VDC Editing Help and Wikipedia cleanup process. Also, remember to check for any notes left by the tagger at this article's talk page.The UI contains three major areas:
- The properties
- The viewport
- The Preview window
The top edge of the screen is the main menu. From here you can load and save VMT files, undo and redo actions, and configure your workspace.
- The Properties window is where the material properties are edited. Any user could set the properties to get the desired look or the material to be worked on.
 Tip:You can use your scroll wheel to increase or decrease most values. There are three modifier keys to help with this:
- For increments of 0.1, use Ctrl
- For increments of 10, use ⇧ Shift
- To lock the value to 0-1, use Alt
- The engine viewport shows whatever environment the game has currently loaded. You can flip control to and from the game with F10, and maximise your view with F11.
- The preview window shows the current material as it may render. You can manipulate your view by holding
 to rotate,
  to zoom, and
  to move on the mouse.
 Note:Some shaders may not show correctly, so the effect may not be entirely accurate.
See also
Todo: Add links
