SteamVR/Environments/Adding a Welcome Panel
Introduction
You have your lavishly detailed SteamVR Home location constructed, but how about adding some informational panels to it? This tutorial will explain a more advanced welcome panel, complete with globe to show where in the world your visitors have found themselves.
Initial Entities
We don't want to crowd the environment with all sorts of permanently visible information panels, so we'll place a teleport point and use entity logic to show and hide the information as appropriate.
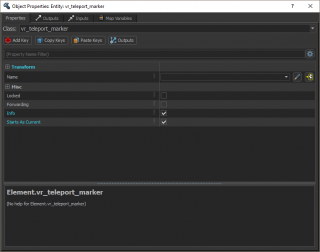
First, place a 'vr_teleport_marker in the world. Since this will be shown when a visitor first arrives in the world, I've placed it at the feet of the info_player_start entity and set the 'Starts As Current' flag - the latter makes it automatically fire its OnTeleportTo outputs on startup. (More on that later!) To make the teleport point appear with a helpfully descriptive informational 'i' icon, I've set the 'Info' flag as well. That's all on this entity for now.
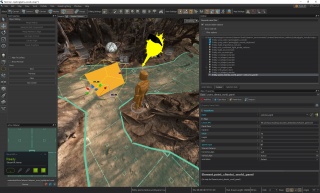
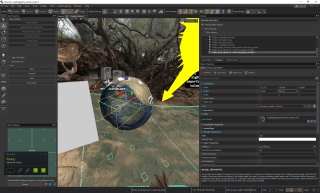
Next, place a point_clientui_world_panel in the world. This will act as the actual information panel - arrange this so that it's facing the teleport point and up a bit - the light grey side is the 'front', the dark grey side is the 'back'. It can be helpful to set a larger width now, so you can be sure it's oriented the correct way and isn't on its side.
I've given mine the name 'welcome_panel', and set the Layout XML (a file akin to a small web page) to 'file://{resources}/layout/custom_destination/welcome_panel.xml'. Width I've set to 48, height to 32, and since we won't be directly interacting with this panel via buttons or similar I've set the Ignore Input flag.
Globe
This part is optional, but can be a useful guide to show people where they now are in the world.
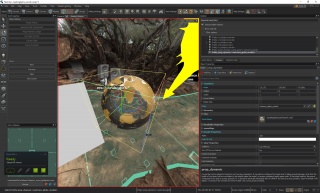
Place a prop_dynamic somewhere to the right of the information panel, and set the model to 'models/globes/earth/earth.vmdl'. Give it the name 'welcome_globe_models', and make sure its angles under Transform are all set to zero. It won't matter for us since in this case we want the globe to be displayed on map entry, but to make sure the entity logic we add later is fully operational, check the Start Disabled flag further down in the properties.
All this by itself provides a globe - now we need some sort of marker on it.
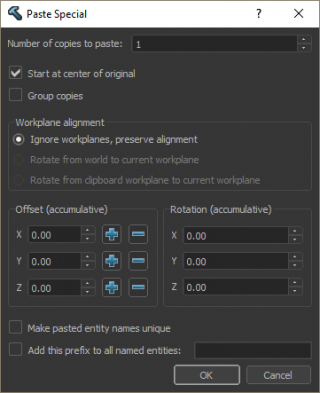
With the globe selected in the 3D view, press Control-C to copy it. Now go to Edit : Paste Special... - this useful tool provides many ways to paste a copy into a map, but we're going to use it simply to place a copy of the globe at the exact position of the existing globe. Make sure the number of copies is zero, and that Start at centre of original is checked, then click OK.
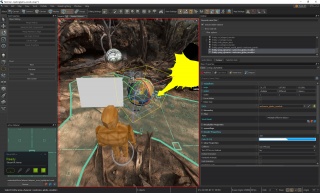
There should now be a second copy of the globe in the exact position of the first. Which isn't very useful - so, with the new copy still selected, change the model to 'models/globes/earth/earth_marker.vmdl'. We should now have a marker at zero degrees longitude and zero degrees latitude.
Now, bring up Google Maps in your web browser, and navigate to the location you captured. When you get there, click once on the ground to get an information popup at the bottom of the window, then click once on the map coordinates it provides. You'll be able to copy and paste those numbers into Notepad or similar - for my scene, the numbers came out as 19.955628, -155.856047.
In the marker model's transform settings, the three angles are Pitch, Yaw and Roll. The last one isn't relevant for us, but the first two are equivalent to Latitude and Longitude. I entered -19.96 for Pitch (the minus sign being a fudge to get things round the right way) and -155.86 for Yaw (which immediately updated itself to 204.14 degrees). The marker is now centered on the north-west of Big Island, Hawaii!
With both globe and marker models selected, rotate them so that the marker faces where the player will be. You can adjust this later as necessary.
Entity Logic
Now to attach everything together. When teleporting to this information point, we want the information panel to become activated, and for the globe to appear.
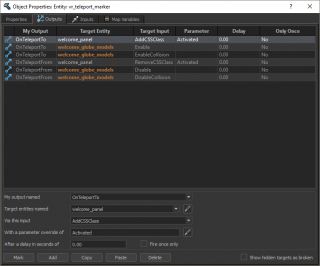
Double-click on the teleport point in the 3D view (or select it and press Alt-Enter) to bring up the full Object Properties window. Switch to the Outputs tab, and click 'Add' at the bottom. You want My output named set to OnTeleportTo (as mentioned earlier, this output fires automatically when Starts As Current is set on the teleport point entity), then Target Entity' set to welcome_panel. Via this input should be AddCSSClass, and With a parameter override of set to Activated.
Keep setting things up as shown in the screenshot. There's a fair amount of stuff to do, but this should give an inkling as to how powerful the system is - entity logic can be used to implement some decidedly complex things. If anything it's a visual scripting language - just be careful not to overdo things. An actual scripting language is now also available!
With that all done, you should have all the necessary entity logic for an information panel and globe which appear and disappear when you teleport to and from that information point. Compile the map and run it to test things out.
...
Remember that .XML file mentioned earlier? We've forgotten to set that up.
Panel XML
Information panels (along with most of the UI) in SteamVR Home use a system called Panorama. Roughly similar to a web browser's rendering engine, it uses XML, CSS, Javascript and other buzzwords for producing interactive user interfaces. For our purposes, we want something very simple - just a heading and a few lines of text.
Navigate your way to your addon's content folder (this is probably somewhere like 'Steam\steamapps\common\SteamVR\tools\steamvr_environments\content\steamtours_addons\your_addon_name'), then look inside 'panorama\layout\custom_destination'. There's probably a 'welcome_panel.xml' there already, but if not, create one in a text editor. Set the contents to the following:
<root>
	<styles>
		<include src="file://{resources}/styles/base_styles.css" />
		<include src="file://{resources}/styles/info_panels.css" />
	</styles>

	<ClientUIDialogPanel class="InWorldInfoPanel">
		<Panel class="Page" id="YourAddonName_Welcome">
			<Panel class="TextArea">
				<Label class="Title" text="#YourAddonName_Welcome_Title" />
				<Label class="Desc Big" text="#YourAddonName_Welcome_Desc" />
			</Panel>
		</Panel>
	</ClientUIDialogPanel>
</root>
See those text strings set to "#YourAddonName_Title" and similar? That's the localisation system in action - it looks up the strings for the user's language in another text file. Head to your addon's game folder, which will be somewhere like 'Steam\steamapps\common\SteamVR\tools\steamvr_environments\game\steamtours_addons\your_addon_name\panorama\localization' and open up the 'addon_english.txt' file. (You can also create additional ones for specific languages, such as 'addon_french.txt' and 'addon_russian.txt', but they're not required.)
You can define strings like the following:
"addon"
{
	"YourAddonName_Welcome_Title"	"Title goes here"
	"YourAddonName_Welcome_Desc"	"Description goes here.\n\nThat was a new paragraph, in case you were wondering."
}Additional Panels
If you want to add more panels to your map, carry on placing more vr_teleport_marker entities, along with corresponding new point_clientui_world_panel entities. You'll want each of those to have a unique target name, and refer to a new .XML file. (There'll only be one addon_english.txt file, though - put all your strings in there with unique names.)
For those additional teleport points, unless you want them to display their panels by default make sure the Starts As Current flag is not set. Make sure their entity outputs point at the appropriate panels.
Javascript Example Button
The following, while not used in my map, shows the use of Javascript to call an output through an interactive button, in this case the CustomOutput0 and CustomOutput1 entity outputs. It could be used to toggle the visibility of a particular model or set of models - for instance, an additional informational overview. (See the Mars and English Church scenes for examples of this in action.)
<root>
	<styles>
		<include src="file://{resources}/styles/base_styles.css" />
		<include src="file://{resources}/styles/info_panels.css" />
	</styles>

	<script>
		function SetModelVisible( bVisible )
		{
			if ( bVisible )
			{
				$.DispatchEvent( "ClientUI_FireOutput", '0' );
				$( "#ShowModelBtn" ).RemoveClass( "Visible" );
				$( "#HideModelBtn" ).AddClass( "Visible" );
			}
			else
			{
				$.DispatchEvent( "ClientUI_FireOutput", '1' );
				$( "#ShowModelBtn" ).AddClass( "Visible" );
				$( "#HideModelBtn" ).RemoveClass( "Visible" );
			}
		}
	</script>

	<ClientUIDialogPanel class="InWorldInfoPanel">
		<Panel class="Page" id="CameraPositionsDialog">
			<Panel class="TextArea WithButtons">
				<Label class="Title" text="#ExampleAddon_Title" />
				<Label class="Desc" text="#ExampleAddon_Desc" />
			</Panel>

			<Panel class="InfoDialogButton">
					<Button id="ShowModelBtn" class="DialogButton Visible" text="Show Model" onactivate="SetModelVisible( true )">
						<Label text="#ExampleAddon_ShowModel" />
					</Button>
					<Button id="HideModelBtn" class="DialogButton" text="Hide Model" onactivate="SetModelVisible( false )">
						<Label text="#ExampleAddon_HideModel" />
					</Button>
			</Panel>
		</Panel>
	</ClientUIDialogPanel>
</root>
Conclusions
While just scratching the surface of what is possible with interactive panels and entity logic, this guide should be enough to get you started. The documented scene is available on the Workshop here - and as always, if you have any questions feel free to ask them in the Discussion tab of this page.
