SteamVR/Environments/Adding Lighting
The Renderer
The Source 2 engine appears to be designed with multiple different renderers in mind. SteamVR Home uses a forward renderer tailored for VR applications, while Dota 2 uses a deferred renderer with real-time global illumination.
The renderer in SteamVR Home supports a combination of two kinds of lighting, real-time direct illumination and static baked global illumination. The real-time illumination uses point light sources and deferred shading with cascaded shadow maps. The global illumination uses path tracing[confirm] to generate lighting which is baked to lightmaps and light probe volumes. Image-based lighting is also supported. An alternate baker that uses photon mapping to bake vertex lighting and light probe volumes is also available.
The lighting can be split up into four different groups, diffuse and specular, with each with respectively direct and ambient lighting. Physically based rendering (PBR) is assumed to be used, which among other things means that surfaces are energy conserving and cannot emit more light that they receive. The light received by the surface is split up into diffuse and specular reflections according to the material properties.
Direct diffuse light can either be rendered by real-time lighting or baked into the static lighting.
Indirect diffuse light is baked into the static lighting.
Direct specular light is emitted by direct light sources, and is rendered on surfaces with specular materials.
Indirect specular light is baked to environment maps using cubemap entities, and the nearest cubemap in range is used to illuminate materials.
This guide uses a Cornell box-like scene with extra subdivisions on the faces to illustrate the effect of vertex lighting. The green and blue materials have specular reflections enabled.


Light Sources
All light sources can be set to provide direct or indirect light, or both. When per-pixel direct lighting is used, the the light entities can be manipulated at runtime to change the lighting.

light_environment
The light_environment entity provides outdoors environmental lighting, as well as options to add ambient occlusion and a base ambient term.
The base Color, Brightness and entity rotation settings control the directional sunlight, providing both direct and indirect lighting. The direct lighting can be switched between per-pixel real-time and baked, while the indirect lighting can only be baked. When real-time lighting is used, the sun light casts shadows using cascaded shadow maps, and the direct light and shadows are excluded from the baked lighting, leaving only the reflected indirect light to be baked.
The ambient sky is controlled with the setting in the Sky group. The Sky Color allows setting an uniform color, and the intensity controls its brightness. The Sky IBL Source option allows using the skybox texture set in the env_sky entity for image-based lighting, sampling the colors in the skybox for the ambient lighting instead. To use it, give the env_sky a name, and supply it in the Sky IBL property. It is recommended to use floating point HDR images for this.
The ambient occlusion controls allow extra shadows to be baked to areas with high occlusion, (indents, crevices, etc.), this can have limited use with vertex lighting unless the meshes have high detail.
The Ambient Light option allows adding a constant light to the entire level. This is unrealistic, and can produce bad results unless used with caution.
light omni
An omnidirectional point light source. Does not provide cascaded shadow maps. Many properties are carried over from the Source light entity.


light_spot
A spot light source. Provides cascaded shadow maps as long as the light cone angle is set under 90 degrees. Many properties are carried over from the Source light_spot entity.


Baking lighting
The VRAD2 tool used to bake lighting in SteamVR Home uses the photon mapping algorithm to bake lighting. This is a two-step process where the first step generates the photon map itself, a representation of the lighting made by ray tracing light packets from light sources and storing occurrences of packets hitting surfaces. This fist part is cached to file and can be re-used if the geometry or lighting hasn't been changed significantly between runs.
The second step generates the baked lighting onto meshes. Although some of the tools suggest that lightmapping support is in the works, the current version only supports vertex lighting, meaning that lighting is baked only to each vertex of the mesh. This can cause triangular artifacting and odd gradients in areas with high contrast lighting. Due to these effects it is not recommended to bake direct lighting on directional light sources.
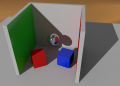
Real-time direct sunlight
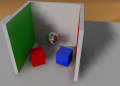
Vertex-lit baked sunlight
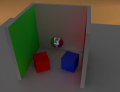
No sunlight


Dynamic objects
The baking only directly affects static meshes. To enable dynamic objects such as physics props to be lit by baked lighting, two techniques are used.

For diffuse lighting, light probe volumes sample the ambient light inside them and generate voxel maps of the different ambient values, and the maps are stored as textures. This is similar to how ambient lighting is handled in the legacy Source engine, except there the volumes are defined by the automatically generated visleaf volumes, whereas in Source 2, the lack of sealed maps and a BSP portal visibility system requires us to map out the volumes ourselves.
Light probe volumes are defined with the env_light_probe_volume and env_combined_light_probe_volume entities, the latter also having an env_cubemap_box built-in.
There are two different ways light probe volumes can sample lighting, the default option samples the light directly from geometry around it by tracing (
). The other option is to indirectly sample the lighting using cubemaps (see below), enabled using the Calculate Diffuse Lighting Using Cubemap option in the light probe volume entity.

Ambient specular lighting is handled by environment maps (cubemaps). Cubemaps bake the environment around them into panoramic textures, which are then used for detailed reflections. Cubemaps only provide a fully accurate reflection at its point of origin, so it is recommended to place them at head height.

The default VR shader supports projecting the cubemap on its bounds and rendering the reflection from the correct position inside the room, using the Specular Cube Map Projection setting. This effect is enabled on a per-material basis, and can result in a correct mirror effect on the cubemap bounds. Anything inside the cubemap will be skewed though.
Direct lighting is handled per light source, and can be either per-pixel real time lit, or baked into the ambient lighting. A mixed option exists to enable real-time lighting on dynamic objects only, while retaining baked direct lighting on static objects.


Optimization
Baking time increases rapidly with increased map sizes, but there are several ways of combating this.
Photon mapping from environmental lights is performed from the edges of the map, defined by where the map geometry starts. If the map has far away background objects, photon mapping can take a very long time. To combat this, a light_importance_volume entity can be placed. This entity defines a volume to perform detailed photon mapping in. Outside it only simplified lighting is performed. Note that the importance volume is a single axis-aligned bounding box, so it can't be rotated, and multiple volumes are merged into a single one, making it less useful for maps that are not rectangularly shaped.
| Text | Cause |
|---|---|
| Photons 1/1 | This is the first step of the photon map generation. This can be optimized by using a light_importance_volume.
|
| LPV-Indirect/Direct | The light probe volume voxel size generation. Can be optimized by decreasing the voxel resolution in light probe volume entities. |
| Tris 1/1 | This is the second step of the photon map generation. The time here is dependent on the number of lighting samples, in this case the number of vertices in the static meshes of the map. The only way to optimize this is to simplify the models and meshes used in the map, or decrease the number of complex static objects. |
Lightmapping
Upon release of the Half-Life Alyx preview environments, SteamVR Home was updated to include support for a lightmapping system similar to one used in the full game. Instead of baking lighting information onto the vertices of static mesh geometry, a lightmap texture can be generated with lighting detail not dependent on geometric complexity, but rather the resolution of the lightmap texture and user tunable biasing. For many lighting effects and scenes it is now possible to rely on accurate precalculations of lighting and shadows instead of the typical arrangement using expensive per-pixel runtime calculations for shadows and the direct component of a light and inferior baked vertex lighting for the indirect.
Usage
By default, a light entity placed in SteamVR Home will still have its directional component set to per-pixel (real-time). The take advantage of the lightmapper you will have to set it to 'Baked', though you will not see any change in the editor—all lights in the hammer viewports necessarily render as per-pixel lights with any indirect vertex lighting and cubemap reflections also being shown if they are present. If 'Generate Lightmaps' is enabled at build time, the direct component and shadows of any baked lights (along cubemap reflections, light probe volume textures and the indirect component for relevant lights) will be generated and then packaged into the finished map VPK. If this build setting is not enabled, previously generated vertex/preview lighting will be used instead.
The Hammer editor UI was adjusted and renames the original method to 'Preview Lighting'. Because it is much quicker to build, it is used during map development. Map makers can initiate (re)builds of vertex/preview lighting on the whole map (or a selection of objects) at some arbitrary point prior to build—whereas lightmaps will be built at the time of compilation, process everything, and take *much* longer to generate.
Toggling this flag in a light entity and setting the compile time toggle are the only necessary steps to use the new system, but it is also helpful to change the resolution of the lightmap for certain areas of your environment. Setting the lightmap bias of faces and static props will allow you to influence which areas of your map receive more (or less) detail. You may also enclose important areas of your map with meshes using the "tools/lightmap_playerspace" material—parts of your environment farther away from the faces of these meshes will have a lower lightmap bias.
In addition to (and exacerbated by) the long processing times, the primary difficulty presented when using the lightmapper is handling certain visual discrepancies between what is presented in the editor and what the lightmapper is capable of precalculating. You can view the final lightmap results without having to put on a VR HMD by setting a Hammer viewport to 'Game' mode, however, certain other things like the skybox and certain kinds of animated props might only render inside the headset or in the other Hammer views.
- The most pertinent issue is the loss of the specular component when the light is fully baked. Half-Life Alyx supports 'Baked Light Indexing' which allows the specular component to render without the light being fully per-pixel, but SteamVR Home does not have this feature. You may opt for the specular component to be baked into the cubemaps, but achieving desired visual results may not always be feasible this way. (Disabling 'Render Specular' for all baked lights will have the editor view more closely resemble the game build—although the preview render of light_environment will not be affected by this entity flag.)
- Next is the difference in shadow generation. First, the quality of shadows baked into the lightmap become dependent on overall resolution and careful biasing. Second, translucent materials will not block light like they do when the light is per pixel, so things like grass or chain link fence textures will not create interesting shadows in your environment. This might necessitate an alteration of the scene, use of a blocklight mesh, etc. (Hammer has baked lighting visualization modes to generate previews of what the lightmapper will be able to see and what shadows will eventuate in your environment. To achieve visual parity with a game build against the editor preview, you may also 'Disable Shadows' on objects that won't cast shadows when only hit by baked lights.)
- Lastly, materials that feature the 'tree sway' parameter (allowing things like leaves and such to cheaply animate) can often not render properly in a lightmapped build. They might artifact, glitch, stretch etc. If you spot this, you will have to either set the prop to a 'prop_dynamic' or keep it as static and disable the 'Bake Lighting' flag. The latter option will use less resources and the end result on visuals is seemingly the same. Depending on the scene, this prop may then sometimes appear brighter than you would like, and lowering the prop's color value might help to appropriately darken it. (Take advantage of quick '512-Fast' builds to spot offending props early.)
Building
Running the lightmapper takes a long time, so finding ways to run quicker invocations during development will be important for your productivity and ability to iterate. The vrad3 process does not hang the editor, so you can work on another map or prefab, or even the map that is building (though the changes won't be present until the next build). Resolution and the Quality setting will be the main factor influencing build time. You should expect to build 4k 'Final' lightmaps for your shipping level, but can rely on more relaxed settings when iterating on your environment. Using the (limited) Tools Visualization Modes can help you spot problems with shadows, and preview lighting will still help you place cubemaps and adjust properties of the lights. Debugging luxel density and shadows is more difficult when testing with lower resolution lightmaps. It may help to section a large map off into prefabs such that your computer will be able to execute 4k (or even 8k) 'Fast' test builds of these separate sections which will result in grainy, but high resolution lighting detail that will help you find important areas where biasing should be adjusted.
When using vertex lighting, cubemap textures are generated before the map is built. If generating lightmaps for your environment, you will need to initiate the process of generating the final cubemap textures that will be rendered in-game. You can do this with the 'Build cubemaps on load' toggle in the compile dialog and loading the map from there, or otherwise with the 'buildcubemaps' console command when the compiled map is loaded in tools mode. The textures will then be inserted into the map VPK.
Guidelines
A per-pixel light will create attractive and dynamic shadows (with configurable resolution) at runtime and employ a specular component, but they are very expensive to render and so it is recommended to use baked lights whenever possible to claim higher VR performance. Deciding which lights will use a per-pixel direct component and their placement will be important considerations. Keep them far enough away from other per-pixel lights and shining directly on as few surfaces as you need then to. Meanwhile, a fully baked light is more or less able to accomplish what it is able to for free. Beyond their performance cost, it is generally hard to have many per-pixel lights in one environment without the engine running into problems.
If your level is an open outdoor area, shadows from translucent foliage might be of particular importance to the look of your scene, and it would be acceptable to have the one per-pixel directional environment light doing most of the work to illuminate and shadow your environment. Perhaps your level is a circular atrium in a chromed space station. Having one hefty spot light filling up that large scene can be set to per pixel so all the metal materials (which otherwise look considerably dull and crude without the specular component) can shine properly. Should your level be something more complicated, sprawling, and/or indoors, you will have to be more diligent about how you use your resources, and which materials can look decent without specular and which showcase areas need the full treatment of a per-pixel light.
In conclusion, the SteamVR tools received just enough of an update to make the Alyx sample environments have visual parity with the full game. You will have to work within some new limitations and apply some technical and artistic creativity but the performance benefits, workflow improvements, and increase in indirect lighting detail are worth it. Good luck!