Source Shader Editor - Control flow
Control flow nodes can be used to iterate over a set of instructions (Loop node) or to branch code depending on dynamic and static combos (Combo node), which are set on compile. These nodes look slightly different than other nodes, they have an extensible field on their right side. All nodes that should be affected by the control flow node have to be moved inside that field.
Control flow design
Furthermore there are a few aspects to take into account when working with control flow nodes:
- If any node inside a control flow node cannot be solved, all nodes affected by that control flow node will show an error.
- Variables declared inside a control flow node are in local scope, they cannot be accessed from the outside, you will get compile errors about undeclared identifiers if you forgot to take this into account.
- You can't leave and enter the same control flow node along the same path.
- If a node has multiple control flow parents, these parents must stand in some kind of relation to one another.
- You can't put any semantic nodes inside a control flow node.
- A control flow node can only be used in a single hierachy. Having vertex and pixel shader nodes in the same control flow node will cause errors.
- The 2D preview inside the flow graph does not iterate over nodes inside a control flow node.
Loop node
The Loop node will create a for loop in the HLSL source file. You can select the initializing value of the loop counter ![]() variable, the loop condition and the value to test against in its properties, the variable will be incremented or decremented by 1 based on that info. Furthermore this node provides an output jack to read the loop counter variable; make sure that you don't connect this jack to anything outisde of the loop or the loop node will immediately create an error.
variable, the loop condition and the value to test against in its properties, the variable will be incremented or decremented by 1 based on that info. Furthermore this node provides an output jack to read the loop counter variable; make sure that you don't connect this jack to anything outisde of the loop or the loop node will immediately create an error.
Combo node
This node is used to encapsulate parts of code inside preprocessor macros that are affected by shader combos. Make sure that you're using a combo name that is going to have an effect, for example FLASHLIGHT. While this node does not literally put its children inside a local scope, you still have to accommodate your nodes for the case that the preprocessor will snip this code as expected.
Using Declare
The Declare node, which can be found at New node -> Utility -> Declare in the context menu, can be used to redeclare a variable in the respective scope. This is usually necessary while working with control flow nodes. This node will simply forward the input values to a newly declared variable and return the latter, but leave them otherwise untouched.
The code would just look as follows (assuming the input is a float3):
float3 variable_out = variable_in;
Any node that is connected to the output of this node will now use the newly declared variable for reading and writing instead.
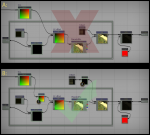
The image on the right visualizes two errors with control flow nodes (image A, top) that can be fixed with proper usage of the Declare node (image B, bottom). The goal is to create a very simple diagonal box blur effect on the framebuffer. The loop node starts at -5 and will iterate while it is smaller or equal to +5.
The first error happens at the node entitled UV offset. This node will write to a variable declared by the node named UVs every time it is called. Instead of adding the absolute UV offset to the original UVs, this would lead to accumulating the UV offset over time. The resulting UVs would be wrong. This can be fixed by declaring a new variable in the local scope of the loop (see note [1]) and write the original UVs and the offset into that one instead. That way the original UVs will not be compromised.
The second error will prevent a successful compilation. The divide node will try to read from a variable that has been declared in the local scope of the loop by the Texture sample node. This can be fixed by declaring a new variable in function scope, before the loop is being generated (see note [2]).
Using Assign
The Assign node is located at New node -> Utility -> Assign in the context menu. Its purpose is to assign the value of the second input to the variable of the first one and return the first input.
The code would read as follows:
variable_1 = variable_2;
Any nodes which are connected to the Assign output will access variable_1.
This example shows two Combo nodes which will be compiled or ignored based on the static combo FLASHLIGHT. When rendering the flashlight pass, the flashlight will be the sole lightsource and all other lighting should be ignored. The standard pass won't project the flashlight but instead process lights from the world (per pixel lighting in this case).
To make this work as expected, the first step is to create a variable that should later contain the diffuse lighting information outside of the two Combo nodes. The Assign node will then be used inside of each Combo node to store the respective lighting output to the variable that was declared earlier by hand. The last step is to combine both branches with a third Assign node. This should be done to ensure that the following code will be placed after both branches, otherwise the diffuselighting output may be used before anything actually calculated it.

