Choreography creation/Creating Events
The bulk of choreographing involves the creation of Events. Events are chunks of the Timeline that tell an actor to perform an action, be it an animation, an expression, an AI trigger, a command to move to another entity, or something else. This article will cover how to create and manipulate them in a general sense, with a series of sub-articles giving specific information about the major type groups.
The Timeline
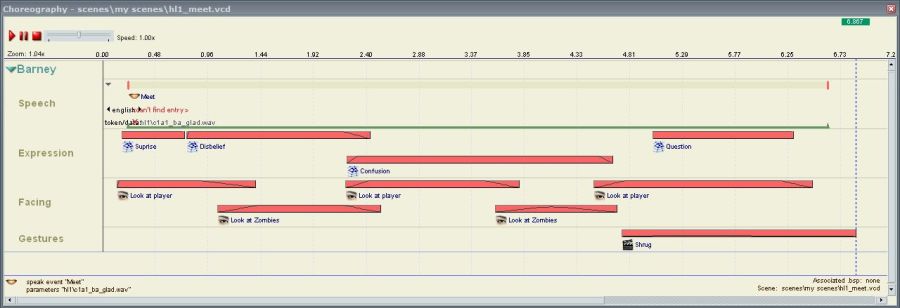
The Timeline is the main FacePoser dialogue. It displays the complete chronology of your scene and by default takes up the bottom third to half of the screen. A similar interface is used everywhere where time needs to be displayed (these lesser implementations will not be capitalised when referred to).
All timelines consists of the following key components:
- Scrubber
- This is the green bar at the very top of the timeline area. The numbers inside it are its location in seconds to three decimal points. You can drag the scrubber forwards or backwards at whatever speed you want (a vertical line will display its position along each channel), and if you click to the left or right the scene will play or rewind at the selected speed from the Scrubber to your click. The position of the Scrubber is synchronised across all timelines.
- Event pane
- The main area, in which all events, channels and actors are displayed. A scale can be seen across the very top which can be manipulated with the scroll wheel. See Event creation and manipulation or the relevant page of this tutorial series for more information on the area's functionality.
- Snap settings
- This part of the timeline is actually located in the main FacePoser window, in the very bottom right. It consists of two buttons: one to set the FPS, defaulting to sixty, and the other to toggle snap itself on or off. The FPS figure is the number of snap points per second; sixty is probably too high, so if you want to use snap be sure to decrease it.
The main Timeline also includes:
- VCR Controls
- These are positioned directly below the Scrubber and consist of Play, Pause and Stop buttons, a playback speed modifier for helping with precise adjustments, and an invisible area that can be right-clicked twice to set start and end markers that will be obeyed by the Play command (left-click to reset).
- Properties pane
- Along the very bottom of the Timeline is an are which displays context-dependent information about the event you are currently hovering over, including its name and key properties. On the far right, scene-wide information is permanently available.
Event creation and manipulation
" character at any point in FacePoser. Doing so will corrupt your scene, and you will have to open it with a text editor and alter the problematic segements manually.Once you have at least one Actor and Channel (see Setting up your scene), Events can be created through the Timeline context menu. Once you have entered a name and any other required details, a new Event Bar will appear, usually salmon-coloured. You can then perform the following manipulations:
- Move the event up or down the Timeline
- Simply move your pointer over it and drag wherever you see the four-directional cursor. An outline will tell you where the event will end up when you release, but note that it will not predict the vertical shuffling that will occur when there is more than one simultaneous event in a channel. Press the
Escapekey to cancel the movement. - Lengthen or shorten the event
- Almost all events can have their duration changed by dragging either end up or down the Timeline. Look for the horizontal movement cursor. Note that this will compress or decompress the event, not cut parts from it, make it loop, or add a period of inactivity. As with event movement an outline will tell you where the event will end up when you release, vertical shuffling is not predicted, and pressing the
Escapekey will cancel the action. - Change the intensity of the event
- This is accomplished with the Ramp tool. See Ramp manipulation, below.
- Add Event Tags
- See Planning your scene.
- Move the event between Channels or Actors
- Hold shift while dragging.
Ramp manipulation
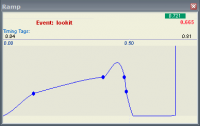
The ramp should already be active, just above the Timeline, but if it is not double-click on it in the tab tray along the very bottom of the FacePoser window or select Window > RampTool from the menu strip at the top.
This tool allows the overall intensity of the Event to be altered through a smoothed graph. To create a Ramp Point, Ctrl+Click somewhere to the left of the blue line. If you can't see the line, zoom out with the scroll wheel or resize the dialogue until you can. You can add any number of ramp points, all of which can be moved up or down (intensity) by dragging them with the left mouse button, left and right (timing) by dragging with the right mouse button, and in both axes at once by holding Ctrl and dragging with either mouse button. FacePoser will automatically generate a curve between your points that dictates the Event's intensity at that point in time. This curve has been calculated to provide a natural motion, so you should excercise care when overriding it at close quarters.
By default, the ramp graph will wind down to zero intensity at both edges. If you want it to start or end at a different level, right-click anywhere that is not a ramp point and choose the Edge Properties... option. This will let you specify an Edge Value for the Event's ramp to start or end at. You can also alter the calculation of the graph's curve, but this is very complicated and not recommended.
An event's ramp graph is displayed on the Timeline as a thin black line in the background of its event bar.
Event types
There are many Event types, some of which break one or more of the above rules, and most of which have their own unique settings and caveats. Each group will be covered in its own sub-article, listed here:

