Half-Life: Alyx Workshop Tools/Lua Scripting/Hello Gordon
Contents
Hello, Gordon: An Introduction to Integrating Scripts with Hammer for Half-Life: Alyx
This article aims to explain the process of integrating Lua scripts with Half-Life: Alyx and the new Workshop Tools. Note: this guide requires basic understanding of the Half-Life: Alyx Workshop Tools and the file structure of addons.
Before Getting Started
- First make sure you have the Half-Life: Alyx Workshop Tools installed!
- Then make sure you have your scripting folders set up!
Creating a New Script
In order to execute the code in-game, we need to place the code in the correct directory. By default, the engine will look in the scripts/vscripts folder and any folders inside for usable scripts.
- Go to your scripts/vscripts folder and make a new folder for your scripts - in this example the folder will be called HelloGordon.
- Inside this folder, create a new file called HelloGordon.lua. Lua files are plain text files - to create one, first add a *.txt file in your chosen directory by right clicking anywhere in the window and using the 'New' context menu to create a text document. From there, just change the extension of the *.txt file to *.lua. Note: if you don't see an option to change the extension of a text document, that's okay! Simply open a File Explorer window, click the View tab, and enable the file name extensions check-box. From there, you should be able to change the extension in the same process as renaming your file.
Use folders to keep your scripts organized.

Writing and Editing Your Code
- Open the script in your chosen text editor (Notepad is fine to begin with, but it is recommended to use editors such as Notepad++ or Visual Studio Code) and input the following:
-- The purpose of this code is to print a simple message to the command line.
function SayHello()
    print("Hello Gordon")
end- Save your file (Ctrl+S).
Connecting The Code to Hammer
To get the code that we wrote working with the Hammer Editor, we need to connect it to entities in the engine that will trigger the execution of the code. Open your project (or create a new one), and open the Hammer Editor.
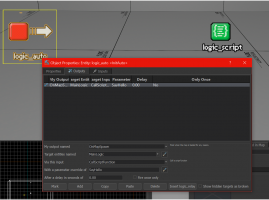
Creating a logic_script entity
The logic_script entity will hold a reference to your script so that we can call it later
- Using the entity tool (Shift + E) create an entity of any type somewhere on your map, double click it to open the settings
- Change the entity to a logic script by typing logic_script in the class field

Change the entity to logic_script.
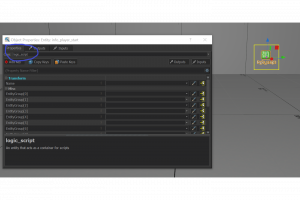
The entity model should change and the properties should look different


- Give the script a name in the name field (i.e. MainLogic). This will be used to target this entity when we want to call the script.
- Put the path to your script in the misc-> Entity Scripts field (i.e HelloGordon/HelloGordon.lua)
- There is no need to include scripts/vscripts in the path since that is already the base path of where source searches for the scripts.
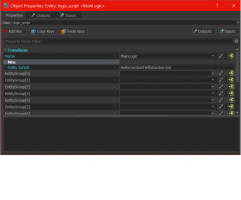
Add a name and Entity Script path

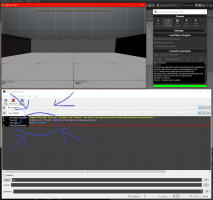
Creating a logic_auto entity and running your script!
In order to run a script, there has to be an entity that can call it. In this case, a logic_auto will work.
- Create a logic_auto entity the same way you created a logic_script (by renaming a new entity's class) and give it a name.
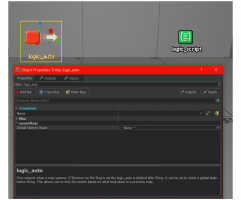
Create a logic_auto entity.

- In order to run the script attached to the logic_script, we need to make an output from this logic_auto and program it to call the code when the level loads.
- Click the 'Outputs' tab in the 'Properties' view on the logic_auto and click 'Add' to add a new output.
- Set the output name as: OnMapSpawn - this will make it so that this output runs as soon as the map loads.
- Set the target as the NAME of the logic_script that you made. It must be exactly the same name.
- "via this input" determines what will happen when this output is triggered. In our case, we want the logic_script to run the SayHello function inside out Lua file. (CallScriptFunction)
- If done correctly when you check the input of your logic_script, you should see that your logic_auto is set as an input.
Create an output that will trigger when the map loads.

logic_script input if done correctly


Building, Running, and Seeing Your Code In Action!
First, press F9 to open your build menu. Choose a compile mode (for this guide, we're using 'Fast Compile') and then run the Build. Changes made to code are reloaded every time you reload your map (Run (Skip Build)) which allows you to quickly debug and edit your code as the game is running without the need for a re-compile! When the build is complete, open your Half-Life: Alyx window and press the grave key (`) to see the console. If all went well you should see the message in your console!
The message showing in the console!

Up Next
- Coming Soon!