Team Fortress 2 Design Theory
What makes a good Team Fortress 2 map? What does it need? How should it work? Designing and producing a map is difficult, but designing a balanced, exciting TF2 map is even more challenging. This tutorial will cover the basics of TF2 map design and is designed to be a brief overview of the different kinds of design aspects and features a mapper should consider before attempting to create a Team Fortress 2 map.
Although no rule about creation is set in stone, keep in mind that this guide is based on the experiences of established mappers. These guidelines are designed to help a mapper create a enjoyable mapping experience for all players. Please keep in mind that creativity created some of these rules
Related articles:
How TF2 works
TF2 is a highly balanced multiplayer game. Part of TF2's extraordinary balance belongs to it's well-designed maps, which accommodate all of the classes equally. Understanding TF2 is easy, but designing a high quality map takes serious thought. Here's a basic list of things you need to do for your map to work well:
- The map needs to be optimized, fast, and fun to play. The map should be able to run on a 24/7 server without it getting boring after the third time played.
- The map needs to accommodate all classes within TF2. Each class must have a purposeful use in the map.
- The map should be built around gameplay. The true beauty of a map lies not in minute details but in well-balanced play.
The first step in creating a TF2 map is choosing the gameplay type to implement. There are 3 map types within TF2: Capture The Flag, Capture Points, and Territorial Control. Each type has it's own set of advantages and disadvantages. Since the gameplay type is ultimately going to determine how you design your map, we'll study each option in detail.
CTF - Capture The Flag
- Maps Featuring CTF Gameplay: ctf_2fort
Capture the Flag maps tend to be the easiest gameplay type to design around. They consist of a "flag" (represented by an intelligence briefcase) and a capture point to deposit the intelligence at for each team. The player must pick up the enemy's intelligence and return it to their own capture point. Commonly, the intelligence and capture location are the same place, but you are not limited by this and may decide to have the player capture in an alternative location. Splitting up the intelligence and capture locations can create interesting map designs where either team has two areas to attack and defend in either base. Because this creates many "jobs" for the player, it's generally a good idea to leave those layouts to larger maps.
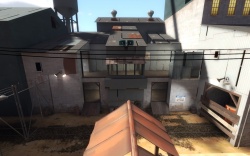
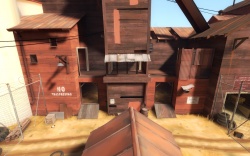
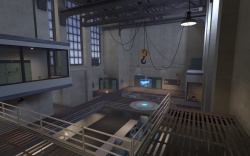
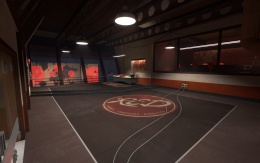
CTF maps are generally symmetrical in layout. ctf_2fort is a prime example of this. It consists of two bases directly opposite one another, both with the same internal layout. The only difference is the visual design of each base. The core gameplay when you're inside of either base is exactly the same. Symmetrical maps are generally chosen to keep the sides even in a way that's easy for the map developer. For each team's side, it should take the exact same time to reach the intelligence from the entrance. If a non-symmetrical is chosen, you must be sure to test the gameplay of each side thoroughly to ensure an advantage isn't given to one team or the other. In the screens to the right, you can see that while they both sides look very different from one another, they are exact copies of each other when it comes to gameplay. The easiest way to make an CTF map is to copy one side, rotate it 180 degrees, and then re-texture it to your liking.
CTF maps are also generally the smallest kind of map. Having to make a long journey to and from the intelligence can make a map very boring very quickly. It's recommended that you keep size to a minimum. Include lots of obstacles and complexity in the map to keep them interesting at these smaller sizes.
Advantages
- Design is generally easier than the other two gameplay styles.
- Map design can be simplified using symmetry between the two sides.
Disadvantages
- Non-symmetric maps can be very difficult to balance. Maintaining evenness and avoiding giving one side an advantage can take a long time during the design process.
- With a symmetric design, once you make the copy of one side, any changes to the gameplay of the map have to be duplicated to the other side.
CP - Capture Point(s)
- Maps featuring CP gameplay: cp_well, cp_dustbowl, cp_granary, cp_gravelpit
CP gameplay type maps, are much more difficult than making CTF maps, and for that reason alone, not too many of them are well thought out. CP maps tend to have more than 2 cp's or Control Points, but the greatest thing about these maps is the fact that they offer much more room for design, and tend to be much larger than most maps. Taking cp_dustbowl for instance, the map contains over 6 Points, where the Blue side must Push Forward towards the Rocket at the end of the map, being on the Red side. On most CP maps, Red tends to be the defending side, while Blue attacks. However that doesn't have to happen in your map, so feel free to twist that around. Control points tend to be 2 per round and with that tend to have large areas around them. Mainly for the size of the Point, and for any defense and attack. Your Idea through designing this type of gameplay should be to design around the Point rather than towards it. Instead, create areas that might add the classes in attacking and defending the points. Choose area within geometry that are made for classes like the Engineer, where he can place down a good sentry if he notices it. But, leave that area to have its disadvantages too. However instead of going to in-depth with that, we'll keep this info for later.
Another great thing about CP's to have in mind is that they never have to be symmetrical, but instead are more placed in areas, that are much different from others. Because of this, they are so far two types of CP modes. Linear, and Round based.
Round based
- Referenced: cp_dustbowl
A good example of a Round based CP gameplay type would be cp_dustbowl. This mode works by having Blue take control of two points, then the round ends, and heads to another area. Most maps like these tend to have the other areas visible from certain spots, but instead, are limited if they are not part of the Round. Most of these areas are controlled by areaportals that prevent rendering of earlier Geometry. Red first owns two points, once blue acquires them both, the Round ends, and now takes both teams to another set of Points, that are now in a different place in the map. The area that was last played is the area that tends to be the limited visible one, but some very few geometry tends to be within an area thats visible from a couple points or so.
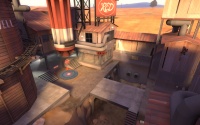
Carefully looking at the first Image shows how much of the Geometry shapes to effect the control point. These are all class specific things, like the Scout being able to jump over the gap, and the Soldier being able to rocket jump to certain areas by the CP building. Much of the geometry within all these images are the same, but each gets more, and more square as Blue progresses, and along with that, each area tends to get much more thinner then the previous areas, acting as Choke-Points. Choke Points are really in many maps, but tend to last longer, and really effect the outcome of how wins in a CP map. This is something else to take under consideration when making a CP map, that Choke-Points only really work, when there in the right spot, and those right spots tend to be between both CP's.
In the Second Image, the first Control Point is housed in. Not only is it harder to defend, but its more cramped, allowing for fire like Rockets, and grenades to do a lot of damage. In the second point, the geometry is much the same from point 1, however this time, its slightly less compact, and now has two openings towards CP. One being larger, and one being small. After that each point progresses the same, until the Final Point.
Something very noticeable abut the final point is that its very large, and very open. Due to that, the area has much more room to be defended, and not only that, but now larger waves of players on the Blue team can attack. Each point in cp_dustbowl gets wider, and wider till this point is reached. In Dustbowl, everything gets reversed, The Control points get wider, and the path to them get smaller, and more narrow.
The above was all stated to really show you, how many CP maps are created, and fall under placement. Thats not to say that CP maps require more thought, but instead because of the way they play, they only require more geometry, but as its your map, feel free to make the map any size you would like, and most importantly, any type of shape you want. Like stated previously, this is all just tips to making a normal Map.
Advantages
- Allows for more detail in each area, as each area can be different from the last, including that each area can have its own layout.
- More easy to control optimization, and more compact than linear gameplay.
Disadvantages
- CP Maps are bigger than most maps, and tend to be around the same size as a TC map, because of that, they are hard to layout, but not so restricting.
- Because of the size, be ready to wrap the map around itself to optimize well. Also, this is mentioned due to tiny sized CP maps tend to be to hard to defend.
Linear
- Referenced Maps: cp_well, cp_granary
Linear gameplay is much more different than Round based. The idea of this type pf map is that all the CP's are in a straight line, and instead are within the same area. cp_well is a great example for this type of gameplay, as well as cp_granary. Both maps have a linear type within them due to each point is in a direct straight line, and instead, Red and Blue each attack and defend, rather than Just Red defending, and Blue attacking. Red and Blue each hold two points, while the middle point is unoccupied from any team, its Red, and Blues job to get the middle point, and then push forward. Basically, whomever gets the middle is winning the game. However something very interesting about this type is that it doesn't have to be linear at all, and instead can curve around and such. Another thing is that the entire area is mostly the Gameplay area within a Linear map, and doesn't seal off areas, until a Round ends.
Instead, when a point is acquired, time is added, whereas if Blue Fails to take both points in the Round Gameplay type, Red wins. And in Linear gameplay, both teams loose. Mainly a Sudden Death will occur. For this example, lets take a look at granary.
In the Image on the right, both sides meet to the same exact point, being the middle, compared to cp_well, this map is on a lower level then Well, and instead height is the extra factor added in to the map. This is another class specific design that aids in who can own the middle. Notice also that this map is symmetrical much like a CTF map, while they don't have to be symmetrical, Valve instead made it a symmetrical map. Which comes to another balance of the sort. Another map thats symmetrical is cp_well, and is an exact copy of itself, mainly for gameplay reasons, however you can always have a unsymmetrical map, and layout the idea anyway you like.
With both of these gameplay types within CP, you have many options, as well as the non-included, cp_gravelpit. This map is a bit of the both, and instead focuses back on Red Defending, and Blue attacking, and is much like cp_eell, and cp_granary. Instead though, it is not Linear, nor symmetrical, and is the perfect example of a mixed CP map.
TC - Territorial Control
- Maps Featuring TC Gameplay: tc_hydro
TC is a new gameplay type within TF2, and is different from any other gameplay type. Because of the difference in design philosophy, there hasn't been very many custom TC maps developed. TC is similar to CP in the sense that it is a round-based version of CP. Each team must try to get the opposite team's capture point and win the round. Once the round has been won, a new area is opened up with a new set of capture points. If no team captures the opposing point by the end of the round, sudden death is activated to break the stalemate. Once a team pushes the opposite team to the last point, that team no longer has an option to attack and must defend. Sadly, the only good example of this type of gameplay is tc_hydro. Because the ownership of each capture point can vary throughout the game, TC maps tend to be mostly of neutral colors. Gray and White are usually predominate.
Something thats noticeable in any CP map is the height of a capture point. Raised areas tend to only be easily accessible for certain classes like the Scout, Demoman or Soldier. Lower areas are easily accessible by any class and can result in hard-to-defend sections. Use care when factoring in height with your map routes, as it can give an advantage to one team in a particular section.
Advantages
- Many users consider TC maps more fun due to the increased complexity over the relatively simple CP map design.
- There are barely any TC maps being made, so yours won't get drowned out in a sea of crappy maps :)
Disadvantages
- TC maps tend to be big in size. As a result, optimization can be tricky and and it can be difficult to manage a large map design.
- Areas are only distinctly colored at the opposite ends of each map. This limits texture selection and can make it difficult to design a visually distinctive map.
Getting Down a Layout
Once you really understand what Type of Gameplay you want, or if you even choose your own, you now need to Layout the map. Although this is an optional thing, it really can help, especially if you want to get a very balanced map down, and are working with a gameplay other than CTF. Layouts are simple, but its good if you draft your layout many times, to really get a perfect Layout, and soon after that, you can always add upon an original layout within Hammer itself, and make it even better.
You might ask why you should make a Layout, and why does it Matter? Well, Layouts are meant for the specific fact of shaping basic geometry in the map itself, and with that, try to get implementations, of heights and such. Color code your layout if that helps. Also, add in scales and such, work out grid size if you happen to have gridded paper. After this, the Mapping is really left to you, and this tut can only aid so much. Once you get a Layout you like, whether it be in Hammer, or on paper, start Mapping!
Basic Elements of a TF2 Map
A map is built from multiple, small elements. VDC is a community-driven wiki including excellent tutorials which introduce the creation of these elements. While editing your map, consider including these elements in the layout of your map in a fair way. One team should not have advantage over another.
Some tutorials cover the creation of the parts which are used to construct these elements. If the elements are the complex molecules, these parts are the atoms building it up. The covered topics include:
Other tutorials approach the explanations in a different way. The following tutorials are in-depth explanations of the creation of certain elements and goal systems:
Where To Go From Here
At this point in mapping, you might have a bit of your map created, and some things laying around within it. Something you should now focus on is "Geometry in Steps".
Design Before Detail
Design Before Detail is a phrase often used to explain how a proper map, in any game, should be created. The mapper should look at the overall design of a rooms, areas, and connecting hallways before adding detail. The problem with a lot of new mappers is that they have put so much detail into one part of the map, and then the rest is filler. A sign of a good, experienced mapper is the feel of great connectivity with controlled choke-points.
Maps should also have set piece fighting areas. The easiest way to think about this is to name an area in the map that players can immediately identify with: The bridge in the middle, the red courtyard, the blue basement.
Factors
In short Factors is things that tend to make a CP, or a Flag harder to get to, and because of this, this area has been split for both modes, as CP, and Flags, tend to be very different in terms of geometry shaped around them.
A list of Factors available to a Mapper that are known:
- Height
- Surrounding Geometry
- Class Specific
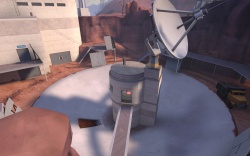
These really are the only two that exist, mainly Height is the Major factor used in most Maps, and because of that, has much more info regarding it. A good example of a Height factor would be the Dish Control Point in Hydro, and a good example of Surrounding Geometry would be the first Control Point in Dustbowl. While Class Specific is hard to sum up, a good example wood be the top of the Radar Dish Housing, as only Demomen, and Soldiers can Reach it.
Flags
- Flags in a way tend to be on flat ground, much like in ctf_2fort, and because of that, have less factors than any other Gameplay, However most players automatically know that Demomen, and Engineers, make for the Best Flag defense, and because of that take 2fort for example.
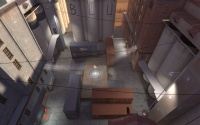
Taking a look at the Image to the right, any good player, by looking at this area will be able to tell where to place his sentry, and most likely where demomen can place their sticky Bombs. This is mainly a Surrounding Geometry Factor, and because of this, there really is no class specific area, as any class can defend the flag down within this room. However thats not too say that you, in your map, cannot add in any other factor. You might for instance have the flag up on a ledge, or instead inside of a pit, that requires the player to head down, then back up. All this can really add to how each team can win, and grab one another flag, but most likely, the map might be symmetrical.
Control Points
- Adding Factors to a Control point is more different than a CTF, map, because they can each differ from point to point. Taking a look at a map like cp_dustbowl, you can see how each point progress upon itself, and adds each factor carefully. The first point starts with a Surrounding Geometry Factor, where there is only two entrances to the CP itself. One in the direct line from the Blue team, and the other on the opposite side, from the Red teams side. Also beside that, this CP has two factors, where Height is also added. A small balcony exists to the right of the CP, acting as another doorway, and can be reached by a Scout, etc. However taking a closer look at the Surrounding Geometry you can notice that the sentry placement is hard for an engineer, and due to that, players tend to place their Sentry's on the stairway, which is directly looking upon the entire point, and the balcony. Without getting into too much explanation for this area, you can tell how each area aids itself around the point. This is why, stated above, its better to shape geometry around the goal. With all this stated, its time o move onto making factors work around, and outside of Goals.
Class Specific
- As in any map its always cool to have an area great for Sentry's, or a great place to Rocket Jump too. Even perhaps a good place to build a couple of teleporters safely, even though thats more of a random factor for the Player. However these both need to have their upsides, and downsides, and because of this, is what makes them good. To help make this more even, each Class aid, is under a section.
Height
Height is always an option for Classes much like the Scout, Demoman, and Soldier. Because of this though, Only really a Demoman and a Soldier can reach very high heights. To understand a bit of the Height ratio, and other values, you can take a look at This. Something that always makes a difference in a game, is when you have that one little Soldier up on a ledge, weakening people with his rockets, and also at the same time, have a good view of the area. This can be around the Goal area, or can just instead be an area that the Soldier can reach first, before any other class. However there needs to be balance with that. It's no fair if a Soldier or Demoman can see the entire area around a Goal, and get constant ammo and health at the same time.
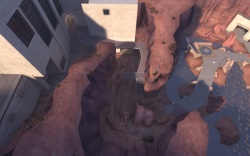
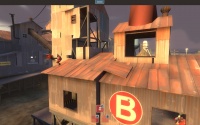
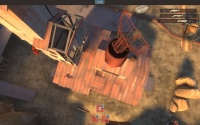
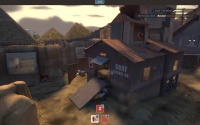
Looking at the Images again on the right, you can see how each area, on the roof has a total overview of the area surrounding Point B in cp_gravelpit. However the balance within this area is the fact that there are no Ammo or Health Pickups. So the Player needs to travel back down to get either, and yet at the same time, they loose health for Pipe Jumping, or Rocket Jumping up there.
Something to note in height is that it gives players a lot of choice between holding the point, and also gives many attackers options of choosing how to attack, most importantly, if theres many doors leading to the Goal, like Height areas, (For instance the Roof in Point B has a window leading to the point) then that adds as a double whammy in a way. Last Sometimes things like spawnrooms, much like the ones in cp_gravelpit, are also High above ground. Meaning that certain classes can only reach the entrances. Also taking a last look at a map like cp_gravelpit, you can tell that each point has height as a factor to it. Mainly all of cp_gravelpit, revolves around Height Factors.
Surrounding Geometry
Surrounding Geometry could be called Height, but instead its more of a flat Factor, giving an area more space, and less Height options. Also, because of this, these areas tend to be harder to get into, or sometimes the other way around, and instead just harder to defend.
One good example of a different Surrounding Geometry then showed before is cp_dustbowl's last and final CP. The area itself is very wide, and because of that gives the Defenders a way to fence in the Attackers, buy placing their Sentry's right, and spamming fire towards the transition area, leading to the final cp. There is hardly an Height areas within this area, and because of that, the area is much more balanced, and requires the Blue side, which is Attacking, to move forward in a general direction. The only thing added is an UnderSide-Height Factor. This is the Tunnel, or often referred to as the sewers, that lead the Blue side to the final CP, from underneath, rather than above. Still Red has an advantage, as any player, and/or Sentry can see the entire Gap, connecting to the Tunnel.
Constructing the Gameplay Area
The Gameplay area, or as referred to the area that players will be allowed to go into is exactly that. All though there might be a lot of different heights within your maps, things like Player clips, and such keep the player from going where there not supposed to. Because this is TF2, Blast Jumping allows a lot of players to climb almost anything, so its best to prevent that, and keep the action controlled, without making it feel that way.
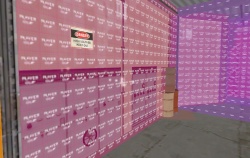
The idea, is to create a box within a box, use the Texture Player Clip to prevent people from going into places they should not be allowed to go in, also most importantly, use Player clips to really help with the maps structure. No one Likes Getting shot at and running backwards to find they got stuck on a pole and died due to that reason. Most of the time thats being clipped yourself, and players tend to really hate that. Taking a Look at TF2 maps, quite a lot is really clipped off to prevent the player getting hitched on any props, or detail that might be in the way.
To get this also in sections, each area has been divided to talk about each more individually.
One of the most Important thing about clipping, is that it aids to make the gameplay much, much more smoother, as mentioned above, but not only that, it also can control the players movements in a way, although that tends to be far more complex, and unneeded. However to get more into it, you might be wondering why you might need player clips. Does it effect anything, how does it aid towards the gameplay? The effect is, it keeps players from going into bad areas, or it creates the boundaries, for the map itself. Think for instance Dustbowl. The map has few areas that it seems like you can jump over a fence, or get atop a roof, but these areas are clipped off, (a tech term for not being able to reach or go to.) to disallow players to reach them, and also keeping the gameplay more streamlined, and the action more controlled. This is what it means to control the action, and to make sure that its all contained. Of course thats not too say that clipping, or not clipping things is bad, it all just depends on how your map reacts to action in certain areas, and if having a Demoman on a roof can change that flow. One thing to consider is the word streamlined, with that, there should be a focus within the area. A focus in example, would be a goal, see at this moment, the player looks at hardly nothing else but the goal at times, and therefore travels straight too it. But the factors surrounding it, also do their job to effect the outcome. All this combines together to create a streamlined area, and to keep the focus on an area, rather than having a player worry about ten different roofs, that any number of players can be on.
Adding in Detail
While any mapper will tell you detail is great to have, it's not very useful in Multiplayer maps, and for a sole reason. That's not too say that it is bad to detail a map with props, etc, but instead things like this, can create obstacles, and believe it or not, can also detract from concentration to the players rather than the environment. However this is something more of a tropic thats deeper than this tutorial, and has been discussed quite a lot of the Internet. However the basic premise is: Use objects, and visual hints to aid the player to their goal, rather then confuse them. In TF2, players tend to see many arrows, or signs pointing towards the proper direction. While most MP games don't have these things, the art style of TF2 allows for it, and although funny, its okay to point the player to the Goal, even if its right around the corner. Just of course don't have signs in every single turn! For now though, you should pretty much get into finishing up a map, or more or less working on it, also on a side note, clipping can very well be combined with detail, to control the gameplay, which is the best way to explain control overall. Next is finishing up a map and sending it out to servers.
