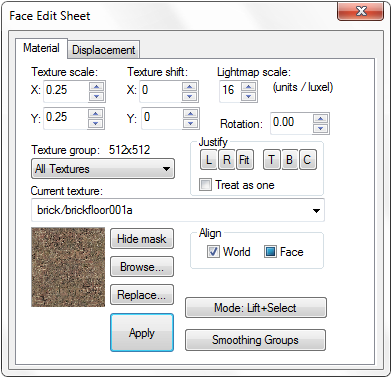
Ru/Hammer Face Edit Dialog
Выбор инструмента Toggle Texture Application выводит диалоговое окно Face Edit Sheet. Вкладка Materials содержит инструменты, которые используются для редактирования текстур на поверхности уровня. Вкладка Displacement содержит инструменты для создания и редактирования геометрии смещения. Смотрите Face Edit, Displacements.
Диалоговое окно Face Edit Sheet позволяет манипулировать текстурами выбранных граней брашей. Чтобы выделить грань браша, кликните по ней левой кнопкой мыши в 3D-окне. Чтобы выделить несколько граней, зажмите CTRL и выделяйте их. Вы можете выделить несколько брашей и до выбора инструмента Toggle Texture Application.
Применение текстур с помощью правой кнопки мыши
Особенность окна Face Edit Sheet заключается в том, что для применения текущей текстуры на браш нужно использовать правую кнопку мыши.
Пока действует режим Toggle Texture Application, вы можете выделить несколько граней с помощью CTRL+ЛКМ или выделить весь браш, зажав Shift и кликнув на одной из его граней. Чтобы выделить одновременно несколько брашей, нажмите CTRL+⇧ Shift+![]() на другом браше.
на другом браше.
В окне Face Edit Sheet доступны следующие параметры:
Texture Scale (X/Y)
You can modify the scale of a texture to shrink or enlarge it. Numbers less than 1 shrink, and numbers greater than 1 enlarge. You can use negative values to mirror the texture in one or both axes. The mouse wheel can be used to cycle the value quickly.
Texture Shift (X/Y)
This simply allows you to shift the texture around in the X and/or Y planes. The mouse wheel can be used to alter the value quickly.
Lightmap Scale
Sets the scale of the lightmaps, measured in world units per luxel. Lower numbers are smaller luxel sizes, therefore higher resolution. The default is 16. A value of 8 would give higher quality but more expensive lighting on the surface, and a value of 32 would give lower quality for less expensive lighting.
Rotation
Rotation allows you to rotate the texture on a brush face. The mouse wheel can be used to alter the value quickly.
Justify
There are six buttons you can press here: L (left), R (right), Fit (fit to face), T (top), B (bottom), and C (center on face). These allow you to quickly and easily align a texture on a brush.
Treat as one
If you have multiple faces selected, you can check this option to treat all the faces as one single face. This is especially useful if you are fitting a texture across multiple faces.
Align: World and Face
These checkboxes allow you to set the texture alignment style for the selected faces. World alignment causes textures to be aligned according to world coordinates. Face alignment uses the coordinates of the face as a basis for alignment.
Texture Group
You can select which group of textures you want to use - either all of them, or individual texture WADs or Material folders.
Current Texture
The name of the current texture is displayed here, along with a thumbnail picture of the texture.
Hide Mask
If this button is toggled on, the selected brush face(s) will not appear as selected (with a reddish hue). This may make it easier to perform some texture manipulations.
Browse
Opens the Texture Browser window
Replace
This will bring up the Replace Textures dialog which allows you to search, mark or replace all textures of a certain type.
Apply
Applies the current settings to the selected faces
Mode
This lets you select what will happen when you click on a brush face with the left mouse button. The available options are Lift+Select, Lift, Select, Apply (texture only), Apply (texture + values), and Align to View.
- Lift+Select - Clicking on a brush face in the 3D view will select that face and make it's texture the current texture.
- Lift - Clicking on a brush face will make it's texture the current texture without selecting the face.
- Select - Clicking on a brush face will select that face without changing the current texture.
- Apply (texture only) - Clicking on a brush face will apply the current texture to that face without changing any of it's other properties.
- Apply (texture + values) - Clicking on a brush face will apply the current texture and texture properties.
- Align to View - This is like projecting a texture from the camera face, as if you were a slide projector and the texture is a slide. It's useful for painting a texture onto a cliff or other irregular things.
Smoothing Groups
Opens up the Smoothing Groups dialog to let you set the smoothing groups for the selected faces.
Texturing Individual Faces
To apply textures to individual faces of a brush:
- Click the Texture Application Tool to bring up the Face Edit dialog.
- In the 3D view, left-click on a face to select it. CTRL-click to add or remove faces from the current selection.
- Choose a texture from the Current Texture pop-up list, or click Browse to open the texture browser.
- Click Apply. The texture will be applied to the objects.
- Use the Scale, Shift, or Rotate buttons to modify how the texture is positioned on the objects.
- When you are finished, click on the Texture Application Tool to close the Face Edit dialog.
