Custom Testchamber Signs
For help, see the VDC Editing Help and Wikipedia cleanup process. Also, remember to check for any notes left by the tagger at this article's talk page.
Testchamber signs are stored as a texture with an alpha mask.
For an easier method, simply download this file.[template] Either follow the instructions within, or you can use these.
Note: You will need photoshop or a similar image editing program to do this tutorial.
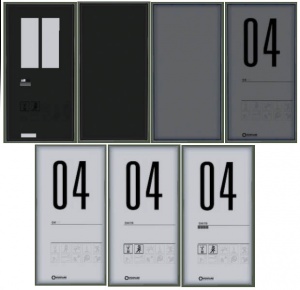
Each sign model has 7 textures
For the purposes of this tutorial only one will be created, after you've done one the others should be pretty simple to figure out.
1. Setting up the large numbers
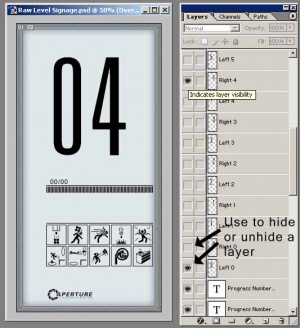
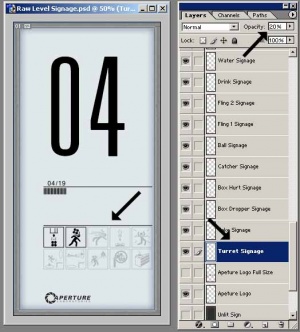
Start by setting up the large numbers you want displayed. In the layers window, hide all the large number layers except Left 0 and Right 4.
2. Setting up the small numbers
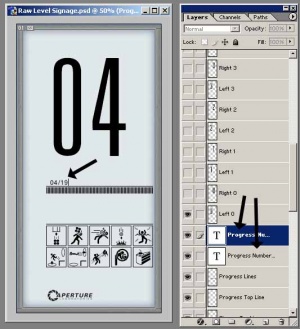
Now set the small numbers to 04 and 19. These numbers are divided in to two layers because on some stages of the lighting up animation for the sign, the first numbers are fully lit, while the / and second set of numbers are grayed. Select the Progress Numbers 1 layer and the text tool to change the first set, the second set is on the Progress Numbers 2 layer.
3. Setting up the progress bars
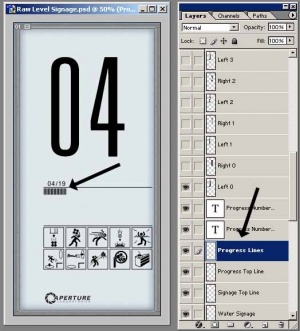
By default the row of progress bars is full, so some will need to be erased to get the right amount for the current sign being built. There are 76 bars on the full row and the example is on the 4th or 19 levels so: (76/19) * 4 = 16. So select the Progress Lines layer and use the erase tool to remove all but the first 16 lines.
4. Setting up the obstacle signs
Each obstacle sign is on its own layer so that they can have their opacity changed independently of one another. Change the opacity of signs that should be grayed out to 20%
5. Copying the sign
Now that the sign is done being adjusted, on the menu bar at the top of the photoshop window go to Layer -> Merge Visble. Next, Select -> All, and Copy. Create a new image 512x1024 in size, Paste in to the image, go to Layer -> Flatten Image. You should now have a new image containing the texture for the sign.
6. Adding the alpha channel
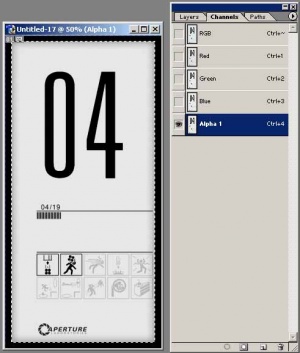
Next an alpha channel needs to be added to the new image so that the sign can self illuminate. Switch back to our raw level signage image. Hold down Ctrl and left click on the Sign Mask layer. This will select only the area of the sign that we want to be illuminated. Copy this selection. Switch back to the new image. In the Channels window click on the new channel button at the bottom of the window. Paint the new channel completely black if it isn't already. Next Paste the the selection from the raw level sign in to the new alpha channel.
Next go to Image -> Adjustments... -> Brightness/Constast... and reduce the brightness of the alpha channel to -45. You may need to experiment with this brightness value depending on how well lit your map is.
7. Saving the sign
Save this image as a TGA file. This image is the last (of 7) in the animation so save it as yourfilename007.tga and place it in your sourcesdk_content\portal\materialsrc folder. For the other frames in the animation you should save them as 001, 002, 003 etc.
8. Creating the rest of the images for the sign
Next go switch back to the raw level signage image and go to Edit -> Step Backwards. Keep stepping backwards until the the visible layers unmerge (you should need to step back two or three time.) Now repeat steps 1-7 for the rest of the sign animation stages (as seen in the image at the start of this tutorial.)
9. Creating the vtf file
Create a text file in your sourcesdk_content\portal\materialsrc folder with the same name as your images (yourfilename.txt). Paste this in to the file:
"startframe" "1" "endframe" "7"
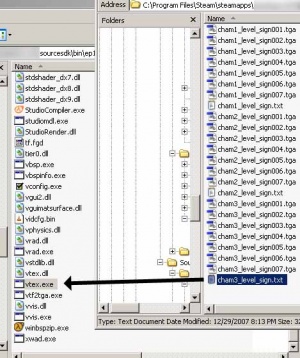
Now go to your sourcesdk\bin\orangebox\bin folder and drag the text file you just created onto vtex.exe.
VTex will build a vtf file from the TGA images you created and display the output directory where it placed the vtf file.
10. Using your texture
Place the vtf file that VTex created in to your portal\portal\materials folder and create a text file in the materials folder as well. Rename the text file to yourfilename.vmt and paste this in to the file:
"LightmappedGeneric"
{
  "$baseTexture" "yourfilename"
  "$surfaceprop" "glass"
  "$selfillum" 1
  "%keywords" "portal"
  "%noportal" 1
  "Proxies"
  {
     "ToggleTexture"
     {
        "toggleTextureVar" "$baseTexture"
                    "toggleTextureFrameNumVar" "$frame"
                    "toggleTextureShouldWrap" "0"
     }
  }
}
You should now be able to use your signage file in hammer. Apply it to a brush and use an env_texturetoggle and logic_relay to do the animation. The use of env_texturetoggle will let you switch between the different images in your texture you just created. Information on using the env_texturetoggle is beyond the scope of this tutorial and I suggest you google it if you're not sure how to use it. Information on the animation timing and sound can be found in the sample portal level provided with the Source SDK. Happy Mapping!
