Choreography creation/Creating Events
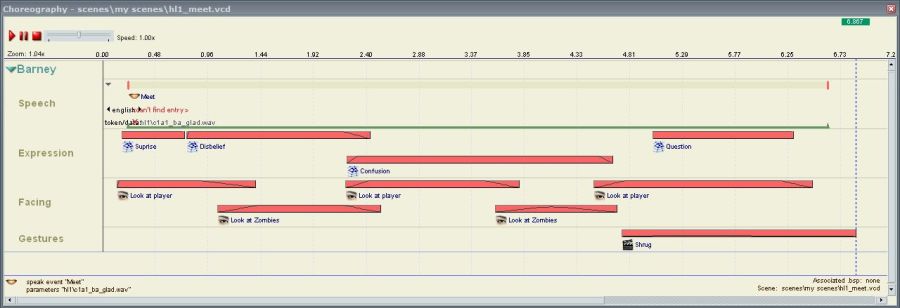
The bulk of choreographing involves the creation of Events. Events are chunks of the Timeline that tell an actor to perform an action, be it an animation, an expression, an AI trigger, a command to move to another entity, or something else. This article will cover how to create and manipulate them in a general sense, with a series of sub-articles giving specific information about the major type groups.
Event creation and manipulation
All Events can be created through the Timeline context menu. Once you have entered a name and any other required details, a new Event Bar will appear, usually salmon-coloured. You can then perform the following manipulations:
- Move the Event up or down the Timeline. Simply move your pointer over it and drag wherever you see the four-directional cursor. An outline will tell you where the Event will end up when you release, but note that it will not predict the vertical shuffling that will occur when there is more than one simultaneous Event in a Channel. Press the
Escapekey to cancel the movement. - Lengthen or shorten the Event. Almost all Events can have their duration changed by dragging either end up or down the Timeline. Look for the horizontal movement cursor. Note that this will compress or decompress the Event, not cut parts from it, make it loop, or add a period of inactivity. As with Event movement an outline will tell you where the Event will end up when you release, vertical shuffling is not predicted, and pressing the
Escapekey will cancel the action. - Change the intensity of the Event. This is accomplished with the Ramp tool. It should already be active, just above the Timeline, but if it is not double-click on it in the tab tray along the very bottom of the FacePoser window. This tool allows the overall intensity of the Event to be altered through a smoothed graph. To create a Ramp Point, Ctrl+Click somewhere to the left of the blue line (if you can’t see the line, zoom out with the scroll wheel). You can add any number of Ramp Points, all of which can be moved up or down by dragging them with the left mouse button, left and right by dragging with the right mouse button, and in both axes at once by holding Ctrl and dragging with either mouse button. FacePoser will automatically generate a line between the points that dictates the Event’s intensity at that point. An Event’s Ramp is displayed in its Event Bar on the Timeline.
- By default, the ramp will wind down to zero intensity at both edges. If you want it to start or end at a different level, right-click in an empty area of the Ramp timeline or in the lighter Scrubber area above it and choose the
Edge Properties...option. This will let you specify an Edge Value for the Event’s Ramp to start or end at.
- By default, the ramp will wind down to zero intensity at both edges. If you want it to start or end at a different level, right-click in an empty area of the Ramp timeline or in the lighter Scrubber area above it and choose the
- Add Event Tags. See Planning your scene.
Event types
There are many Event types, some of which break one or more of the above rules, and most of which have their own unique settings and caveats. Each group will be covered in its own sub-article, listed here:

