Choreography creation/Setting up your scene
Jumping straight in might help you learn isolated skills, but it is not productive in the longer term. To make your life easier, you are going to want to plan your moves before you commit the time and effort.
Organise your dialogue
The chances are your raw dialogue recordings (.WAVs) will need some alteration and management before they can be used in FacePoser. You will need an audio editing tool like Goldwave to perform most of these operations.
- Every .WAV should be a PCM signed 16-bit, 44100Hz (44KHz), mono .WAV file. Other formats will not work properly, though you can use any bitrate. If you have problems getting the encoding right, compare the
Properties > Summaryof one of Valve's .WAVS with your own through Windows Explorer. - No .WAV should contain more than one sentence. This helps FacePoser create lip synch data, reduces in-game overhead slightly, and avoids close captions that fill too much of the screen. If you have an incredibly long sentence in your scene, consider splitting it up.
- Every .WAV should have a Soundscript entry. Soundscript entries are audio defenitions that provide a useful interface between Source and the raw file. You can read about the system's features in its article. A sample soundscript entry is provided below.
- If you are making a standalone scene you will likely find using the soundscript system too fiddly. It is perfectly acceptable to bypass the system and load .WAVs directly in these situations, but for larger projects such hacks are not recommended.
- .WAVs for a scene ought to be stored in a single folder. Purely an organisational tip. Prevents confusion and overwriting, and makes moving the files as one item easier.
Sample soundscript entry
<Scene>.<Actor>_<file summary>
{
	"channel"	"CHAN_VOICE"
	"volume"	"1"
	"soundlevel"  	"SNDLVL_TALKING"
	"wave"		"*<relative path>"
}
Asterisk intentional.
Create a scene framework

Create the VCD file that will store your scene with FacePoser's Choreography > New... menu option. Give it a memorable name, and place it in a suitable subfolder if necessary.
You will notice the bottom third of the FacePoser window light up: this is the Timeline, on which all Events in your scene will be positioned and undergo basic manipulation.
- Right click the Timeline somewhere and find the
Newsubmenu. ClickActor...to add your first Actor. It is important to note that the actor name you are prompted to enter is not simply cosmetic: it defines the targetname of the actor who should performed the scene in-game. You can use an actual entity name if you know it, but if you don't!target1through to!target8are semi-dynamic names that are defined per-map. You can also use!pickerto have whatever actor the player is looking at play the scene, if you can trigger the scene at an appropriate time.!caller,!activatorand the other generic targetnames do not currently function as Actor names in Valve's games – but a mod could easily add that functionality.
- What is cosmetic is the next addition you must make: a Channel. Make one by now by opening the context menu over an Actor and clicking
New > Channel. Name it ‘Speech', or something to that effect. Channels are purely for separating your scene into manageable chunks, and unless you count the ability to disable an entire channel by double-clicking on its name do not affect a scene's playback. Despite that fact, they are all but essential to keep your scene organised. - Now right-click in your new channel and select the second option from the expanded context menu,
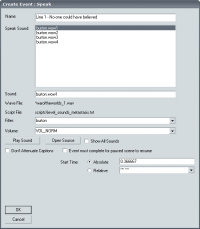
WAV file.... Add a descriptive name, perhaps the key words from the line of speech you are adding, then follow one of these options:- If added your .WAVs to the mod soundscript you will find them in the dialogue's list control. Find the precise entry you want either by manually scrolling and/or typing the first letter, or by using the third text box,
Filter, to run a search. - If you did not add a soundscript entry you must manually type the filename of the .WAV you want, relative to
mod/sound/: so for a sound files sitting directly in the/soundfolder you would enter only the filename.
- Note that you won't be able to use the Play Sound preview button if you are entering a raw filename, and Open Source will only work if you have en entry from a custom soundscript selected.
- If added your .WAVs to the mod soundscript you will find them in the dialogue's list control. Find the precise entry you want either by manually scrolling and/or typing the first letter, or by using the third text box,
When you click OK the Speech Event will be created, and will automatically take on the correct length in the timeline. There will be several pieces of information underneath the main Event bar, but they probably won't be of much interest to you, so hide them by clicking on the grey arrow to the extreme left of the channel.
Adding more .WAVs or actors is simply a case of repeating these steps. You can drag an Event bar left or right to tweak timing, and the play button in the top left of the Timeline will help you judge how much more adjustment is needed. If you need to play a specific part of the scene, right-click in the Scrubber area, above the Actors and Channels, to create start and end markers that are wiped with a left-click.
Analyse your dialogue
Before you go any further, listen carefully to the dialogue you will be choreographing. Try to extract what the character is thinking and feeling from the voice actor's delivery, and consider how your digital actor might reinforce that pattern of stresses and tones with his or her movements and expressions.
This area of choreographing is to all intents and purposes acting; the only difference is that it is not you who will be giving the final delivery. You will probably find it helpful to stand in front of a mirror and experiment with the various expression and gesture possibilities. When doing so, imagine that it is you delivering the lines, in the situation that your actor will be in. If you can make yourself believe momentarily that you have the same context, things will come naturally – if you can't then you will have a much harder time theorising a strong performance, but keep trying regardless.
Remember during all this that you are trying to give movement to the voice actor's dialogue. Look for the patterns of his or her speech, and try to not only follow but exceed them – use your entire body and a wide range of expressions if you can. Furthermore, you should take into account tone as well as meaning. If the voice actor loudly stresses a word widening your actor's eyes and leaning back can be a suitable response, but if the stress is quiet you would probably better reinforce it with the eyes narrowing, a slight hunching forward and a hand motion.
To learn these tricks is to learn to act, and vice versa; like mapping and architecture, if you are serious about choreography drama courses of some sort will directly improve your work.
Choose your Actors
TODO
Place Event Tags
Once you have your scene framework created and have a rough idea of the performance you want to produce, there is only one more piece of preparation before work can begin in earnest. Go through your scene adding Event Tags at every point of interest: when the voice actor reaches a stressed word, when you want a digital actor to change animation in a way that other actors should react to, and wherever else you will need to precisely synchronise Events in the Timeline.
The tags are global markers that appear whenever you are working on any timeline, including the main Timeline itself. Like Channels, they are cosmetic but invaluable. Note that you can currently only place Event Tags on Events; they cannot be placed in empty sections. They are created with the second item on an Event's context menu, the misnamed Timing Tag... (Timing Tags are used in Gestures). Right-click at the point where you want the Event Tag to be created, click the option and choose a short and memorable name. If you missed the precise point you wanted, you can drag the tag up and down the Event after it has been created; look for the relevant cursor image.
Tags can be deleted through the Delete context submenu. Here, they are called 'Relative Tags'.

