Animation in Blender
![]() This article covers rigging and animating a model in Blender in a manner that can be exported to SMD. It assumes you are familiar with using Blender to create meshes and with the principles of keyframed skeletal animation and weightmapping.
This article covers rigging and animating a model in Blender in a manner that can be exported to SMD. It assumes you are familiar with using Blender to create meshes and with the principles of keyframed skeletal animation and weightmapping.
Creating an armature
"Armature" is Blender's term for a skeleton.
- Toggle into Object Mode with Tab ⇆. Add an armature with Space > Add > Armature.
- To prevent the mesh hiding your bones, go to the Edit panel with F9 and find the Armature box. Click the X-Ray button, which is in the first row.
- Also in the Armature box, un-click the Envelopes button under Deform Options. Envelope deformations are not exported, so you don't want to confuse yourself by ever seeing them.
- To manipulate just one end of the bone, enter Edit Mode with Tab ⇆ and select one of its connector spheres. You can resize bones in this manner at any time from Edit Mode without it affecting the mesh.
- To add bones to the chain, use Ctrl+
 in Edit Mode. The new bone will be connected to the end of the one currently selected.
  Tip:To create bones symmetrically, click Edit panel > Armature > X-Axis Mirror, then use e.
 - When in Edit Mode, the selected bone can be renamed from Edit panel > Armature bones. To have Blender label bones in the 3D view for your convenience, click Edit panel > Armature > Names.
Skinning
In Blender, the link between mesh and bones is called a "skin". There are several ways of creating a skin, but Dvondrake's SMD exporter only supports those defined by vertex groups.
- Toggle into Object Mode with Tab ⇆. Select your mesh object, then your armature. The order is important; the text in the bottom-left of the 3D window should say "Armature".
 Tip:To join several mesh objects into one, select them and press Ctrl+j.
 - Press Ctrl+p to make the armature the parent of the mesh. You must choose Armature from the menu that appears.
- The next menu defines whether and in what manner Blender automates the skinning process. The options are:
- Don't create groups
- Blender leaves all vertex grouping to the user. Don't use this now.
- Create groups
- Blender creates a vertex group for each bone in the armature, but does not populate them.
- Create from Envelopes
- Blender populates vertex groups by examining the envelopes of each bone. Safe for export.
- Create from Bone Heat
- Blender populates vertex groups by calculating how close to each bone each vertex is. Results in jelly-like motion at joints.
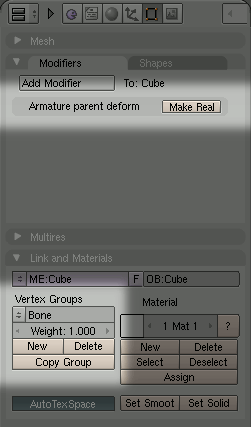
- Blender will now add an "Armature parent deform" Modifier to the mesh, and (unless you chose "Don't create groups") add vertex groups for each bone in the armature. The armature itself will not be altered.
If you had Blender populate the vertex groups for you, you will now be able to manipulate the armature and see the mesh deform accordingly.
Weightmapping
Blender's automatic skinning, while helpful, is rarely satisfactory for anything but the simplest objects. To properly rig a complex model you will need to tweak its weightmap.
In Blender, a skin's weightmap is defined by vertex groups on the mesh with names matching attached bones. If a vertex is split 50% between two groups, then the associated bones each have 50% control over it during animation.
To edit a vertex group:
- Select your mesh in Object Mode, then toggle into Edit Mode with Tab ⇆. It will become purple all over, indicating that every vertex is selected.
 Tip:If you are not in vertex selection mode, press Ctrl+Tab, 1.
 - Find the Vertex Groups controls in Edit panel (F9) > Link and Materials. Check the tooltips for a description of each field. You can change the active group from the double-arrow button in the top left of the group.
 Note:Irksomely, operations from this set of buttons are additive. To remove vertices from the group, you must select them and click Remove.
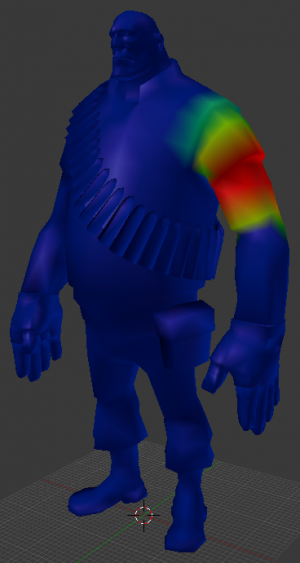
 - To paint weight onto vertices, press Ctrl+Tab while in Object Mode (or just select Weight Paint from the drop-down mode list).
- Cooler colours mean less weight. Blue = 0%, red = 100%.
- Shift+LMB on the mesh to select a vertex group from that region to paint with.
- Note the options in Edit panel > Paint, which allow you to subtract weight as well as add it, and to define the rate at which weight is applied as you paint.
Animating
Hit Ctrl+left arrow to enter animation view. Make sure you have the armature selected and are in Pose mode (Ctrl+Tab), then manipulate. Use i to set keyframes.
To store multiple animations in one file, switch the Curve Editor from Object to Pose, then hit the arrow button to the right of the drop-down you just used. You can store any number of animations here, creating and flipping between them with the arrow button. The exporter will only look at the active pose.
Exporting
To export an SMD (of any type) for a rigged model, you must select the mesh followed by the armature. Then choose File > Export > Half-Life 2 (.smd).

