Team Fortress 2/Creating a Spawnroom: Difference between revisions
mNo edit summary |
m (condensed it) |
||
| Line 1: | Line 1: | ||
==Creating your room== | ==Creating your room== | ||
[[image:Tut spawnroom r1.JPG|thumb|right|200px|A simple | [[image:Tut spawnroom r1.JPG|thumb|right|200px|A simple room.]] | ||
First of all, you | First of all, you should have an area which you consider the spawnroom. This may be of any shape, color, and size. For this example, the room you see on the right will be transformed into a spawnroom for the RED team.{{clr}} | ||
==Making it a respawn room== | ==Making it a respawn room== | ||
[[image:Tut spawnroom r2.JPG|thumb|right|200px|Fill the room with func_respawnroom.]] | [[image:Tut spawnroom r2.JPG|thumb|right|200px|Fill the room with func_respawnroom.]] | ||
Create a brush | Create a {{ent|func_respawnroom}} brush-based entity with material <code>tools/toolstrigger</code> that fills your area. Name it something like <code>red_respawn_room</code> and set its team to RED.{{clr}} | ||
==Bring the players inside== | ==Bring the players inside== | ||
[[image:Tut spawnroom r3.JPG|thumb|right|200px|Now add 12 | [[image:Tut spawnroom r3.JPG|thumb|right|200px|Now add 12 to 16 spaced out player spawns to your room.]] | ||
Now | Now you need to add the player spawns. Create an {{ent|info_player_teamspawn}} in your room. Change the spawn's team to RED.{{note|The other details can be used to make more advanced respawn mechanisms which are not covered in this tutorial.}}Make 11 to 15 copies of the player spawn entity, giving each of them plenty of space.{{clr}} | ||
==Respawn and resupply== | ==Respawn and resupply== | ||
[[image:Tut spawnroom r4.JPG|thumb|right|200px|Add a resupply somewhere obvious.]] | [[image:Tut spawnroom r4.JPG|thumb|right|200px|Add a resupply somewhere obvious.]] | ||
It may be a good to have a resupply area inside your respawn. A resupply consists of 2 things: a {{ent|prop_dynamic}}, representing the resupply locker, and a {{ent|func_regenerate}}, which gives it functionality. Create a {{ent|prop_dynamic}} somewhere in the room, set its model to <code>models/props_gameplay/resupply_locker.mdl</code>, and give it a name <code>resup1</code>. Now create a {{ent|func_regenerate}} brush-based entity with material <code>tools/toolstrigger</code>, making sure it surrounds the bounding box of the prop. Set its <code>Associated Model</code> to the name of the dynamic prop its and Team to RED.{{clr}} | |||
==Keeping the bullies out== | |||
==Keeping | |||
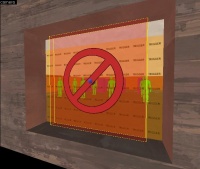
[[image:Tut spawnroom r5.JPG|thumb|right|200px|Access denied.]] | [[image:Tut spawnroom r5.JPG|thumb|right|200px|Access denied.]] | ||
Some players like to camp in spawn rooms, spawn-killing players. There, however, is an easy solution. Create a {{ent|func_respawnroomvisualizer}} brush-based entity with material <tools/nodraw</code>. Assign material <code>overlay/no_entry</code> to the side that faces away from the spawn area. Be sure to set its <code>Associated Respawn Room</code> accordingly. This will block only BLU players.{{clr}} | |||
==Last words== | ==Last words== | ||
It's easy to create a basic | It's easy to create a basic spawn room. The tutorial covers the minimum; you might, for instance, want to create a door that only opens for RED players, or multiple spawn rooms associated to different control point. These will be covered in other tutorial later. | ||
Revision as of 11:25, 27 September 2007
Creating your room
First of all, you should have an area which you consider the spawnroom. This may be of any shape, color, and size. For this example, the room you see on the right will be transformed into a spawnroom for the RED team.
Making it a respawn room
Create a func_respawnroom brush-based entity with material tools/toolstrigger that fills your area. Name it something like red_respawn_room and set its team to RED.
Bring the players inside
Now you need to add the player spawns. Create an info_player_teamspawn in your room. Change the spawn's team to RED.
Make 11 to 15 copies of the player spawn entity, giving each of them plenty of space.
Respawn and resupply
It may be a good to have a resupply area inside your respawn. A resupply consists of 2 things: a prop_dynamic, representing the resupply locker, and a func_regenerate, which gives it functionality. Create a prop_dynamic somewhere in the room, set its model to models/props_gameplay/resupply_locker.mdl, and give it a name resup1. Now create a func_regenerate brush-based entity with material tools/toolstrigger, making sure it surrounds the bounding box of the prop. Set its Associated Model to the name of the dynamic prop its and Team to RED.
Keeping the bullies out
Some players like to camp in spawn rooms, spawn-killing players. There, however, is an easy solution. Create a func_respawnroomvisualizer brush-based entity with material <tools/nodraw. Assign material overlay/no_entry to the side that faces away from the spawn area. Be sure to set its Associated Respawn Room accordingly. This will block only BLU players.
Last words
It's easy to create a basic spawn room. The tutorial covers the minimum; you might, for instance, want to create a door that only opens for RED players, or multiple spawn rooms associated to different control point. These will be covered in other tutorial later.


