Ko/Hammer Manual Configuration: Difference between revisions
< Ko
Jump to navigation
Jump to search
| Line 20: | Line 20: | ||
# 이젠 '''Close''' 버튼을 누르세요. | # 이젠 '''Close''' 버튼을 누르세요. | ||
== | == 게임 경로와 기본적인 매게 변수 설정 == | ||
# You should now be back in the '''Configure Hammer''' dialog with your entry in the '''Configuration''' drop-down list: | # You should now be back in the '''Configure Hammer''' dialog with your entry in the '''Configuration''' drop-down list: | ||
| Line 40: | Line 40: | ||
#:: <code>$SteamUserDir\half-life 2</code> | #:: <code>$SteamUserDir\half-life 2</code> | ||
# Under '''Game Directory''', copy what you entered into '''Game Executable Directory''', paste it into '''Game Directory''', and add the game directory to the end. The game directory for Counter-Strike is <code>\cstrike</code>. For Half-Life 2, it is <code>\hl2</code>. For Half-Life 2 Deathmatch, it is <code>\hl2mp</code>. | # Under '''Game Directory''', copy what you entered into '''Game Executable Directory''', paste it into '''Game Directory''', and add the game directory to the end. The game directory for Counter-Strike is <code>\cstrike</code>. For Half-Life 2, it is <code>\hl2</code>. For Half-Life 2 Deathmatch, it is <code>\hl2mp</code>. | ||
#* | #* 예를 들어, '''Counter-Strike'''의 설정이라면, 당신의 '''Game Directory'''는 아마: | ||
#: <code>C:\Program Files\Valve\Steam\SteamApps\'' | #: <code>C:\Program Files\Valve\Steam\SteamApps\''사용자이름''\counter-strike source\cstrike</code> | ||
#* | #* '''Half-Life 2''',의 설정이라면, 당신의 '''Game Directory''' 아마: | ||
#: <code>C:\Program Files\Valve\Steam\SteamApps\'' | #: <code>C:\Program Files\Valve\Steam\SteamApps\''사용자이름''\half-life 2\hl2</code> | ||
#* | #* '''Half-Life 2 Deathmatch''',의 설정이라면, 당신의 '''Game Directory'''는 아마: | ||
#: <code>C:\Program Files\Valve\Steam\SteamApps\'' | #: <code>C:\Program Files\Valve\Steam\SteamApps\''사용자이름''\half-life 2 deathmatch\hl2mp</code> | ||
#: | #: 또한, ''사용자이름'' 은 당신의 Steam 로그인 계정 이름입니다. | ||
#* | #* 또한 '''모드'''는, your '''Game Directory''' will be: | ||
#: <code>$SteamDir\steamapps\SourceMods\''MODDIR''</code> | #: <code>$SteamDir\steamapps\SourceMods\''MODDIR''</code> | ||
#: ''MODDIR'' | #: ''MODDIR'' 는 당신의 모드의 게임 경로 이름일 것 입니다. | ||
# | # '''Hammer Map Directory''' 항목은, .VMF 파일을 당신이 원하는 곳에 저장하게 만들수 있도록 설정합니다. [[Source SDK Files and Directory Structure|Source SDK 파일과 경로 구조]]를 이용해보세요, 당신은 적절한 <code>mapsrc</code> 경로에 맵이 있을겁니다: | ||
#* | #* '''Counter-Strike'''는?: | ||
#: <code>C:\Program Files\Valve\Steam\SteamApps\'' | #: <code>C:\Program Files\Valve\Steam\SteamApps\''사용자이름''\sourcesdk_content\cstrike\mapsrc</code> | ||
#* | #* '''Half-Life 2'''는?: | ||
#: <code>C:\Program Files\Valve\Steam\SteamApps\'' | #: <code>C:\Program Files\Valve\Steam\SteamApps\''사용자이름''\sourcesdk_content\hl2\mapsrc</code> | ||
#* | #* '''Half-Life 2 Deathmatch'''는?: | ||
#: <code>C:\Program Files\Valve\Steam\SteamApps\'' | #: <code>C:\Program Files\Valve\Steam\SteamApps\''사용자이름''\</code><code>sourcesdk_content\hl2mp\mapsrc</code> | ||
#* | #* '''MOD'''는?: | ||
#: | #: 아마 당신이 현재 작업을 하고 있는 곳일겁니다. | ||
== Setting up the Build Programs == | == Setting up the Build Programs == | ||
Revision as of 19:18, 19 December 2014
먼저 읽으세요!
당신이 Hammer 에디터를 적절한 게임 환경 설정이 되있지 않은 상태로 실행을 한다면, Hammer 에디터는 Source SDK가 실행된 후 자동으로 에디터 스스로 설정을 맞추지 않습니다. 당신은 설정하는 메뉴얼대로 따라와 문제를 해결할 수 있습니다. 이 단계를 거쳐 잘못된 설정을 고치기 전, 저희는 당신의 설정을 잘못된 Hammer 에디터 설정 항목에 나와있는 개요를 따라 한번 수정을 시도해 보는것을 강력하게 추천드립니다
새로운 게임 설정 추가
- Source SDK Launcher를 실행하여 Hammer를 실행하세요.
- First Time Setup 대화 박스가 보인다면, No 버튼을 누르세요:
- 그럼 Configure Hammer 대화 상자가 나타날 것 입니다..
- 만약 나오지 않는다면, Options > Tools 메뉴로 가셔서, Game Configurations 탭을 눌러주세요.
- 가장 위에있는 Edit 버튼을 눌러주세요, 그럼 Configuration 드롭-다운 리스트 항목 옆 Edit Game Configurations 대화 상자가 나타날 것입니다:
- Add 버튼을 누르세요. 그럼 Add a game 대화 상자가 나타날 것입니다:
- "Counter-Strike", "cstrike", "Half-Life 2", "HL2DM" 혹은 당신의 모드 이름을 쓰세요. 이것은 Source SDK Launcher 가 Current Game을 표시할때 나타나는 이름입니다. 정확한 이름은 필요없습니다, 중요한건 이 이름이 당신에게 무슨 의미가 있는가 입니다. OK 버튼을 눌러 당신의 선택을 확인하시고 창을 닫아주세요.
- 이젠 Close 버튼을 누르세요.


게임 경로와 기본적인 매게 변수 설정
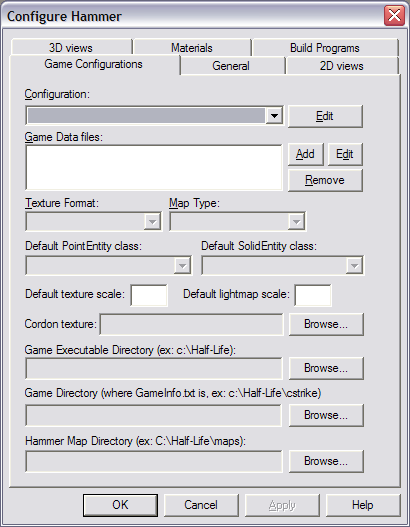
- You should now be back in the Configure Hammer dialog with your entry in the Configuration drop-down list:
- Press Add to the right of the Game Data files list. An Open dialog will appear:
- Open the appropriate .FGD file for your configuration:
- For a Counter-Strike: Source configuration, click on
cstrike.fgdand then the Open button. - For a Half-Life 2 configuration, click on
halflife2.fgdand then the Open button. - For a Half-Life 2 Deathmatch configuration, click on
hl2mp.fgdand then the Open button.
- For a Counter-Strike: Source configuration, click on
- Now you'll be back in the Configure Hammer dialog with these fields filled out:
- Type
0.25into the Default texture scale field. Typetools\toolsskyboxinto the Cordon texture field. - Under Game Executable Directory, hit Browse and go to where you have the the game installed.
- For example:
C:\Program Files\Valve\Steam\SteamApps\username\counter-strike source
- where username should be your Steam Login name.
- Use the Following for a mod:
$SteamUserDir\half-life 2
- For example:
- Under Game Directory, copy what you entered into Game Executable Directory, paste it into Game Directory, and add the game directory to the end. The game directory for Counter-Strike is
\cstrike. For Half-Life 2, it is\hl2. For Half-Life 2 Deathmatch, it is\hl2mp.- 예를 들어, Counter-Strike의 설정이라면, 당신의 Game Directory는 아마:
C:\Program Files\Valve\Steam\SteamApps\사용자이름\counter-strike source\cstrike
- Half-Life 2,의 설정이라면, 당신의 Game Directory 아마:
C:\Program Files\Valve\Steam\SteamApps\사용자이름\half-life 2\hl2
- Half-Life 2 Deathmatch,의 설정이라면, 당신의 Game Directory는 아마:
C:\Program Files\Valve\Steam\SteamApps\사용자이름\half-life 2 deathmatch\hl2mp- 또한, 사용자이름 은 당신의 Steam 로그인 계정 이름입니다.
- 또한 모드는, your Game Directory will be:
$SteamDir\steamapps\SourceMods\MODDIR- MODDIR 는 당신의 모드의 게임 경로 이름일 것 입니다.
- Hammer Map Directory 항목은, .VMF 파일을 당신이 원하는 곳에 저장하게 만들수 있도록 설정합니다. Source SDK 파일과 경로 구조를 이용해보세요, 당신은 적절한
mapsrc경로에 맵이 있을겁니다:- Counter-Strike는?:
C:\Program Files\Valve\Steam\SteamApps\사용자이름\sourcesdk_content\cstrike\mapsrc
- Half-Life 2는?:
C:\Program Files\Valve\Steam\SteamApps\사용자이름\sourcesdk_content\hl2\mapsrc
- Half-Life 2 Deathmatch는?:
C:\Program Files\Valve\Steam\SteamApps\사용자이름\sourcesdk_content\hl2mp\mapsrc
- MOD는?:
- 아마 당신이 현재 작업을 하고 있는 곳일겁니다.


Setting up the Build Programs
- Click on the Build Programs tab:
- Copy and paste the Game executable Directory you entered into the Game Configurations tab previously, then add
\hl2.exeon the end.- For example, for a Counter-Strike configuration, your Game Executable might be:
$SteamUserDir\counter-strike source\hl2.exe
- For a Half-Life 2 configuration, your Game Executable might be:
$SteamUserDir\half-life 2\hl2.exe
- For a Half-Life 2 Deathmatch configuration, your Game Executable might be:
$SteamUserDir\half-life 2 deathmatch\hl2.exe

- For BSP executable, enter the location of the
vbsp.exe:Orange Box: $SteamUserDir\sourcesdk\bin\orangebox\bin\vbsp.exeEp1 Engine: $SteamUserDir\sourcesdk\bin\ep1\bin\vbsp.exe
- For VIS executable, enter the location of the
vvis.exe:Orange Box: $SteamUserDir\sourcesdk\bin\orangebox\bin\vvis.exeEp1 Engine: $SteamUserDir\sourcesdk\bin\ep1\bin\vvis.exe
- For RAD executable, enter the location of the
vrad.exe:Orange Box: $SteamUserDir\sourcesdk\bin\orangebox\bin\vrad.exeEp1 Engine: $SteamUserDir\sourcesdk\bin\ep1\bin\vrad.exe
- For Place compiled maps in this directory before running the game, add
\mapsthe end of the Game Directory:- Example for Counter-Strike:
$SteamUserDir\counter-strike source\cstrike\maps
- Example for Half-Life 2:
$SteamUserDir\half-life 2\hl2\maps
- Example for Half-Life 2 Deathmatch:
$SteamUserDir\half-life 2 deathmatch\hl2mp\maps
- Example for MOD:
$SteamDir\steamapps\SourceMods\MODDIR\maps- MODDIR is the name of your game directory for your mod.
- Press OK. Hammer is now configured for use.