Ko/Hammer Manual Configuration: Difference between revisions
< Ko
Jump to navigation
Jump to search
(Created page with "== Read this first! == If you launch the Hammer editor with no proper game configurations set up, the Hammer Editor has not automatically configured itself after installing t...") |
|||
| Line 1: | Line 1: | ||
== | == 먼저 읽으세요! == | ||
당신이 Hammer 에디터를 적절한 게임 환경 설정이 되있지 않은 상태로 실행을 한다면, Hammer 에디터는 '''Source SDK'''가 실행된 후 자동으로 에디터 스스로 설정을 맞추지 않습니다. 당신은 설정하는 메뉴얼대로 따라와 문제를 해결할 수 있습니다. 이 단계를 거쳐 잘못된 설정을 고치기 전, 저희는 당신의 설정을 [[Incorrect Hammer configuration|잘못된 Hammer 에디터 설정]] 항목에 나와있는 개요를 따라 한번 수정을 시도해 보는것을 ''강력하게 추천드립니다'' | |||
{{warning| | {{warning:ko|대부분의 경우, Hammer 에디터는 자신 스스로 환경을 설정하고 당신은 이 절차를 읽어보지 '''않습니다'''. 만약 당신이 문제가 생겼다면, [[Incorrect Hammer configuration|게임 설정 초기화]] 방법이 더 간단합니다. 이 방법을 사용하면, 당신의 모드 설정은 제거 됩니다.}} | ||
== Adding a new Game Configuration == | == Adding a new Game Configuration == | ||
Revision as of 18:48, 19 December 2014
먼저 읽으세요!
당신이 Hammer 에디터를 적절한 게임 환경 설정이 되있지 않은 상태로 실행을 한다면, Hammer 에디터는 Source SDK가 실행된 후 자동으로 에디터 스스로 설정을 맞추지 않습니다. 당신은 설정하는 메뉴얼대로 따라와 문제를 해결할 수 있습니다. 이 단계를 거쳐 잘못된 설정을 고치기 전, 저희는 당신의 설정을 잘못된 Hammer 에디터 설정 항목에 나와있는 개요를 따라 한번 수정을 시도해 보는것을 강력하게 추천드립니다
Adding a new Game Configuration
- Run Hammer from the Source SDK Launcher.
- When you see the First Time Setup dialog box, click the No button:
- This Configure Hammer dialog should appear next.
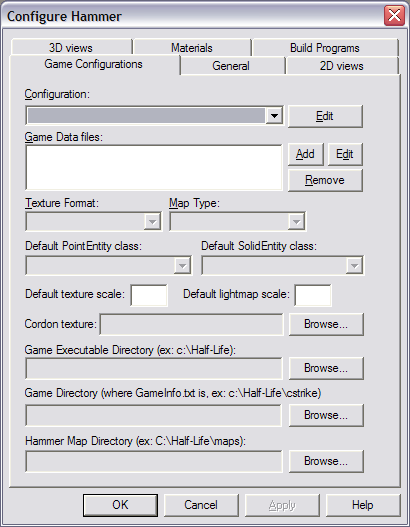
- If this dialog does not appear, choose Options from the Tools menu, and then select the Game Configurations tab.
- Click on the topmost Edit button, next to the Configuration drop-down list. The Edit Game Configurations dialog appears:
- Press the Add button. This will open the Add a game dialog:
- Type in "Counter-Strike", "cstrike", "Half-Life 2", "HL2DM" or an equivalent to name your configuration or your mod. This is the name that will appear in the Source SDK Launcher where it says Current Game. The exact name is unimportant, what's important is that it makes sense to you. Press OK to confirm your choice and close the dialog.
- Press the Close button in the Edit Game Configurations dialog.


Setting game directory and basic parameters
- You should now be back in the Configure Hammer dialog with your entry in the Configuration drop-down list:
- Press Add to the right of the Game Data files list. An Open dialog will appear:
- Open the appropriate .FGD file for your configuration:
- For a Counter-Strike: Source configuration, click on
cstrike.fgdand then the Open button. - For a Half-Life 2 configuration, click on
halflife2.fgdand then the Open button. - For a Half-Life 2 Deathmatch configuration, click on
hl2mp.fgdand then the Open button.
- For a Counter-Strike: Source configuration, click on
- Now you'll be back in the Configure Hammer dialog with these fields filled out:
- Type
0.25into the Default texture scale field. Typetools\toolsskyboxinto the Cordon texture field. - Under Game Executable Directory, hit Browse and go to where you have the the game installed.
- For example:
C:\Program Files\Valve\Steam\SteamApps\username\counter-strike source
- where username should be your Steam Login name.
- Use the Following for a mod:
$SteamUserDir\half-life 2
- For example:
- Under Game Directory, copy what you entered into Game Executable Directory, paste it into Game Directory, and add the game directory to the end. The game directory for Counter-Strike is
\cstrike. For Half-Life 2, it is\hl2. For Half-Life 2 Deathmatch, it is\hl2mp.- For example, for a Counter-Strike configuration, your Game Directory might be:
C:\Program Files\Valve\Steam\SteamApps\username\counter-strike source\cstrike
- For a Half-Life 2, your Game Directory might be:
C:\Program Files\Valve\Steam\SteamApps\username\half-life 2\hl2
- For a Half-Life 2 Deathmatch, your Game Directory might be:
C:\Program Files\Valve\Steam\SteamApps\username\half-life 2 deathmatch\hl2mp- Again, where username should be your Steam Login name.
- For a Mod, your Game Directory will be:
$SteamDir\steamapps\SourceMods\MODDIR- MODDIR should be the game directory name of your mod.
- Under Hammer Map Directory, you should enter in where you wish to save your .VMF map source files. Using the Source SDK Files and Directory Structure, you should enter the appropriate
mapsrcdirectory:- Example for Counter-Strike:
C:\Program Files\Valve\Steam\SteamApps\username\sourcesdk_content\cstrike\mapsrc
- Example for Half-Life 2:
C:\Program Files\Valve\Steam\SteamApps\username\sourcesdk_content\hl2\mapsrc
- Example for Half-Life 2 Deathmatch:
C:\Program Files\Valve\Steam\SteamApps\username\sourcesdk_content\hl2mp\mapsrc
- Example for a MOD:
- This directory will be the folder you are doing your work from


Setting up the Build Programs
- Click on the Build Programs tab:
- Copy and paste the Game executable Directory you entered into the Game Configurations tab previously, then add
\hl2.exeon the end.- For example, for a Counter-Strike configuration, your Game Executable might be:
$SteamUserDir\counter-strike source\hl2.exe
- For a Half-Life 2 configuration, your Game Executable might be:
$SteamUserDir\half-life 2\hl2.exe
- For a Half-Life 2 Deathmatch configuration, your Game Executable might be:
$SteamUserDir\half-life 2 deathmatch\hl2.exe

- For BSP executable, enter the location of the
vbsp.exe:Orange Box: $SteamUserDir\sourcesdk\bin\orangebox\bin\vbsp.exeEp1 Engine: $SteamUserDir\sourcesdk\bin\ep1\bin\vbsp.exe
- For VIS executable, enter the location of the
vvis.exe:Orange Box: $SteamUserDir\sourcesdk\bin\orangebox\bin\vvis.exeEp1 Engine: $SteamUserDir\sourcesdk\bin\ep1\bin\vvis.exe
- For RAD executable, enter the location of the
vrad.exe:Orange Box: $SteamUserDir\sourcesdk\bin\orangebox\bin\vrad.exeEp1 Engine: $SteamUserDir\sourcesdk\bin\ep1\bin\vrad.exe
- For Place compiled maps in this directory before running the game, add
\mapsthe end of the Game Directory:- Example for Counter-Strike:
$SteamUserDir\counter-strike source\cstrike\maps
- Example for Half-Life 2:
$SteamUserDir\half-life 2\hl2\maps
- Example for Half-Life 2 Deathmatch:
$SteamUserDir\half-life 2 deathmatch\hl2mp\maps
- Example for MOD:
$SteamDir\steamapps\SourceMods\MODDIR\maps- MODDIR is the name of your game directory for your mod.
- Press OK. Hammer is now configured for use.