Hammer Clipping Tool: Difference between revisions
Jump to navigation
Jump to search

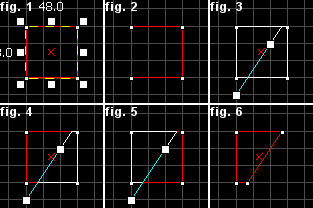
 Note:You can cycle through the clip modes by clicking on the Clipping Tool icon, or by pressing SHIFT+X (fig.2, 3, 4). You can move both points of the clip line by holding CTRL and dragging one point of it.
No edit summary |
(Added link to helpful tutorial) |
||
| Line 18: | Line 18: | ||
{{note|You can cycle through the clip modes by clicking on the '''Clipping Tool''' icon, or by pressing SHIFT+X (fig.2, 3, 4). You can move both points of the clip line by holding CTRL and dragging one point of it.}} | {{note|You can cycle through the clip modes by clicking on the '''Clipping Tool''' icon, or by pressing SHIFT+X (fig.2, 3, 4). You can move both points of the clip line by holding CTRL and dragging one point of it.}} | ||
* See [http://www.nacimota.com/2009/12/07/the-carve-tool-and-you The Carve Tool and You] for a tutorial on using the Clip tool to cut a hole in a wall. | |||
Revision as of 19:19, 2 November 2011
The Clipping Tool allows you to slice the currently selected brush using clip planes. Clip planes enable you to precisely make a cut in a solid, leaving you the option to keep either or both parts of the resulting two solids. It is in some ways quicker and more efficient than carving or vertex manipulation. You have the option of only splitting the brush, or actually slicing a piece right off.
To use the Clipping Tool to slice an object with a clip plane:
- Select the object to be clipped using the Selection Tool.
- Select the Clipping Tool on the MapTools toolbar.
- Drag a line across the selected object. This is the clip line. The part of the object to be kept will be highlighted in thick white lines. Cycle through the clip modes by clicking on the Clipping Tool icon.
- When you are satisfied with the potential resulting object, press the ENTER key to perform the clip.

Switching the clipping plane and executing a clip.
- See The Carve Tool and You for a tutorial on using the Clip tool to cut a hole in a wall.