Discouragement Beam: Difference between revisions
No edit summary |
(removed see also, already in category) |
||
| Line 4: | Line 4: | ||
==Creation== | ==Creation== | ||
The two most important elements of any laser setup are [[env_portal_laser]] and [[prop_laser_catcher]], which create and "catch" the laser, respectively. Two optional elements are the [[prop_weighted_cube]] with ''CubeType'' set to 2 (redirection cube) and the [[prop_laser_relay]]. | The two most important elements of any laser setup are [[env_portal_laser]] and [[prop_laser_catcher]], which create and "catch" the laser, respectively. Two optional elements are the [[prop_weighted_cube]] with ''CubeType'' set to 2 (redirection cube) and the [[prop_laser_relay]]. | ||
== External links == | == External links == | ||
Revision as of 13:51, 9 May 2011

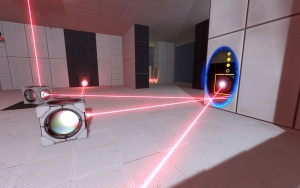
Thermal discouragement beams or lasers are a puzzle element in Portal 2. Lasers emanate from emitters, and can be used to trigger sockets and destroy things, mainly turrets. They can be extended through portals, just like bridges, walls, and funnels. When players touch a laser, they receive a small amount of damage and are pushed away from the beam. Prolonged contact kills the player. Normal cubes block the laser, but redirection cubes point it in a different direction (parallel to the floor).
Creation
The two most important elements of any laser setup are env_portal_laser and prop_laser_catcher, which create and "catch" the laser, respectively. Two optional elements are the prop_weighted_cube with CubeType set to 2 (redirection cube) and the prop_laser_relay.
External links
Example map using this tutorial. VMF included.