|
|
| Line 16: |
Line 16: |
| [[Image:Footlocker02.png|thumb|A Simple Safe Room.]] | | [[Image:Footlocker02.png|thumb|A Simple Safe Room.]] |
|
| |
|
| This is the most important part of the finale, the path the player takes to his escape. | | This is the most important part of the finale, the path the players take to their escape. It's important to keep in mind that the map needs many obstacles or walls for the infected to spawn behind, otherwise the finale will not function as intended. It's also important to keep in mind that players need help to know where they're going; either the map can be directionally linear such as The Parish Gauntlet, or it can be dynamic to your likings, just be sure to give the player hints where to go. |
|
| |
|
|
| |
|
| Line 22: |
Line 22: |
| ---- | | ---- |
|
| |
|
| [[Image:Footlocker03.png|thumb|Collision brushes.]]
| |
|
| |
|
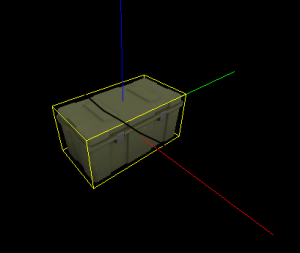
| The second thing to do is to put in a couple of nodraw-textured brushes so that the player and objects will appear to collide with the locker. Valve left the locker with no collision model of its own probably because it would require more expensive VPhysics calculations to include one (since the locker is a concave shape), so brushes are used to act as the solid sides and base of the locker.
| |
|
| |
| The collision brushes should be 2 units thick and follow the edges of the locker. Putting one in for the locker base is also useful. ''Don't forget'' to tie all of these brushes to a '''func_detail,''' otherwise they will play havoc with your [[visleaves]].
| |
|
| |
| {{note|You may want to set the animation of your locker to aid in creating the collision brushes. In the properties of the model, go to the "Model" tab and select the sequence "open". Don't forget to set this back to "ref" afterwards, as changing the default animation in this tab can cause problems in Hammer.}}
| |
| {{clr}}
| |
|
| |
|
|
| |
|
| Line 35: |
Line 28: |
| ---- | | ---- |
|
| |
|
| [[Image:Footlocker04.png|thumb|Items in the locker.]]
| |
|
| |
| Place your desired items into the locker and rotate/position them. I have used health kits and pistols here, since I designed this locker to be present at the beginning of my campaign. If you are using other items, it's best to pretty much fill the entire bottom of the locker model with a layer of items.
| |
|
| |
| If you are using items such as pipe bombs, molotovs or boomer bile, you'll want to set their "Count" value to 10, or maybe higher. This means that players will be able to take more than one item from each spawner in-game; of course, if you just want single item pickups (like the health kits in the picture), set the "Count" value to 1.
| |
|
| |
| {{tip|Some items, such as adrenaline, do not have a count value my default and only allow a single pickup; this can be overriden by disabling "Smart Edit" and adding a keyvaue called "count" with a value of whatever you choose.}}
| |
|
| |
| Name ''all'' the items you have added as '''"static_locker_items"'''.
| |
| {{clr}}
| |
|
| |
|
|
| |
|
| Line 50: |
Line 33: |
| ---- | | ---- |
|
| |
|
| [[Image:Footlocker05.png|thumb|The locker opening sound.]]
| |
|
| |
| Set your locker's animation back to "ref" (to close the lid) and add an ambient_generic somewhere near the locker. The position doesn't really matter, as we'll be specifying the origin point of the sound in the ambient_generic's properties.
| |
|
| |
| The properties can be left at the defaults, apart from these:
| |
|
| |
| *'''Name:''' ''static_locker_snd_open'' - This will allow us to trigger the sound later on.
| |
| *'''Sound Name:''' ''Trunk.Open'' - The soundscript entry for the locker opening sound.
| |
| *'''SourceEntityName:''' ''static_locker'' - This is the name of the prop_dynamic locker model. When triggered, the sound will originate from the locker model rather than from the position of the ambient_generic itself.
| |
| {{clr}}
| |
|
| |
|
|
| |
|
| Line 65: |
Line 38: |
| ---- | | ---- |
|
| |
|
| [[Image:Footlocker06.png|thumb|The template spawner.]]
| |
|
| |
| Next, we need a point_template in order to spawn our items when we want them. Simply ticking the "Must Exist" flag on the items may cause their glow effect to be visible through the edges of the locker model, so the point_template ensures that the items are only created when they are needed. For lockers which may or may not be present, the point_template allows the spawning of the items only if the locker exists.
| |
|
| |
| Setting up the point_template is simple:
| |
|
| |
| *'''Name:''' ''static_locker_template'' - The name of the point_template.
| |
| *'''Template 1:''' ''static_locker_items'' - When triggered, the point_template will spawn our ''static_locker_items'' (that we named earlier) at their appropriate spawn points.
| |
| {{clr}}
| |
|
| |
|
|
| |
|
| {{note|This article is a work-in-progress. It is currently being updated.}} | | {{note|This article is a work-in-progress. It is currently being updated.}} |
Gauntlet Finales were introduced into Left 4 Dead 2 with The Parish campaign. Rather than having the player holdout at a specific location, the Gauntlet forces to player to hurry to the end of the level, where the rescue vehicle is already waiting for them. In The Parish, the players must run across a bridge to make it to the evac helicopter. This article will demonstrate how to successfully create a working Gauntlet Finale, and customize it to your liking.
The article assumes that you have a good grasp of working in Hammer and are familiar with the way Left 4 Dead entities work.
Safe Room
This is where you'll begin your gauntlet, it all begins with a simple safe room. It's highly recommended you use an adequate amount of medkits, as well as throwables and secondary medical items. In The Parish, there are 8 medkits in the saferoom, four throwables, and one melee weapon.
Map Layout
This is the most important part of the finale, the path the players take to their escape. It's important to keep in mind that the map needs many obstacles or walls for the infected to spawn behind, otherwise the finale will not function as intended. It's also important to keep in mind that players need help to know where they're going; either the map can be directionally linear such as The Parish Gauntlet, or it can be dynamic to your likings, just be sure to give the player hints where to go.
The Entities
The Rescue Vehicle
The Navigation Mesh
Custom Gauntlets
 Note:This article is a work-in-progress. It is currently being updated.
