Ru/Demo Recording Tools: Difference between revisions
| Line 16: | Line 16: | ||
[[Image:demoplayback.jpg]] | [[Image:demoplayback.jpg]] | ||
В любое время пока | В любое время, пока воспроизводится демо файл, окно проигрывателя может быть выведено на экран нажатием '''Shift-F2''' или команды консоли <code>demoui</code>. Окно проигрывателя позволяет делать паузу и продолжить воспроизведение, изменить скорость воспроизведения или изменить положение камеры. | ||
Для загрузки демо файла нужно нажать кнопку '''Load...''' и выбрать файл на диске. Имя загружаемого файла будет показано справа от кнопки '''Load...'''. Текущее и полное время воспроизведения показано под кнопкой. Используя слайдер справа можно регулировать скорость воспроизведения от 0% до 600% от обычной скорости. Ниже расположена строка прогресса, под которой находятся кнопки '''Play''', '''Pause''', '''Resume''', кадр вперед '''>''', к началу '''|<''', к концу '''>|''' (некоторые функции пока не работают, например кадр назад '''<''', быстро назад '''<<''') | |||
Для маркировки одиночных кадров в пределах воспроизведения время внутри демо файла разделено на так называемые тики(ticks). Текущее и полное количество тиков показано слева от кнопки '''Goto:'''. Можно перейти к произвольному тику в пределах демо файла путем ввода его номера в текстовое поле и нажатия кнопки '''Goto:'''. | |||
Для | Для изменения положения камеры нужно переключится путем нажатия кнопки '''Drive...''' в "режим управления камерой". Кнопка останется нажатой пока режим управления камерой будет активен. Для навигации камеры нужно нажать левую кнопку мыши и передвинуть курсор в желаемом направлении. Также можно передвигать камеру в горизонтальном положении нажимая на клавиатуре клавиши '''W''','''A''','''S''','''D''', а для перемещения по-вертикали клавиши '''Z''' и '''X'''. Скорость перемещения можно увеличить, если нажимать дополнительно клавишу '''Shift'''. Когда воспроизведение приостановлено это становится весьма полезно для получения скриншотов (используя <code>r_drawviewmodel 0</code> и <code>cl_drawhud 0</code> для очистки экрана). Снова нажмите кнопку '''Drive...''' для того чтобы вернутся к нормальному положения камеры. | ||
=Demo Editor= | =Demo Editor= | ||
[[Image:demoeditor.jpg]] | [[Image:demoeditor.jpg]] | ||
Revision as of 14:08, 31 January 2008
For help, see the VDC Editing Help and Wikipedia cleanup process. Also, remember to check for any notes left by the tagger at this article's talk page.
Введение
ПРИМЕЧАНИЕ: Большая часть статьи переведена с использованием автоматического переводчика и содержит эта статья грубые языковые ошибки.
Source Engine содержит комплект инструментов для записи игры в демо файлы, их воспроизведения и редактирования. Эти инструменты доступны через команды консоли или утилиты с графическим интерфейсом.
Основны записи и воспроизведения
Для того чтобы записать игру, необходимо написать в консоли record "name", причем имя архива не должно содержать специальных символов и пробелов. Архив demo (с расширением .dem) сохраняется в директории игры, например \hl2\name.dem. Вы можете начать запись игры в любое время, а также остановить ее с помощью команды stop. Если во время записи происходит смена уровня, то запись текущего файла прекратится и начнется запись следующего с именем name_2 (name_3, name_4, и т.д.). Для просмотра ранее записанных игр, то необходимо написать в консоли playdemo "name". Если вы хотите использовать демо-запись как бенчмарк, то используйте команду timedemo "name". Timedemo воспроизводит запись как можно быстрее и показывает по ее завершению статистику ( количество отображенных кадров, время, затраченное на воспроизведение,среднее число кадров в секунду и его изменение).
Demo Player
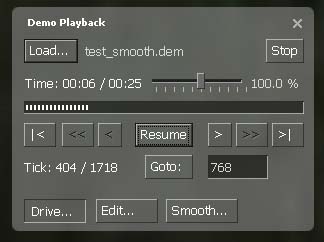
В любое время, пока воспроизводится демо файл, окно проигрывателя может быть выведено на экран нажатием Shift-F2 или команды консоли demoui. Окно проигрывателя позволяет делать паузу и продолжить воспроизведение, изменить скорость воспроизведения или изменить положение камеры.
Для загрузки демо файла нужно нажать кнопку Load... и выбрать файл на диске. Имя загружаемого файла будет показано справа от кнопки Load.... Текущее и полное время воспроизведения показано под кнопкой. Используя слайдер справа можно регулировать скорость воспроизведения от 0% до 600% от обычной скорости. Ниже расположена строка прогресса, под которой находятся кнопки Play, Pause, Resume, кадр вперед >, к началу |<, к концу >| (некоторые функции пока не работают, например кадр назад <, быстро назад <<)
Для маркировки одиночных кадров в пределах воспроизведения время внутри демо файла разделено на так называемые тики(ticks). Текущее и полное количество тиков показано слева от кнопки Goto:. Можно перейти к произвольному тику в пределах демо файла путем ввода его номера в текстовое поле и нажатия кнопки Goto:.
Для изменения положения камеры нужно переключится путем нажатия кнопки Drive... в "режим управления камерой". Кнопка останется нажатой пока режим управления камерой будет активен. Для навигации камеры нужно нажать левую кнопку мыши и передвинуть курсор в желаемом направлении. Также можно передвигать камеру в горизонтальном положении нажимая на клавиатуре клавиши W,A,S,D, а для перемещения по-вертикали клавиши Z и X. Скорость перемещения можно увеличить, если нажимать дополнительно клавишу Shift. Когда воспроизведение приостановлено это становится весьма полезно для получения скриншотов (используя r_drawviewmodel 0 и cl_drawhud 0 для очистки экрана). Снова нажмите кнопку Drive... для того чтобы вернутся к нормальному положения камеры.
Demo Editor
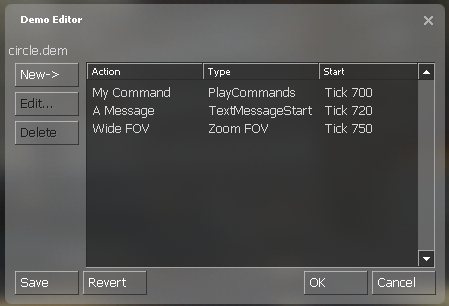
To open the Demo Editor GUI, press the "Edit..." button in the Demo Playback window. The Demo Editor allows you to add and execute a set of commands during demo playback. These demo commands can display text, fade in/out, change the FOV or run any other console command. The Demo Editor can not change the camera view, use the Demo Smoother to do that. The demo commands are not saved within the demo file itself, but in a extra text file named demoname.vdm. These .VDM text files are loaded and executed each time a demo file with the same name is played.
To add a new command, hit the "New->" button and choose a demo command you want to add, for example PlayCommands to execute a console command. Each demo command has a user given name and point of time (clock or tick) to be executed. If you added a new PlayCommands entry, choose a new name ("My command"), set "Start on" to "TimeUseTick", enter a valid tick and enter the console command to be executed, e.g. "echo This is my command". Then hit "OK" and a new demo command will be added to the command list. Existing commands can be changed by pressing "Edit..." or removed with "Delete". Once the demo command list is complete, you can save it to the demoname.vdm file by hitting "Save".
The following list gives an overview about the available demo commands:
| SkipAhead | Skips demo playback ahead to a specified tick and resumes playback. |
| StopPlayback | Stops demo playback immediately. |
| PlayCommands | Executes a console command. |
| ScreenFadeStart | Fade screen in/out. |
| TextMessageStart | Shows a simple text message. |
| PlayCDTrackStart | Starts playing a CD track. |
| PlaySoundStart | Plays a .WAV or .MP3 sound file. |
| Pause | Pauses playback for given seconds. |
| ChangePlaybackRate | Changes the playback speed. |
| ZoomFov | Adds a zoom in/out effect. |
Demo Smoother
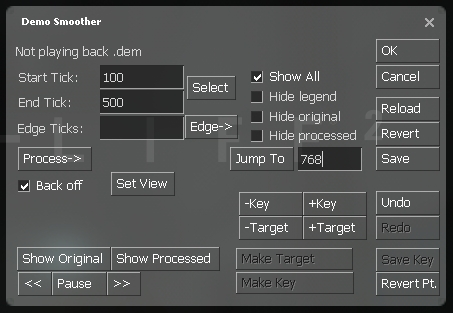
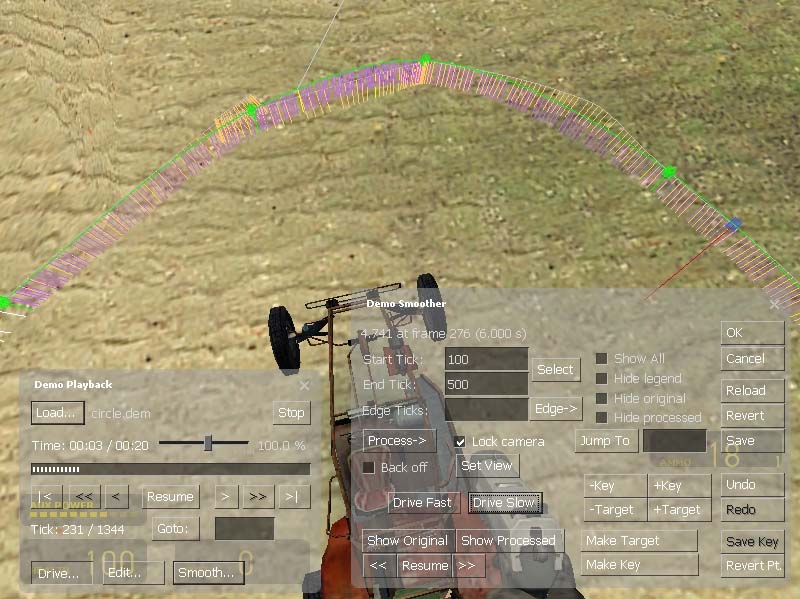
The Demo Smoother is the most complex of all demo tools and allows to override the camera view in demo files. This can be used to smooth out the recorded view or create completely new camera paths. To open the Demo Smoother, hit the "Smooth..." button in the Demo Playback window.
The first thing to do is to pause the playback and load the existing view data from the current demo file by hitting "Reload". Check the "Show All" checkbox to see the complete camera path in your demo file (drawn white). All the time when working with the Demo Smoother, you can still go into "Camera drive mode" and move around the map. If you're not in "Camera Drive mode", you can check the "Back off" checkbox to move the camera backward a bit so you can see some of the path of the camera.
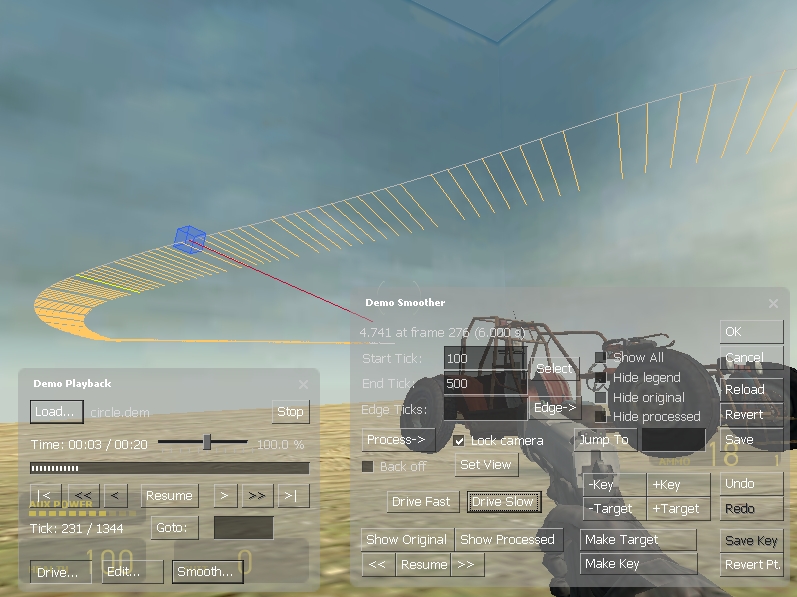
To work with the smoother, you need to have an active selection. To select an part of the current camera track for modification, fill in the "Start Tick" and "End Tick" fields and press "Select". This tick range is now your active selection and the selected samples are now shown in yellow. Click the Show Original button and the camera will follow the path of the selected samples. Notice that we are "backed off" due to the back off button being checked, that's just for the preview. Unclick the back off button for now. Click the lock camera check box and then hold the mouse down on the "Drive Camera" button and you use the WASD keys and mouselook movement to move the camera around. Hit "S" and move back from the current viewpoint.
From this view, the blue box with the red direction line is the current preview position. If you have lock camera clicked and you press the "<<" or ">>" buttons you will move this marker one frame forward or backward. If you don't have the lock camera button checked, then when you press the "<<" or ">>" buttons your view will snap to the new camera position. The white samples at the start and end show you the next few samples just outside your selection range. Clicking the "Process->" button will bring up the menu of currently supported processing types.
Smooth selection angles
Clicking this averages the view angles over a window of about 10 samples, thereby removing some of the high frequency noise from the camera. The smoothed camera directions are shown as purple samples near each yellow sample line. You can preview the processed positions by clicking the "Show processed" button (make sure you turn off "lock camera" if you want to actually see from the camera position, otherwise you'll just see the blue box/red line move across your selection).
Note that the speed scale slider from the "Demo Playback" UI will influence the Show Original/Show Processed (and Drive Camera) speed in the Demo Smoother UI. Okay, that's pure angle smoothing by just averaging the angles over a small window. To undo this change you can just click the "Undo" button.
Smooth selection origin
This is similar to the above, except the window is applied to the origin samples. Clicking this button can be used to remove a bit of high frequency positional jitter. The smoothed camera path is colored yellowish, which deviates from the gray original path. This is the new smoothed path on which the camera will track. Of course, you can apply both angle and origin smoothing to the selection, etc.
Linear Interp Angles
What this tool does it take only the very first sample in the selection range and the very last sample in the range, and then linearly interpolates the view direction smoothly across the entire range.
Linear Interp Origin
Similar to the above, you can linearly interpolate the origin from the start to end sample. As you will see, the camera position follows a direct path from the start to end position, but the original view pitch/roll/yaw data is preserved. You can choose "Linear Interp Angles" if you want to smooth out the angles over this selection as well.
Spline Angles and Spline Origin
The spline functionality, in general, requires you to mark certain samples as "Key Frames" for creating the spline. By default, the first and last samples are automatically included as "anchor" key frames, but you'll want to add at least one if not multiple additional key frames.
The best way to do this is to think of the original samples as a time reference and use the << and >> buttons to move the blue cursor to the sample at the time you want to mark as a key frame. Once you've done that, you need to unlock the camera if it's locked and then press "Set View" to put your eyes into the current sample point.
You can now move that sample point by clicking "Drive Camera" and moving with the keyboard and mouse, etc. Once you have the sample positioned and oriented (just using the camera) as you like, press the "Make Key" button. If you now back the camera up a bit more you'll see a green box which shows the current point as a key. Smoothing out the Edges
The final component of the smoother is useful for dealing with the edges left after post processing a .dem file selection. For instance, chose the last 5 frames to smooth out the right edge at the end of a sample ( type 5 in the Edge Frames box and selected Smooth Right from the Edge-> menu). As you can see in the inset, the processed/purple line is more smoothly integrated with the first non-selected white direction line. You need to use at least 3 edge frames and then select which edges(s) to smooth from the Edge-> menu.
Demo Console Commands
| demo_debug <0/1> | Shows additional demo debug info |
| demo_fastforwardstartspeed <factor> | Go this fast when starting to hold FF button. |
| demo_fastforwardramptime <seconds> | How many seconds it takes to get to full FF speed. |
| demo_fastforwardfinalspeed <factor> | Final playback speed when holding the FF button. |
| demo_interpolateview <0/1> | Enables/disabled view interpolation between demo ticks |
| demo_quitafterplayback <0/1> | Quits game after demo playback |
| demo_recordcommands <0/1> | Record commands typed at console into .dem files |
| demo_pause [seconds] | Pauses demo playback, seconds optional |
| demo_resume | Resumes demo playback |
| demo_togglepause | Toggles demo pause/playback |
| demo_gototick <tick> [relative] [pause] | Skips to a tick in demo. If the relative parameter is 1 the tick is an offset to the current tick. If the pause parameter is 1, playback while be paused when tick is reached |
| demo_timescale <scale> | Set the demo playback speed as a factor, 1.0 is normal playback |
Video Tutorial
Requires Xvid codec
by Fragalishus
Bugs
This bug list was compiled by Lunchtimemama on January 24, 2005 and is potentially out of date. Bugs listed here may be fixed and other bugs may exist.
Unfinished Features:
- The step-back and rewind buttons are disabled.
- The fast-forward, go-to-beginning, and go-to-end buttons do not work.
- Half of the "Edit" effects are disabled.
Major Bugs
- The "Edit" effect configuration windows are immobile and have broken minimize and close buttons.
- With "lock camera" engaged in the Smoother window and "Drive" engaged in the Playback window, the "Make Key" command will incorrectly use the "driven" camera's position instead of the "locked" camera's.
- With "lock camera" and "Drive" engaged, the "Show Original" and "Show Processed" commands will not animate the "locked" camera (though the "step-forward" and "step-back" commands (in the Smoother) will).
- With "lock camera" disengaged and "Drive" engaged, the blue-box camera indicator does not update position when the camera is "driven" around.
- Some demos suffer jumpiness similar to network lag, even those exported from the Smoother.
- "Jump to" in the Smoother does not seem to work properly.
Minor Bugs
- The "New ->" list in the "Edit" window always opens upward, usually extending off-screen.
- "Goto" is very slow when going to a tick in the past.
- If the blue-box camera indicator suffers movement lag during playback, it does not "catch up" when the demo is paused.
- When "Drive" is engaged, clicking and dragging in VGUI windows will move the camera (making it difficult to highlight text in a textfield).
