Rock Textures Creation: Difference between revisions
DomtrLetoo (talk | contribs) mNo edit summary |
JurgenKnops (talk | contribs) m (Spam revert.) |
||
| Line 1: | Line 1: | ||
{{tutpov}} | {{tutpov}} | ||
Revision as of 04:47, 15 October 2007
Skill Level: Easy
What will you accomplish in this tutorial
This tutorial will take you through a step by step detail on how to create a rock texture, and producing a bumpmap/normal map that will bring out depth to the texture.
Requirements
- Photoshop w/Nem's VTF Plugin
- Nem's VTF Plugin for Photoshop 7+
- nvTools Normal Map and DDS plugin for Photoshop
- Notepad
The Tutorial
Finding the Right Texture for the Job
There are two ways of getting this step done. One is by searching for a texture using any image search, then checking to see if its publicly available and free to use, unless you get special rights to the image.
For tutorial purposes, use this one:

Notice that it doesn't even look like a rock wall or which can be used as one. This is because for now, it's best not to use a texture that has too many shadows or large depth to it. In other words, this is just a seamless ground texture.
Putting the Texture to Use
Now that you have the dirt texture to use, you can either right click it to copy, or save it to the hard drive.
Open up Photoshop. When the program has finished loading, either open up the file wherever you saved it to your hard drive, or go to file and click 'New', don't change anything then click 'ok', then 'Ctrl+V' or click 'Edit' at the top and click 'Paste'.
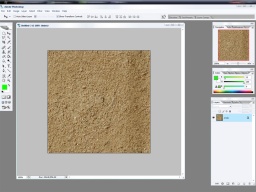
There, now the texture is in photoshop. Now we are going to export it to VTF for use with HL2. Once you have the VTF plugin for Photoshop installed, this shouldn't be a problem, as the VTF save format is in the format list when saving. Click on 'File' then down to 'Save As'.
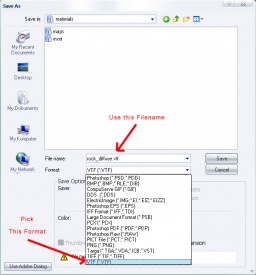
Change the format to VTF and save the file as 'rock_diffuse.vtf'. Save this file into your Materials folder of your mod. Then click 'Save'.

If you get an error just like the image above, then you must convert the image into RGB format. To do this, click on 'Image' at the top menu, then click 'mode' then 'RGB Color', then click ok. Now do the same step to save to VTF.
Creating the Normal Map
Now that the file has saved successfully, create a new image file with the same dimensions at the dirt image, then click 'New'. Now do everything as said in the next image:
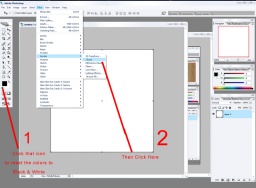
Now that you have an image with the clouds effect applied to it, now click 'Image', then 'Adjustments', then 'Levels'. Here you can play around with the levels of the image. The left most arrow will make the darker colors darker when moved to the right. The right arrow will make light colors lighter when moved to the left. The middle will change the moderate colors to whatever direction you want (Left: Lighter, Right: Darker). By playing around with it, you may make an image looking like this, depending on how you played with the levels:
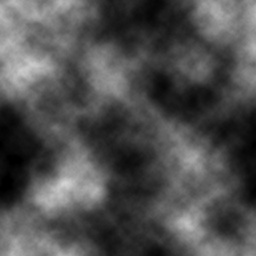
Now you got a reasonable rock texture bumpmap, go to 'Filters', then 'nvTools', then 'NormalMapFilter'. Now set all the settings to the following image.
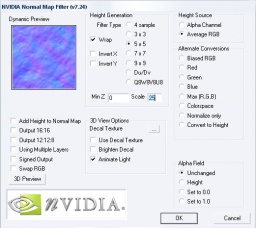
Click 'Ok'. Now the normal map is complete. Save the file in vtf format, similarly to the diffuse map. Save it as 'rock_normal.vtf'
Putting It All Together
Now that the diffuse and normal map are finished, you will need to create a VMT file which tells the game that the texture files are here. So now, open up notepad, and copy and paste the following into it:
"LightmappedGeneric"
{
	"$baseTexture" "rock_diffuse"
	"$bumpmap" "rock_normal"
}
Now save as rock_texture.vmt in the same folder you save the vtf's. Be sure that in Notepad's save dilaog, "All Files" is selected instead of Text Document. Otherwise, Notepad may try to save it as rock_texture.vmt.txt. Now it should be useable ingame. Open up Hammer and add the texture to a wall or a terrain surface to test it.
