Viewmodels in XSI: Difference between revisions
PsychoBrat (talk | contribs) m (punctuation) |
No edit summary |
||
| Line 1: | Line 1: | ||
[[Category:Modeling]] | [[Category:Modeling]][[Category:Tutorials]] | ||
=Creating a view model for Source using XSI= | |||
==Camera Setup== | |||
You can use the | Lets start by positioning the camera in XSI to give us a ''similar'' view as what we will be seeing in the game. You can do this in two different ways as described below (A. and B.). The Source engine supports any F.O.V., but if you use 54 (which is close to the human eye) you will be able to model a weapon to correct scale without having it look distorted in the engine. We actually use a dual F.O.V. system with Source. In Half-Life 2 the world is rendered at 75 F.O.V. while our weapons are rendered at 54. | ||
'''(A.)''' Set a 54 degree F.O.V. perspective camera at origin 0,0,0 facing down the '''Positive Z''' axis. | |||
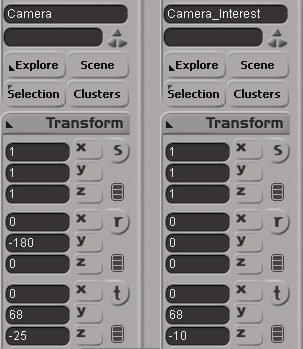
'''(B.)''' Set a 54 degree F.O.V. perspective camera at origin, using the coordinates shown below, facing along the '''Positive Z''' axis. Use the QC command '''$Origin 0 0 68''' to compensate. This way is useful when you need to merge in character rigs to animate with, otherwise it is recommended to use example '''(A.)''' | |||
You | [[Image:camera_settings.jpg]] | ||
==Positioning== | |||
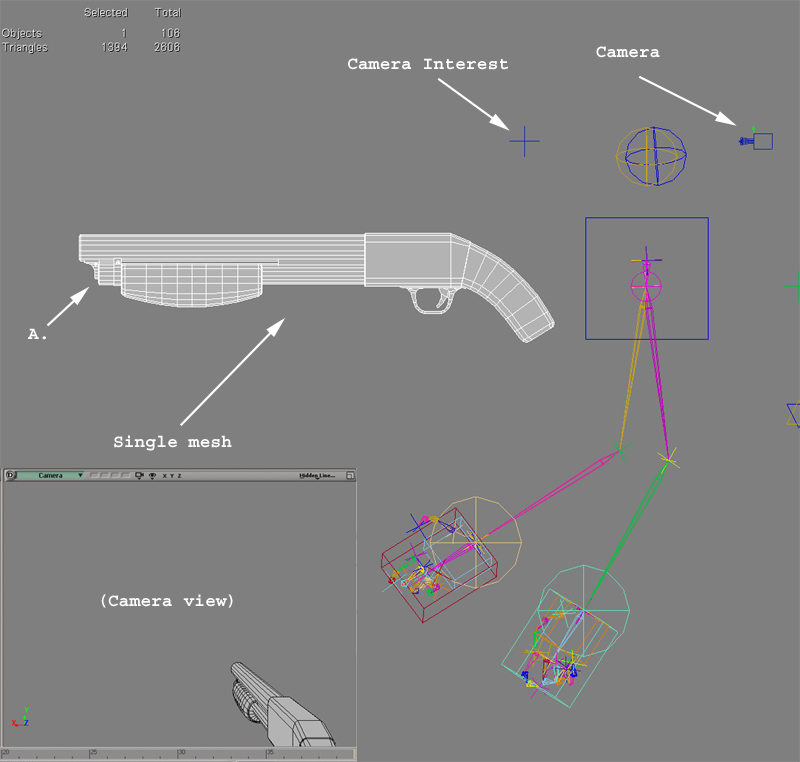
If its not in the scene already, merge/import your weapon mesh. Position your weapon to where it looks best in the camera view. ''To do this move the weapon mesh and not the camera''. I recommend doing this before you finish your model because its good to see where to best spend your polygons. As you can see in the below picture (area marked as A.) the front of the shotgun mesh has some detail near the barrel that is not seen in the camera view. Those polygons would perhaps be best used up near the handle or simply deleted. | |||
[[Image:Shotgun_singlemesh.jpg]] | |||
==Merging texture coordinates== | |||
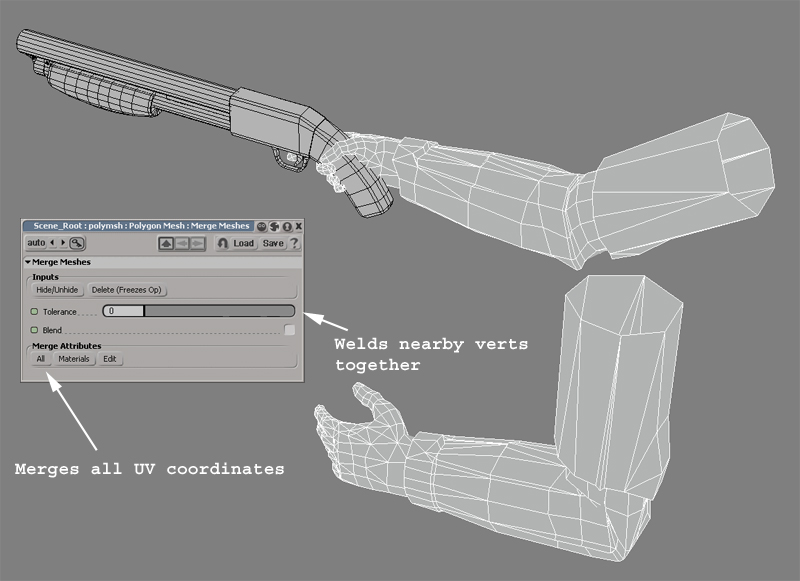
In this example, the shotgun and arms have been modeled and textured separately (You will first need to step into the world of imagination and pretend that my example is textured). View model weapons need to consist of a single mesh, so we need to merge both the shotgun and arm meshes together while keeping the texture coordinates in tact. Do to this, merge the arm mesh into the scene '''File > Merge''', next, under the '''Model''' panel select '''Poly. Mesh > Merge'''. A dialog box will then pop up (shown below). I usually put the tolerance to 0. The tolerance will weld verts that are close to each other. The higher the tolerance number, the more verts will be welded together. This is handy for when you are stitching two models together, such as modeling one side of an object, duplicating and mirroring it, and then welding it back to the original. For this example however, I don't want the hand verts to be welded to any of the weapon verts. Click the '''All''' button to merge all materials and texture coordinates into a new single mesh. | |||
[[Image:merge_armmesh.jpg]] | |||
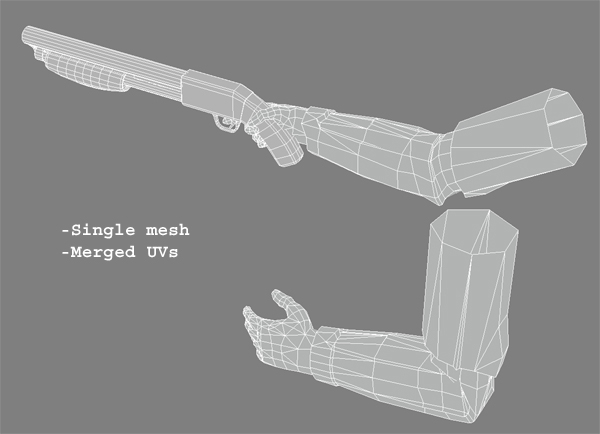
XSI creates an additional mesh after a merge (named Polymesh). Freeze the new mesh before deleting the old meshes. | |||
[[Image:singlemesh.jpg]] | |||
==Rigging== | |||
Now attach the mesh to your rig. Although I used a rig with fully articulate fingers to pose my hand gripping the gun ('''figure A.'''), for the final version I will use a ''single'' bone to control the rotation and translation of the hand and shotgun ('''figure B.'''). High bone counts can be ''very costly'' and with view models you can't take advantage of bone L.O.D.s like you can with characters because its always close to your view-point. If you find that you need to see the finger move (pulling the trigger for example) then add one bone to your scene which is a child of your hand-bone. My right hand (gun holding hand) ''usually'' consists of three bones. One for the elbow, hand, and gun. This example will only have two (elbow and hand) because I already know that my hand will never let go of my shotgun handle. Of course, you will have extra bones parented to the gun if the gun has moving parts such as clips, bolts, etc. | |||
Plan ahead before you create a rig for your weapon. If you find out that none of your animations require the right hand to ever let go | |||
of the handle, don't put bones in all of the fingers of the right hand. | |||
[[Image:simple_rig.jpg]] | |||
Rig the left hand depending on what animations are needed. For the shotgun, I want the left hand to be fully articulate for the reload animation. This is a very old example (notice the old rig) or I would have made the last two fingers of the hand use the same bone controls. | |||
[[Image:left_hand_rig.jpg]] | |||
Once rigged and animated, delete any faces that are not seen in your camera viewport. Re-export your reference file smd. In the below example the faces from the elbows to the shoulders have been deleted. Other areas to look at would be the right-bottom forearm, the back of the right hand, and the right side and underneath of the shotgun. | |||
[[Image:reduced.jpg]] | |||
==Editing the QC file== | |||
Below is our shotgun qc file. I will go over some of the commands that are a little less straight forward. | |||
'''$Origin 0 0 68''' - As stated above, this command compensates for me animating the weapon at the players eye-height in XSI | |||
'''$Attachment''' - The muzzle attachment, for example, dictates where the muzzle flash sprite/effect occurs. One easy way to create an attachment is to parent a null to a bone in XSI. ''Be sure to export with the option of keeping unused bones!'' | |||
'''Nodes''' - We use nodes to to tell the character what state it is in. In the below example I use nodes to tell the weapon whether or not it is pointed at an friendly NPC or not (In HL2, we lower the weapon when pointed at friendly NPCs). If you do not need this feature simply exclude all node commands from your weapon. | |||
$modelname weapons/v_shotgun.mdl | |||
$body studio "Shotgun_reference.smd" | |||
$origin 0 0 68 | |||
//Muzzle flash | |||
$attachment "muzzle" "ValveBiped.Muzzle" 0 0 0 rotate -90 0 0 rigid | |||
//Shell eject | |||
$attachment 1 "ValveBiped.Eject" 0 0 0 rotate 180 0 0 rigid | |||
$sequence idle01 "Idle01" loop fps 30 activity ACT_VM_IDLE 1 node 0 | |||
$sequence fire01 "Fire01" fps 30 snap activity ACT_VM_PRIMARYATTACK 1 { event AE_MUZZLEFLASH 0 "SHOTGUN MUZZLE" } node 2 | |||
$sequence altfire "Alt_fire01" fps 30 snap activity ACT_VM_SECONDARYATTACK 1 { event AE_MUZZLEFLASH 0 "SHOTGUN MUZZLE" } node 2 | |||
$sequence draw "Draw" fps 30 snap activity ACT_VM_DRAW 1 node 0 | |||
$sequence holster "Holster" fps 30 activity ACT_VM_HOLSTER 1 node 0 | |||
$sequence reload1 "Reload_start" fps 30 activity ACT_SHOTGUN_RELOAD_START 1 node 0 | |||
$sequence reload2 "Reload_load_shell" fps 30 activity ACT_VM_RELOAD 1 node 0 | |||
$sequence reload3 "Reload_finish" fps 30 activity ACT_SHOTGUN_RELOAD_FINISH 1 node 0 | |||
$sequence pump "Pump" fps 30 activity ACT_SHOTGUN_PUMP 1 { event 6001 5 "2" } node 0 | |||
$sequence dryfire "Dryfire" fps 30 activity ACT_VM_DRYFIRE 1 node 2 | |||
$sequence lowered "Non_threat_idle01" loop activity ACT_VM_IDLE_LOWERED 1 node 1 | |||
$sequence lowered_to_idle "Non_threat_to_idle01" activity ACT_VM_LOWERED_TO_IDLE 1 transition 1 0 | |||
$sequence idle_to_lowered "Idle01_to_non_threat" activity ACT_VM_IDLE_TO_LOWERED 1 transition 0 1 | |||
Happy hunting!! | |||
[[Image:hl2-1.jpg]] | |||
Revision as of 14:58, 13 July 2005
Creating a view model for Source using XSI
Camera Setup
Lets start by positioning the camera in XSI to give us a similar view as what we will be seeing in the game. You can do this in two different ways as described below (A. and B.). The Source engine supports any F.O.V., but if you use 54 (which is close to the human eye) you will be able to model a weapon to correct scale without having it look distorted in the engine. We actually use a dual F.O.V. system with Source. In Half-Life 2 the world is rendered at 75 F.O.V. while our weapons are rendered at 54.
(A.) Set a 54 degree F.O.V. perspective camera at origin 0,0,0 facing down the Positive Z axis.
(B.) Set a 54 degree F.O.V. perspective camera at origin, using the coordinates shown below, facing along the Positive Z axis. Use the QC command $Origin 0 0 68 to compensate. This way is useful when you need to merge in character rigs to animate with, otherwise it is recommended to use example (A.)
Positioning
If its not in the scene already, merge/import your weapon mesh. Position your weapon to where it looks best in the camera view. To do this move the weapon mesh and not the camera. I recommend doing this before you finish your model because its good to see where to best spend your polygons. As you can see in the below picture (area marked as A.) the front of the shotgun mesh has some detail near the barrel that is not seen in the camera view. Those polygons would perhaps be best used up near the handle or simply deleted.
Merging texture coordinates
In this example, the shotgun and arms have been modeled and textured separately (You will first need to step into the world of imagination and pretend that my example is textured). View model weapons need to consist of a single mesh, so we need to merge both the shotgun and arm meshes together while keeping the texture coordinates in tact. Do to this, merge the arm mesh into the scene File > Merge, next, under the Model panel select Poly. Mesh > Merge. A dialog box will then pop up (shown below). I usually put the tolerance to 0. The tolerance will weld verts that are close to each other. The higher the tolerance number, the more verts will be welded together. This is handy for when you are stitching two models together, such as modeling one side of an object, duplicating and mirroring it, and then welding it back to the original. For this example however, I don't want the hand verts to be welded to any of the weapon verts. Click the All button to merge all materials and texture coordinates into a new single mesh.
XSI creates an additional mesh after a merge (named Polymesh). Freeze the new mesh before deleting the old meshes.
Rigging
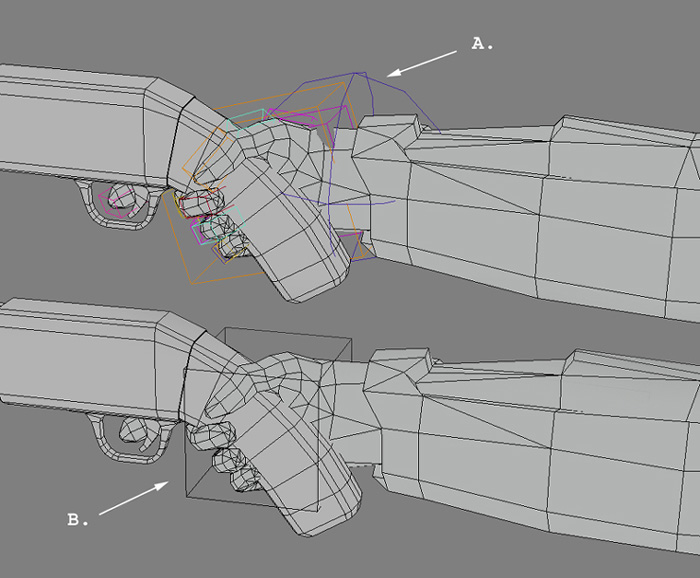
Now attach the mesh to your rig. Although I used a rig with fully articulate fingers to pose my hand gripping the gun (figure A.), for the final version I will use a single bone to control the rotation and translation of the hand and shotgun (figure B.). High bone counts can be very costly and with view models you can't take advantage of bone L.O.D.s like you can with characters because its always close to your view-point. If you find that you need to see the finger move (pulling the trigger for example) then add one bone to your scene which is a child of your hand-bone. My right hand (gun holding hand) usually consists of three bones. One for the elbow, hand, and gun. This example will only have two (elbow and hand) because I already know that my hand will never let go of my shotgun handle. Of course, you will have extra bones parented to the gun if the gun has moving parts such as clips, bolts, etc.
Plan ahead before you create a rig for your weapon.  If you find out that none of your animations require the right hand to ever let go
of the handle, don't put bones in all of the fingers of the right hand.
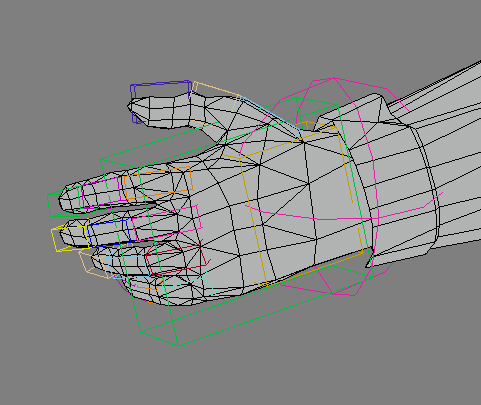
Rig the left hand depending on what animations are needed. For the shotgun, I want the left hand to be fully articulate for the reload animation. This is a very old example (notice the old rig) or I would have made the last two fingers of the hand use the same bone controls.
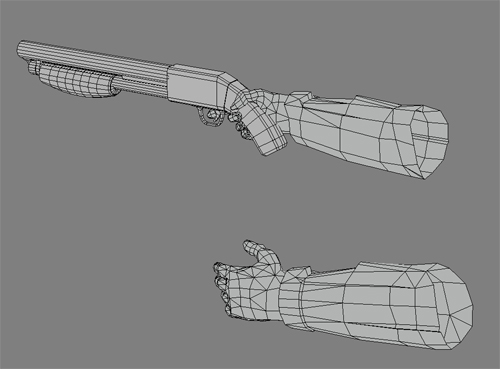
Once rigged and animated, delete any faces that are not seen in your camera viewport. Re-export your reference file smd. In the below example the faces from the elbows to the shoulders have been deleted. Other areas to look at would be the right-bottom forearm, the back of the right hand, and the right side and underneath of the shotgun.
Editing the QC file
Below is our shotgun qc file. I will go over some of the commands that are a little less straight forward.
$Origin 0 0 68 - As stated above, this command compensates for me animating the weapon at the players eye-height in XSI
$Attachment - The muzzle attachment, for example, dictates where the muzzle flash sprite/effect occurs. One easy way to create an attachment is to parent a null to a bone in XSI. Be sure to export with the option of keeping unused bones!
Nodes - We use nodes to to tell the character what state it is in. In the below example I use nodes to tell the weapon whether or not it is pointed at an friendly NPC or not (In HL2, we lower the weapon when pointed at friendly NPCs). If you do not need this feature simply exclude all node commands from your weapon.
$modelname weapons/v_shotgun.mdl
$body studio "Shotgun_reference.smd"
$origin 0 0 68
//Muzzle flash
$attachment "muzzle" "ValveBiped.Muzzle" 0 0 0 rotate -90 0 0 rigid
//Shell eject
$attachment 1 "ValveBiped.Eject" 0 0 0 rotate 180 0 0 rigid
$sequence idle01 "Idle01" loop fps 30 activity ACT_VM_IDLE 1 node 0
$sequence fire01 "Fire01" fps 30 snap activity ACT_VM_PRIMARYATTACK 1 { event AE_MUZZLEFLASH 0 "SHOTGUN MUZZLE" } node 2
$sequence altfire "Alt_fire01" fps 30 snap activity ACT_VM_SECONDARYATTACK 1 { event AE_MUZZLEFLASH 0 "SHOTGUN MUZZLE" } node 2
$sequence draw "Draw" fps 30 snap activity ACT_VM_DRAW 1 node 0
$sequence holster "Holster" fps 30 activity ACT_VM_HOLSTER 1 node 0
$sequence reload1 "Reload_start" fps 30 activity ACT_SHOTGUN_RELOAD_START 1 node 0
$sequence reload2 "Reload_load_shell" fps 30 activity ACT_VM_RELOAD 1 node 0
$sequence reload3 "Reload_finish" fps 30 activity ACT_SHOTGUN_RELOAD_FINISH 1 node 0
$sequence pump "Pump" fps 30 activity ACT_SHOTGUN_PUMP 1 { event 6001 5 "2" } node 0
$sequence dryfire "Dryfire" fps 30 activity ACT_VM_DRYFIRE 1 node 2
$sequence lowered "Non_threat_idle01" loop activity ACT_VM_IDLE_LOWERED 1 node 1
$sequence lowered_to_idle "Non_threat_to_idle01" activity ACT_VM_LOWERED_TO_IDLE 1 transition 1 0
$sequence idle_to_lowered "Idle01_to_non_threat" activity ACT_VM_IDLE_TO_LOWERED 1 transition 0 1
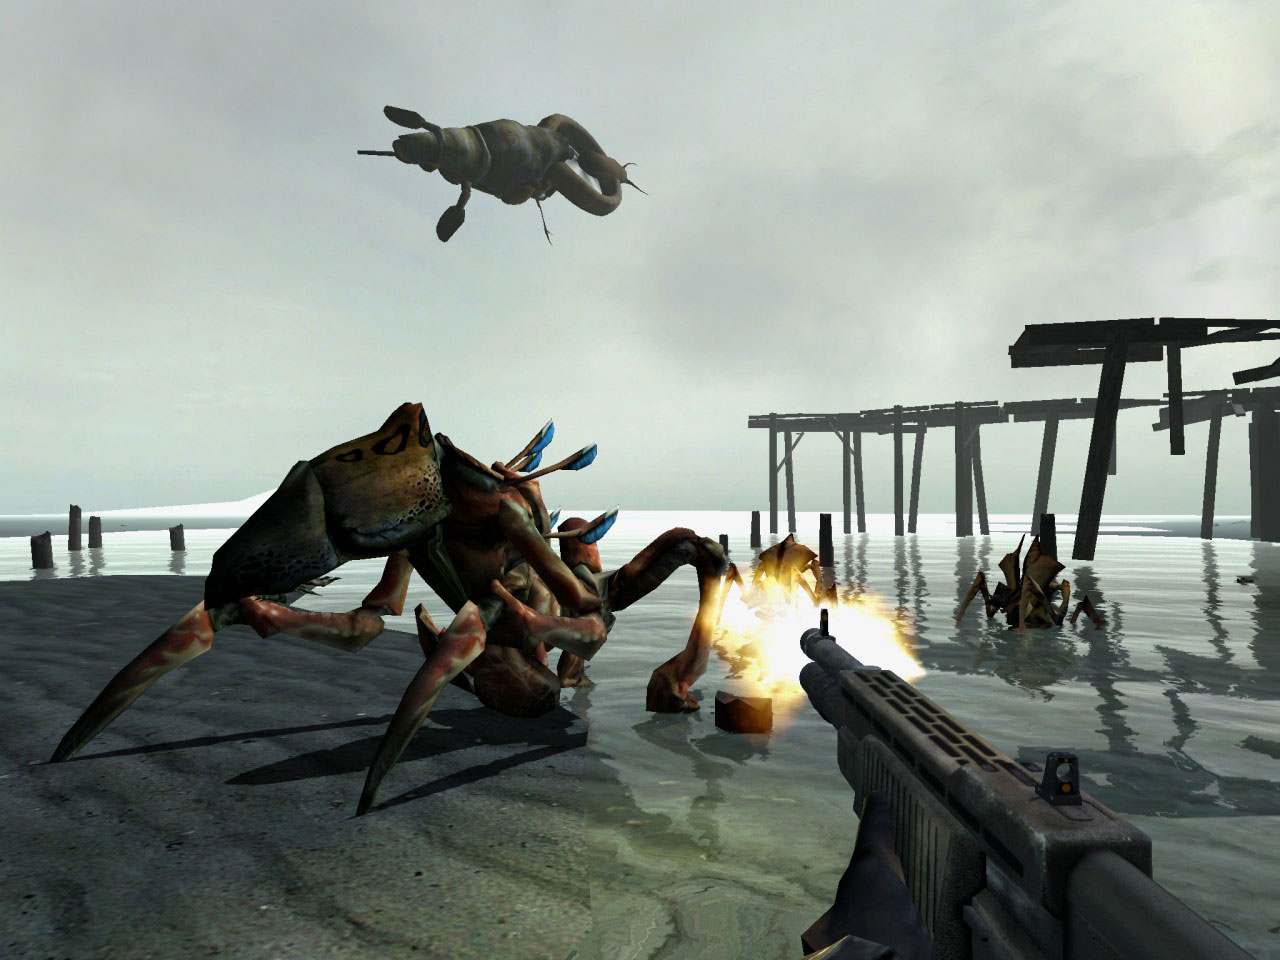
Happy hunting!!
