Compiling under VS2005: Difference between revisions
TomEdwards (talk | contribs) m (→Windows SDK) |
TomEdwards (talk | contribs) m (→Windows SDK) |
||
| Line 27: | Line 27: | ||
[[Image:Vc2005 dirs.png|center|Adding the Windows SDK's includes.]] | [[Image:Vc2005 dirs.png|center|Adding the Windows SDK's includes.]] | ||
Hit OK to return to the workspace. Now right-click on on the server project and choose Properties. Navigate to ''Configuration Properties > Linker > Input'' and add <code>user32.lib</code> to the first setting. It should now read <code>winmm.lib user32.lib</code>. Repeat this in Release mode (choose it from the top-left drop-down list), then repeat both modes again for the client project. | |||
If you get "unresolved external" errors, try adding <code>kernel32.lib</code> as well. | If you get "unresolved external" errors, try adding <code>kernel32.lib</code> as well. | ||
Revision as of 15:01, 17 March 2009
Visual Studio 2005 is the officially-supported IDE of the Source SDK, and if all is well you won't need to do anything special to use it. If you're using Visual C++ 2005 Express or if something is awry however, this page should get you up and running. It assumes you are compiling the Orange Box source code.
Installing
If you don't already have VS2005, you can download the free C++ Express version from Microsoft. After it has installed, run Windows Update to patch it. Do this twice if you are using Windows Vista to catch a compatibility update.
Windows SDK
If you're using Visual C++ Express 2005 you will need to install the Windows SDK to compile the game client.
It doesn't matter which version you download; this one does the job well enough. Don't worry that it talks about Vista - it also covers XP. Windows 2000 users however need to download the older Platform SDK instead.
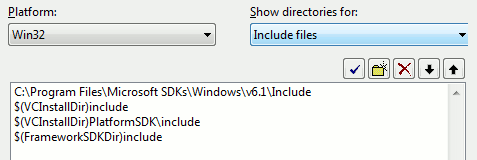
Once you have the Windows SDK installed, you need to tell Visual C++ where the SDK is located. To do this, navigate to Tools > Options > Projects and Solutions > VC++ Directories. Add the Windows SDK's \bin folder to the list. The default location is:
C:\Program Files\Microsoft SDKs\Windows\v6.1\bin
Click on the drop-down list that currently says "Executable files". You now need to add the \include folder to the 'Includes' list and the \lib folder to the 'Library' list.
Hit OK to return to the workspace. Now right-click on on the server project and choose Properties. Navigate to Configuration Properties > Linker > Input and add user32.lib to the first setting. It should now read winmm.lib user32.lib. Repeat this in Release mode (choose it from the top-left drop-down list), then repeat both modes again for the client project.
If you get "unresolved external" errors, try adding kernel32.lib as well.
intrin.h errors
This is a bug with VC++2005 that you may encounter. To fix it, open C:\Program Files\Microsoft Visual Studio 8\VC\include\intrin.h and comment out lines 944 and 945. This fixes a contradiction between two VC++ header files and shouldn't cause any damage.
Fixing the custom build step
- This problem is fixed in the current SDK Beta.
The project files created by the mod wizard won't put your compiled DLLs in the right folders.
Open the client (and then server) properties and navigate to Configuration Properties -> Custom Build Step -> General. Click the '...' button on the right of Command Line and replace everything there with this:
if exist "c:\program files\steam\steamapps\SourceMods\MyMod\bin\client.dll"
attrib -r "c:\program files\steam\steamapps\SourceMods\MyMod\bin\client.dll"
copy "$(TargetDir)"client.dll "c:\program files\steam\steamapps\SourceMods\MyMod\bin"
Then in Output, paste:
c:\program files\steam\steamapps\SourceMods\MyMod\bin\client.dll
Remember to replace MyMod with the actual name of your mod, and to replace client with server when correcting that project.
You will need to perform the same fix for Release mode. Click the drop-down list in the top-left and choose it, then repeat the above. In addition, you will want to paste this if you intend to debug the release build:
if exist "c:\program files\steam\steamapps\SourceMods\MyMod\bin\client.pdb"
attrib -r "c:\program files\steam\steamapps\SourceMods\MyMod\bin\client.pdb"
copy "$(TargetDir)"client.pdb "c:\program files\steam\steamapps\SourceMods\MyMod\bin"
If you do this, add the PDB file to Output as well.
Running your mod
Remember to run with -allowdebug if you've got debug builds!
