Creating a Waterfall Material: Difference between revisions
No edit summary |
Thunder4ik (talk | contribs) m (Unicodifying, replaced: [[Image: → [[File: (4)) |
||
| (45 intermediate revisions by 10 users not shown) | |||
| Line 1: | Line 1: | ||
This is a Tutorial to create a Waterfall material for use on a brush in hammer. It will scroll downward and refract the image behind it. | |||
You can look at the result of the material at the bottom of this page, and download a sample. | |||
== The | == The Bump Map == | ||
A waterfall requires a normal map (which is a type of [[Bump Map|bump map]]). We will create this bump map and then get it to scroll. This will give the illusion of moving, refracting water.<br> | |||
For this tutorial you can use an image editing program of your choice. For many it is best to use [[GIMP]] as it free and open source. However, you can use the costly closed source Adobe Photoshop - instructions for both are given here. | |||
We create | |||
[[ | |||
This tutorial will provide instructions for [[VTFEdit]] later on. There are other options, but are out of the scope of this tutorial. | |||
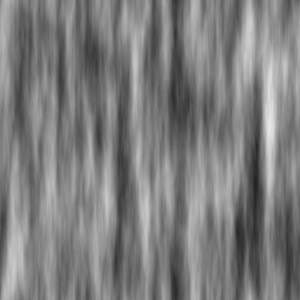
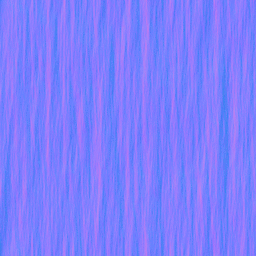
[[File:Solid_noise(15%2C16%2C1_2).png|thumb|The 'solid noise' image or 'base']][[File:Solid_noise_n(15%2C16%2C1_2).png|thumb|The 'bump map' (Normalmap) image]] | |||
[[ | |||
'''For Photoshop''' | |||
#Open Photoshop, and create a document with: | |||
#* A maximum size of 1024x1024; this has to be a power of 2 and it's best to be square. | |||
#* Resolution of 200. The default of 72 may make the image lower quality. | |||
#* Background Contents set to "Background Color". | |||
#After creating the document, create a Solid Noise effect by: ''Filter → Render → Clouds''. | |||
#To achieve the "falling" effect that you see to the right: | |||
#* ''Filter → Render → Fibers''. Then change the options to how you see fit. | |||
#Save your file as TGA, or PNG for the best quality. | |||
'''For Gimp''' | |||
#Open GIMP, and create a document with: | |||
#* A maximum size of 1024x1024; this has to be a power of 2 and it's best to be square. | |||
#We must now create a Solid Noise effect. ''Filters → Render → Clouds → Solid noise''. Set: | |||
#* ''x'' to ''16.0''(the highest possible) | |||
#* ''y'' to between ''1.0'' ''and 3.0'' | |||
#* ''Detail'' to ''15''(highest possible) | |||
#* Finally, you must check the ''Tilable'' box to make it seamless. | |||
#Save your file as TGA, or PNG for the best quality. | |||
'''Continuing from either...''' | |||
{{note|This grey scale image you made will be referred to as the "base image" from now on.}} | |||
#Import this file into [[VTFEdit]]. '''Keep an extra copy of the base image''' since we will need it later on. | |||
# When the dialog comes up, select these options: | |||
#* ''Normal Format'' and ''Alpha Format'' → '''DXT5'''. | |||
#* ''Texture Type'' → '''Animated Texture'''. | |||
#* ''Resize'' → '''Un-check''' or remove the check in the box. Only needed if it isn't square or power of 2. | |||
# Check the texture config dialogue's ''Generate Normal map'' box and set: | |||
#* ''Kernel Filter'' to '''4 Sample''' | |||
#* ''Height Source'' to '''Average RGB''' | |||
#* ''Scale'' to '''9.0''' | |||
# In the "Advanced" tab change the "DXT Compression" to '''High'''. | |||
#Save this new image (which is your [[bump map]]) in a folder like "nature/" in your mod materials folder or game materials folder and give it a name like "''waterfall_norm.vtf''". | |||
{{Note|The "norm" in the file name stands for normal map.}} | |||
== The Material == | == The Material == | ||
''' | === The Basic Material === | ||
First you have to create a valve material type file ([[vmt]]) and name it something like waterfall.vmt. | |||
{{note|This file should have the same base file name as the Bump Map we created above.}} | |||
In the material file you should use the '''[[Refract]]''' shader: | |||
'''Refract''' | |||
{ | { | ||
} | } | ||
<br> | <br> | ||
{{note|Since we are using the refract shader not lightmappedgeneric we '''don't need a $basetexture''' for this vmt file (or shader).}} | |||
That is now the base of our waterfall Material. Now we add the Bump Map (Normalmap) with '''$normalmap''' and the path to it (Ex. ''"nature/waterfall_norm"''). | |||
For the right refraction amount we add '''$refractamount''' with a value between 0 and 1. We will use ''0.08''. | |||
Refract | |||
{ | { | ||
''' | '''$normalmap nature/waterfall_norm''' | ||
'''$refractamount .08''' | |||
} | } | ||
See the [[Refract]] article for more commands you may want to use. | |||
=== Scroll Animation === | |||
If you were to use your material in a map now, you would see that the refraction is frozen. To make it look like it's a waterfall, we will have to add a scrolling effect. | |||
We can do this with an animated texture, or the easier way is to add the [[TextureScroll]] [[Material Proxy]]: | |||
Proxies | |||
{ | { | ||
[[TextureScroll]] | |||
{ | { | ||
'''texturescrollvar $bumpTransform''' | |||
'''texturescrollrate 1.3''' | |||
'''texturescrollangle 270.00''' | |||
} | } | ||
} | } | ||
So now the whole vmt should look like this: | |||
Refract | |||
{ | { | ||
$normalmap nature/waterfall_norm | |||
$refractamount .08 | |||
Proxies | |||
{ | { | ||
TextureScroll | |||
{ | { | ||
texturescrollvar $bumpTransform | |||
texturescrollrate 1.3 | |||
texturescrollangle 270.00 | |||
} | } | ||
} | } | ||
} | } | ||
=== Optional: | ===Adding an Optional Refract Mask=== | ||
Refracting masks go a long way for water based effects, often they can help to give depth to a refracting effect. In water's case, we can use it to help simulate a multitude of effects. | |||
At the beginning of the tutorial we created a noise based image. That image can help serve as a refracting mask for the waterfall effect. As we did before,load it up in VTFEdit. Refracting masks require an [[alpha channel]]. This tutorial will not go over creating the said alpha channel however. | |||
After you have created the image's alpha channel save it your materials directory where the other waterfall material files are (DXT5 format). We must then add the following commands into the waterfall's [[vmt]]: | |||
"$refracttinttexture" "particle\liquids\waterflow_mask_corner" | |||
''Replacing the path to where your refracting mask is located.'' | |||
$refracttint "[1.5 1.5 1.5]" | |||
Refract tint can help control the opacity of the refracting mask. In this case it can help to make the water darker, or lighter, even help illuminate the effect itself more in areas where this might become desirable. | |||
== Summary == | |||
We created a realistic looking waterfall texture. It required a bump map and a valve material type file. We had the option of adding an Refract Mask to improve the look of the material. | |||
You can download a sample of the finished texture [http://s3g.brainnerd.com/forum/index.php/topic,142.0.html here]. | |||
<br> | |||
''You can also download a sample map that uses the textures created in this tutorial from the same site.'' | |||
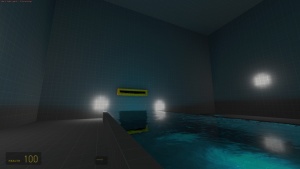
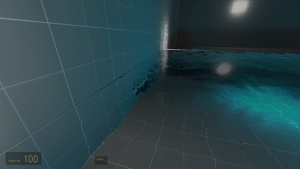
[[File:Waterfall-Screenshot.jpg|thumb|300px|left|alt=Image of waterfall.|Waterfall texture sample.]][[File:Waterfall-Screenshot2.jpg|thumb|300px|right|alt=Image of waterfall.|Another waterfall texture sample.]] | |||
[[Category:Material System]] | |||
[[Category:Tutorials]] | |||
Latest revision as of 23:18, 6 January 2024
This is a Tutorial to create a Waterfall material for use on a brush in hammer. It will scroll downward and refract the image behind it.
You can look at the result of the material at the bottom of this page, and download a sample.
The Bump Map
A waterfall requires a normal map (which is a type of bump map). We will create this bump map and then get it to scroll. This will give the illusion of moving, refracting water.
For this tutorial you can use an image editing program of your choice. For many it is best to use GIMP as it free and open source. However, you can use the costly closed source Adobe Photoshop - instructions for both are given here.
This tutorial will provide instructions for VTFEdit later on. There are other options, but are out of the scope of this tutorial.
For Photoshop
- Open Photoshop, and create a document with:
- A maximum size of 1024x1024; this has to be a power of 2 and it's best to be square.
- Resolution of 200. The default of 72 may make the image lower quality.
- Background Contents set to "Background Color".
- After creating the document, create a Solid Noise effect by: Filter → Render → Clouds.
- To achieve the "falling" effect that you see to the right:
- Filter → Render → Fibers. Then change the options to how you see fit.
- Save your file as TGA, or PNG for the best quality.
For Gimp
- Open GIMP, and create a document with:
- A maximum size of 1024x1024; this has to be a power of 2 and it's best to be square.
- We must now create a Solid Noise effect. Filters → Render → Clouds → Solid noise. Set:
- x to 16.0(the highest possible)
- y to between 1.0 and 3.0
- Detail to 15(highest possible)
- Finally, you must check the Tilable box to make it seamless.
- Save your file as TGA, or PNG for the best quality.
Continuing from either...
- Import this file into VTFEdit. Keep an extra copy of the base image since we will need it later on.
- When the dialog comes up, select these options:
- Normal Format and Alpha Format → DXT5.
- Texture Type → Animated Texture.
- Resize → Un-check or remove the check in the box. Only needed if it isn't square or power of 2.
- Check the texture config dialogue's Generate Normal map box and set:
- Kernel Filter to 4 Sample
- Height Source to Average RGB
- Scale to 9.0
- In the "Advanced" tab change the "DXT Compression" to High.
- Save this new image (which is your bump map) in a folder like "nature/" in your mod materials folder or game materials folder and give it a name like "waterfall_norm.vtf".
The Material
The Basic Material
First you have to create a valve material type file (vmt) and name it something like waterfall.vmt.
In the material file you should use the Refract shader:
Refract
{
}
That is now the base of our waterfall Material. Now we add the Bump Map (Normalmap) with $normalmap and the path to it (Ex. "nature/waterfall_norm").
For the right refraction amount we add $refractamount with a value between 0 and 1. We will use 0.08.
Refract
{
	$normalmap nature/waterfall_norm
 	$refractamount .08
}
See the Refract article for more commands you may want to use.
Scroll Animation
If you were to use your material in a map now, you would see that the refraction is frozen. To make it look like it's a waterfall, we will have to add a scrolling effect.
We can do this with an animated texture, or the easier way is to add the TextureScroll Material Proxy:
Proxies
{
	TextureScroll
	{
		texturescrollvar $bumpTransform
		texturescrollrate 1.3
		texturescrollangle 270.00
	}
}
So now the whole vmt should look like this:
Refract
{
	$normalmap nature/waterfall_norm
	$refractamount .08
	Proxies
	{
		TextureScroll
		{
			texturescrollvar $bumpTransform
			texturescrollrate 1.3
			texturescrollangle 270.00
		}
	}
}
Adding an Optional Refract Mask
Refracting masks go a long way for water based effects, often they can help to give depth to a refracting effect. In water's case, we can use it to help simulate a multitude of effects.
At the beginning of the tutorial we created a noise based image. That image can help serve as a refracting mask for the waterfall effect. As we did before,load it up in VTFEdit. Refracting masks require an alpha channel. This tutorial will not go over creating the said alpha channel however.
After you have created the image's alpha channel save it your materials directory where the other waterfall material files are (DXT5 format). We must then add the following commands into the waterfall's vmt:
"$refracttinttexture" "particle\liquids\waterflow_mask_corner"
Replacing the path to where your refracting mask is located.
$refracttint "[1.5 1.5 1.5]"
Refract tint can help control the opacity of the refracting mask. In this case it can help to make the water darker, or lighter, even help illuminate the effect itself more in areas where this might become desirable.
Summary
We created a realistic looking waterfall texture. It required a bump map and a valve material type file. We had the option of adding an Refract Mask to improve the look of the material.
You can download a sample of the finished texture here.
You can also download a sample map that uses the textures created in this tutorial from the same site.


