Editing VPC scripts: Difference between revisions
SirYodaJedi (talk | contribs) m (→Closing notes) |
|||
| (11 intermediate revisions by 3 users not shown) | |||
| Line 1: | Line 1: | ||
== Editing VPC Scripts == | == Editing VPC Scripts == | ||
This tutorial will show you how to edit [[Valve Project Creator|VPC]] scripts in the source code so you can add and remove files from the visual studio 2013 solution. | |||
This tutorial will show you how to edit [[Valve Project Creator|VPC]] scripts in the source code so you can add and remove files from the visual studio 2013 solution | |||
=== The directory === | === The directory === | ||
You will first need to go to your mods source code folder and find the folder named "'''vpc_scripts'''". In here you will find all of the important VPC scripts for creating the solution as shown here: | |||
here you will find all of the important VPC scripts for creating the solution | |||
as shown here: | |||
[[File:Vpc_scripts_directory.png]] | [[File:Vpc_scripts_directory.png]] | ||
continue to the "'''vpc_scripts'''" folder | Now continue to the "'''vpc_scripts'''" folder and after you have entered the vpc script folder you should be able to see the following files: | ||
after you have entered the vpc script folder you should be | |||
[[File:vpc_scripts_directory_listing.png]] | [[File:vpc_scripts_directory_listing.png]] | ||
After you have entered the folder, then we continue onto the next step. | |||
=== The script files === | === The script files === | ||
Now we are going to be editing a vpc script. | |||
In this example I will show you how to add a library to the vpc script so that when you build the '''.sln''' file it will appear in the solution browser. In this example we will be adding the '''discord-rpc.lib''' file to enable us to use. | |||
[[Implementing Discord RPC|Discord RPC]] | [[Implementing Discord RPC|Discord RPC]] | ||
{{note|you are going to need to get the files for rpc of discord github page and put the '''.lib''' file inside the "'''lib/public'''" folder}} | {{note|you are going to need to get the files for rpc of discord github page and put the '''.lib''' file inside the "'''lib/public'''" folder}} | ||
Open up "'''source_dll_win32_base.vpc'''" with a text editor and scroll down to the bottom where you will see the following. | |||
Open up "'''source_dll_win32_base.vpc'''" with a text editor and scroll down to the bottom where you will see the following | |||
<pre> | <pre> | ||
$Folder "Link Libraries" | $Folder "Link Libraries" | ||
| Line 44: | Line 32: | ||
</pre> | </pre> | ||
Now to add the new library you are going to add the following line underneath '''$Implib "$LIBPUBLIC\vstdlib"''' . | |||
<pre> | <pre> | ||
$Implib "$LIBPUBLIC\ | $Implib "$LIBPUBLIC\discord-rpc" | ||
</pre> | </pre> | ||
Once you're done that, simply save the vpc file. | |||
Congratulations! | Congratulations! You have successfully added a library inside Visual Studio 2013. | ||
=== Adding files to the server/client === | === Adding files to the server/client === | ||
Adding files is as easy as the last step. | |||
Only this time we are going outside the "'''vpc_scripts'''" folder and are going to enter the "'''game/client'''" folder and find the "'''client_base.vpc'''" file and open that with a script editor | |||
{{note|if you are working with the hl2 source code only and not the episodic code you shoud open the appropriate .vpc file}} | |||
and find the "client_base.vpc" file and open that with a script editor | |||
{{note|if you are working with the hl2 only and not the episodic code you shoud open the appropriate .vpc file}} | |||
==== adding a .h file ==== | ==== adding a .h file ==== | ||
Now in this example we will be adding a .h file and a .cpp file. | |||
Open up the vpc file with a text editor and find the following line. | |||
<pre> | <pre> | ||
$Folder "Public Header Files" | $Folder "Public Header Files" | ||
</pre> | </pre> | ||
Now we are going to add a header file to our vpc script with the following line. | Now we are going to add a header file to our vpc script with the following line. | ||
<pre> | <pre> | ||
$File "$SRCDIR\public\discord_register.h" | $File "$SRCDIR\public\discord_register.h" | ||
| Line 77: | Line 60: | ||
</pre> | </pre> | ||
Nice you have added a header file into the vpc script save it and you are done. | |||
==== adding a .cpp file ==== | ==== adding a .cpp file ==== | ||
Now we are going to be adding in a .cpp file to our solution we are now going to edit the server .vpc script | |||
go to the "'''game/server'''" folder and open up "'''server_episodic.vpc'''" in a text editor | go to the "'''game/server'''" folder and open up "'''server_episodic.vpc'''" in a text editor | ||
| Line 103: | Line 85: | ||
==== Renaming projects inside vpc ==== | ==== Renaming projects inside vpc ==== | ||
in this example we will be renaming the "server (episodic)" and "client (episodic)" projects inside of the vpc script | in this example we will be renaming the "'''server (episodic)'''" and "'''client (episodic)'''" projects inside of the vpc script | ||
go over to the "game/server" folder and open up "server_episodic.vpc" with a text editor | go over to the "'''game/server'''" folder and open up "'''server_episodic.vpc'''" with a text editor | ||
you are going to see the following line | you are going to see the following line | ||
| Line 112: | Line 94: | ||
</pre> | </pre> | ||
we are going to rename it to something like "Server (MyMod)" like this: | we are going to rename it to something like "'''Server (MyMod)'''" like this: | ||
<pre> | <pre> | ||
$Project "Server (MyMod)" | $Project "Server (MyMod)" | ||
| Line 119: | Line 101: | ||
for renaming the client project its the same as for the server project | for renaming the client project its the same as for the server project | ||
go to "game/client" and open up "client_episodic.vpc" | go to "'''game/client'''" and open up "'''client_episodic.vpc'''" | ||
now go to the following line | now go to the following line | ||
| Line 160: | Line 142: | ||
== Closing notes == | == Closing notes == | ||
Remember to run the '''.bat''' file for creating the '''.sln''' file after you edit any vpc script | {{note|Remember to run the '''.bat''' file for creating the '''.sln''' file after you edit any vpc script}} | ||
This is a pretty basic editing tutorial for .vpc script files if you want to learn more try experimenting with the vpc scripts and get yourself accustomed to the format if you know more about vpc script editing edits are appreciated | |||
[[Category:File formats|VPC]] | |||
[[Category:Plain text formats|VPC]] | |||
Latest revision as of 14:08, 17 September 2024
Editing VPC Scripts
This tutorial will show you how to edit VPC scripts in the source code so you can add and remove files from the visual studio 2013 solution.
The directory
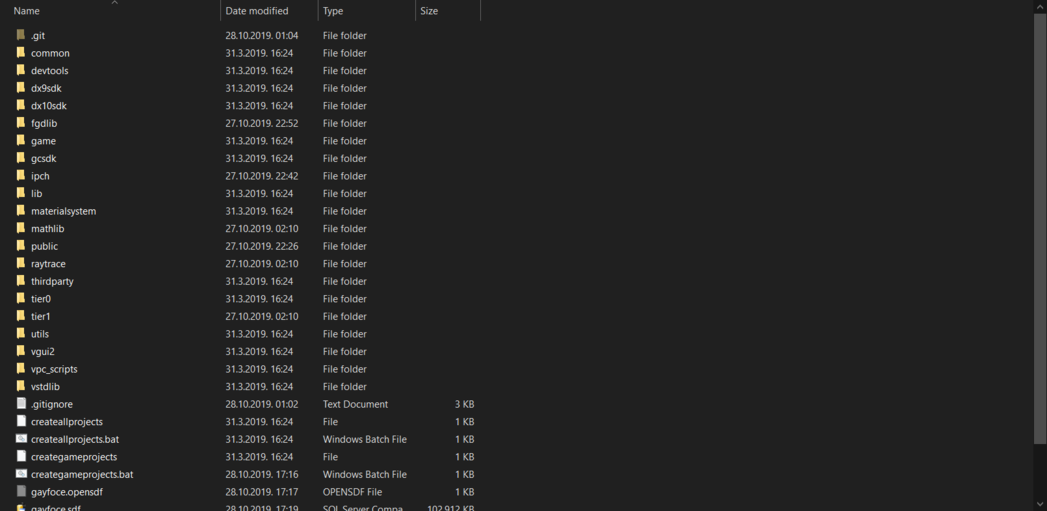
You will first need to go to your mods source code folder and find the folder named "vpc_scripts". In here you will find all of the important VPC scripts for creating the solution as shown here:
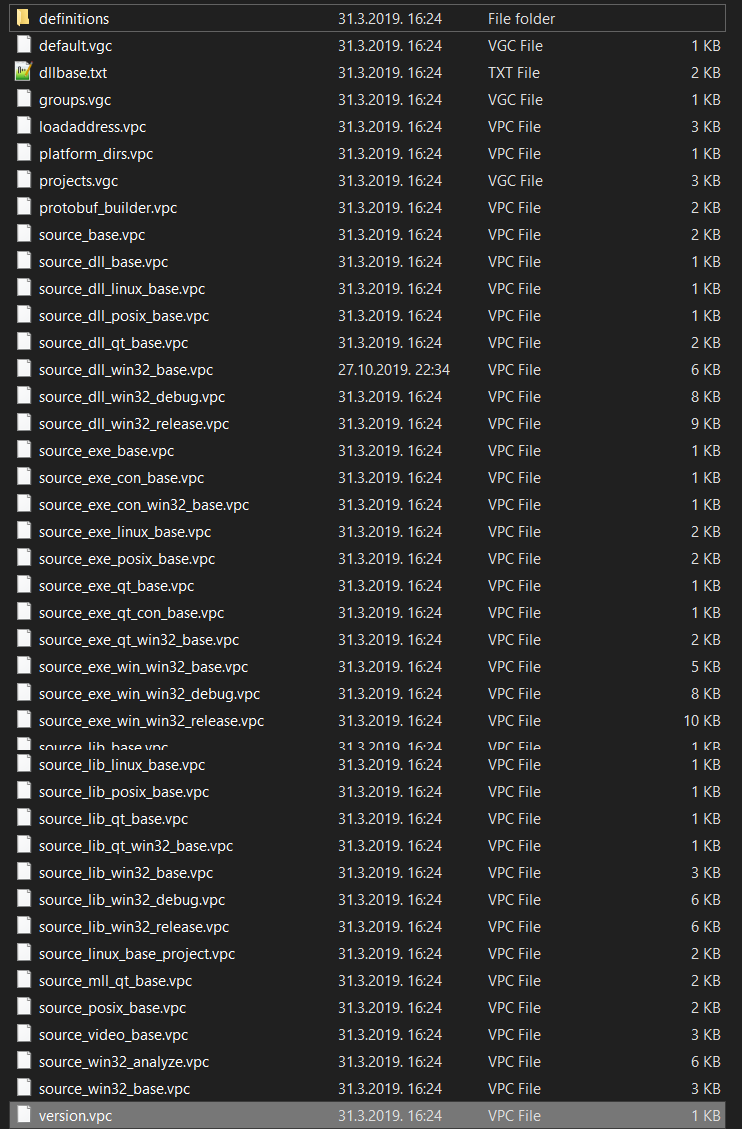
Now continue to the "vpc_scripts" folder and after you have entered the vpc script folder you should be able to see the following files:
After you have entered the folder, then we continue onto the next step.
The script files
Now we are going to be editing a vpc script.
In this example I will show you how to add a library to the vpc script so that when you build the .sln file it will appear in the solution browser. In this example we will be adding the discord-rpc.lib file to enable us to use.
Open up "source_dll_win32_base.vpc" with a text editor and scroll down to the bottom where you will see the following.
$Folder	"Link Libraries"
	{
		$Implib	"$LIBPUBLIC\tier0"
		$Lib	"$LIBPUBLIC\tier1"
		$Implib	"$LIBPUBLIC\vstdlib"
	}
Now to add the new library you are going to add the following line underneath $Implib "$LIBPUBLIC\vstdlib" .
$Implib "$LIBPUBLIC\discord-rpc"
Once you're done that, simply save the vpc file.
Congratulations! You have successfully added a library inside Visual Studio 2013.
Adding files to the server/client
Adding files is as easy as the last step.
Only this time we are going outside the "vpc_scripts" folder and are going to enter the "game/client" folder and find the "client_base.vpc" file and open that with a script editor
adding a .h file
Now in this example we will be adding a .h file and a .cpp file.
Open up the vpc file with a text editor and find the following line.
$Folder "Public Header Files"
Now we are going to add a header file to our vpc script with the following line.
 $File   "$SRCDIR\public\discord_register.h"
 $File   "$SRCDIR\public\discord_rpc.h"
Nice you have added a header file into the vpc script save it and you are done.
adding a .cpp file
Now we are going to be adding in a .cpp file to our solution we are now going to edit the server .vpc script go to the "game/server" folder and open up "server_episodic.vpc" in a text editor
we will be adding a .cpp file for a weapon
scroll down to
$Folder "HL2 DLL"
and add the following line in between the brackets
$File "hl2\weapon_mac10.cpp"
Congratulations! you have successfully added a .cpp file inside of your solution
Renaming projects inside vpc
in this example we will be renaming the "server (episodic)" and "client (episodic)" projects inside of the vpc script
go over to the "game/server" folder and open up "server_episodic.vpc" with a text editor
you are going to see the following line
$Project "Server (episodic)"
we are going to rename it to something like "Server (MyMod)" like this:
$Project "Server (MyMod)"
for renaming the client project its the same as for the server project
go to "game/client" and open up "client_episodic.vpc"
now go to the following line
$Project "Client (episodic)"
we are going to replace it with "Client (MyMod)" like this
$Project "Client (MyMod)"
save the file.
you have changed the client projects name congrats
you can change any project name with this if the project is located inside the vpc script file
Changing the name of the .dll output folder
now we are going to change the name of our output folder we usually get when we compile .dll files
go and open up the "server_episodic.vpc" and "client_episodic.vpc" files
and find the following line:
$Macro GAMENAME "mod_episodic" [$SOURCESDK]
we are going to change this to "MyMod" like this
$Macro GAMENAME "MyMod" [$SOURCESDK]
we have successfully changed our output folders name when we compile our solution
the compile folder is always located outside the source code folder, the folders name is "game" when you open up the folder after you compiled the game you should be able to see a folder named "MyMod" now and inside of it a "bin" folder with all of your .dll and .pdb files
Closing notes
This is a pretty basic editing tutorial for .vpc script files if you want to learn more try experimenting with the vpc scripts and get yourself accustomed to the format if you know more about vpc script editing edits are appreciated

