Creating an Observation Hallway: Difference between revisions
No edit summary |
No edit summary |
||
| (21 intermediate revisions by 3 users not shown) | |||
| Line 1: | Line 1: | ||
{{cleanup}} | {{cleanup}} | ||
{{back | Portal Level Creation|Portal Level Creation}} | |||
{{DISPLAYTITLE: Portal BTS - Tutorial - Observation Hallway}} | |||
This is a tutorial for '''[[Portal]]'''. | This is a tutorial for '''[[Portal]]'''. | ||
| Line 9: | Line 12: | ||
== Tutorial == | == Tutorial == | ||
===Base Layout=== | |||
<center> | <center> | ||
<gallery caption="" widths="400px" heights="300px" perrow="2"> | <gallery caption="" widths="400px" heights="300px" perrow="2"> | ||
Image:Halltut.jpg|Create the floor for your hallway. | Image:Halltut.jpg|Create the floor for your hallway. Create minimal paths to cause less confusion. Hallways are generally 128 units wide. | ||
Image:Halltut_(1).jpg|Add the walls (128 units tall) | Image:Halltut_(1).jpg|Add the walls (128 units tall) | ||
Image:Halltut_(2).jpg|Texture the floor and walls, then copy the walls, resize to 64 and re texture (floor texture: tile/ | Image:Halltut_(2).jpg|Texture the floor and walls, then copy the walls, resize to 64 and re texture (floor texture: tile/observation_tilefloor001a. wall textures: concrete/observationwall_001a for the wall that matches with the ceiling, concrete/observationwall_001b for the wall that matches with the floor. Typing only "observation" will show a more general list of observation hallways skins.) | ||
Image:Halltut_(3).jpg|Add the roof (texture: plastic/plasticwall002a) | Image:Halltut_(3).jpg|Add the roof (texture: plastic/plasticwall002a) | ||
</gallery> | |||
===Light Sources=== | |||
<gallery caption="" widths="400px" heights="300px" perrow="2"> | |||
Image:Halltut_(4).jpg|Add the light bars around the perimeter. These are 4 units thick. (white009) | Image:Halltut_(4).jpg|Add the light bars around the perimeter. These are 4 units thick. (white009) | ||
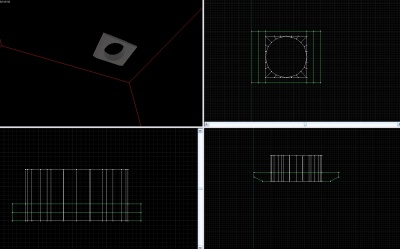
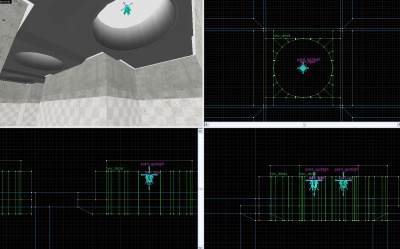
Image:Halltut_(5).jpg|Create the base for the light. 160x120x16. Cut two wedges on the ends. | Image:Halltut_(5).jpg|Create the base for the light. 160x120x16. Cut two wedges on the ends. | ||
| Line 22: | Line 30: | ||
Image:Halltut_(9).jpg|Seal the func_detail. | Image:Halltut_(9).jpg|Seal the func_detail. | ||
Image:Halltut_(10).jpg|Texture the light. Make the inside light, white009 with a scale of 50. The outside part of the light should have the same texture of your ceiling. | Image:Halltut_(10).jpg|Texture the light. Make the inside light, white009 with a scale of 50. The outside part of the light should have the same texture of your ceiling. | ||
Image:Halltut_(11).jpg|Add a [[light_spot]] and a [[point_spotlight]]. | Image:Halltut_(11).jpg|Add a [[light_spot]] and a [[point_spotlight]]. Set the <code>light_spot</code> brightness value to <code>183 204 218 600</code>. Set the <code>point_spotlight</code> color value to <code>183 204 218</code>. | ||
Image:Halltut_(12).jpg|Group the light and place in multiple locations{{clarify}}. | Image:Halltut_(12).jpg|Group the light and place in multiple locations{{clarify}}. | ||
Image:Halltut_(13).jpg|Cut away the roof where the light goes. | Image:Halltut_(13).jpg|Cut away the roof where the light goes. | ||
</gallery> | |||
Image:Halltut_(16).jpg| | ===Detailing=== | ||
Image:Halltut_( | <gallery caption="" widths="400px" heights="300px" perrow="2"> | ||
Image:Halltut_(16).jpg|Add doors. | |||
Image:Halltut_(18).jpg|Create the detailed fuse sets. | |||
</gallery> | |||
Image:Halltut_(21).jpg|Final result. (Use expert compile for proper shadows) | ===Final Steps=== | ||
<gallery caption="" widths="400px" heights="300px" perrow="2"> | |||
Image:Halltut_(21).jpg|Final result. (Use [[Expert_compile_mode|expert compile]] for proper shadows) | |||
</gallery> | </gallery> | ||
</center> | </center> | ||
[[Category:Portal]] | [[Category:Portal]] | ||
[[Category:Level Design]] | |||
[[Category:Tutorials]] | |||
Latest revision as of 16:32, 11 June 2022
For help, see the VDC Editing Help and Wikipedia cleanup process. Also, remember to check for any notes left by the tagger at this article's talk page.
This is a tutorial for Portal.
Introduction
Making bts (behind the scenes) style observation halls is a simple job. It takes little time, especially with prefabricated items.
Due to the highly detailed nature of observation rooms, this tutorial will be provided in images. Reading order is left to right, then down.
Tutorial
Base Layout
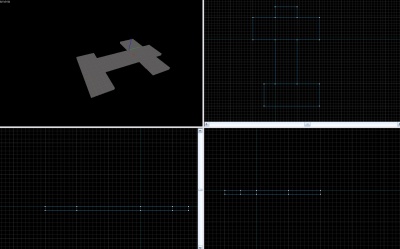
Create the floor for your hallway. Create minimal paths to cause less confusion. Hallways are generally 128 units wide.
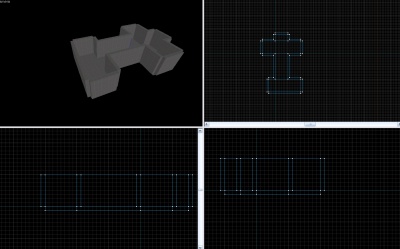
Add the walls (128 units tall)
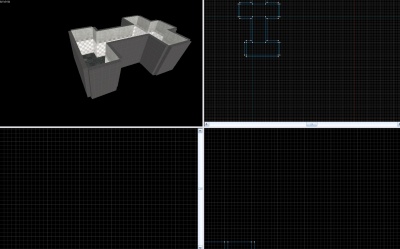
Texture the floor and walls, then copy the walls, resize to 64 and re texture (floor texture: tile/observation_tilefloor001a. wall textures: concrete/observationwall_001a for the wall that matches with the ceiling, concrete/observationwall_001b for the wall that matches with the floor. Typing only "observation" will show a more general list of observation hallways skins.)
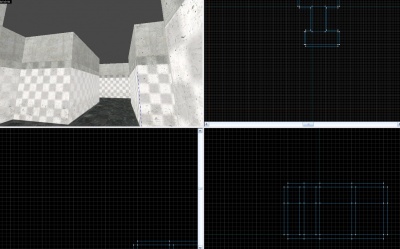
Add the roof (texture: plastic/plasticwall002a)

.jpg)
.jpg)
.jpg)
Light Sources
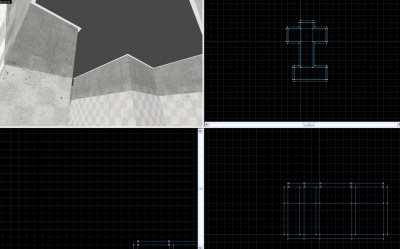
Add the light bars around the perimeter. These are 4 units thick. (white009)
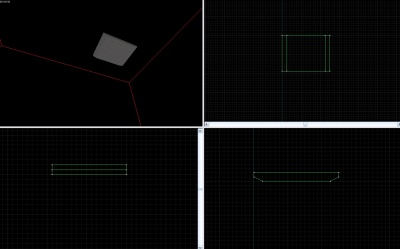
Create the base for the light. 160x120x16. Cut two wedges on the ends.
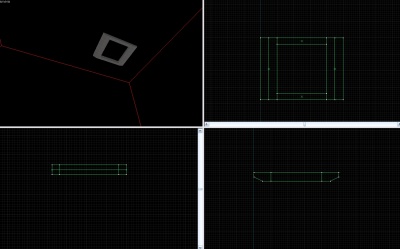
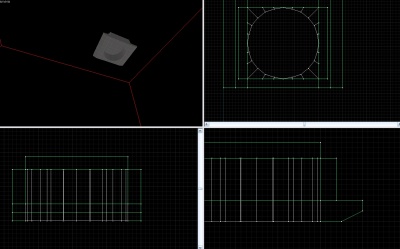
Make a hole in the center, 96x96 units.
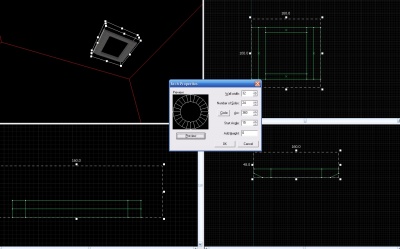
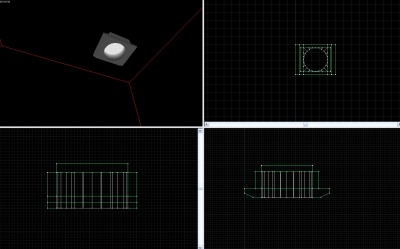
Create an arch as shown.
Select the whole arch, and clip it square. Make it a func_detail.
Seal the func_detail.
Texture the light. Make the inside light, white009 with a scale of 50. The outside part of the light should have the same texture of your ceiling.
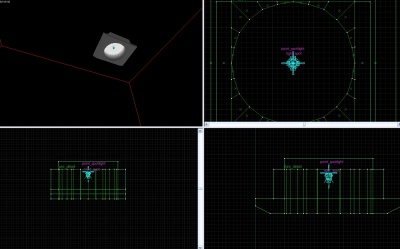
Add a light_spot and a point_spotlight. Set the
light_spotbrightness value to183 204 218 600. Set thepoint_spotlightcolor value to183 204 218.![Group the light and place in multiple locations[Clarify].](/w/images/thumb/b/b7/Halltut_%2812%29.jpg/400px-Halltut_%2812%29.jpg)
Group the light and place in multiple locations[Clarify].
Cut away the roof where the light goes.
.jpg)
.jpg)
.jpg)
.jpg)
.jpg)
.jpg)
.jpg)
.jpg)
![Group the light and place in multiple locations[Clarify].](/wiki/File:Halltut_(12).jpg)
.jpg)
Detailing
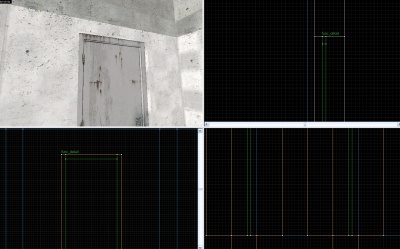
Add doors.
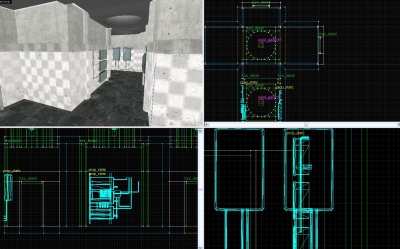
Create the detailed fuse sets.
.jpg)
.jpg)
Final Steps
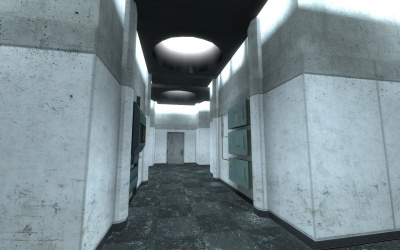
Final result. (Use expert compile for proper shadows)
.jpg)