Ambient Occlusion
About Ambient Occlusion
In ![]() Source Filmmaker, ambient occlusion uses SSAO which stands for Screen Space Ambient Occlusion. It works by examining an onscreen pixel then comparing its location in a depth buffer to the pixels around it. Pixels which are close together but not coplanar (on the same face) are shaded to simulate soft shadows. To maximize efficiency and speed, random sampling is used which will inevitably create noise/grain. This is avoided by blurring the SSAO pass.
Source Filmmaker, ambient occlusion uses SSAO which stands for Screen Space Ambient Occlusion. It works by examining an onscreen pixel then comparing its location in a depth buffer to the pixels around it. Pixels which are close together but not coplanar (on the same face) are shaded to simulate soft shadows. To maximize efficiency and speed, random sampling is used which will inevitably create noise/grain. This is avoided by blurring the SSAO pass.
What Visual Difference Ambient Occlusion Makes
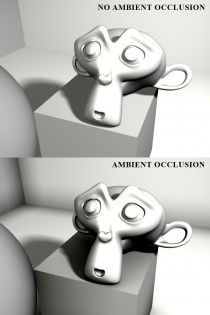
The most significant affect of ambient occlusion is that geometry appears much more three-dimensional.
Parts of a model which are meant to be shaded but aren't reached by dynamic shadows receive proper attenuation.
Picture the roots of ambient occlusion as little points of shading. All these little points group together to form radial shadows. The settings such as bias, radius, and strength (explained below) determine how each of those points work together to create realistic shadows in places of geometry where light would be occluded.
Below are some examples of shading using ambient occlusion.
Enabling Ambient Occlusion
Enabling Ambient Occlusion is as easy as right-clicking the viewport and heading to your render settings. In the dialog box for your render settings, check the box adjacent from the Ambient Occlusion setting which reads "enable". Make sure that the drop-down menu next to the AO setting reads "AO Only" and not "Outline(link) Only" or "AO & Outline" (edit for proof, add pictures).
Camera Settings
SSAO Bias: Determines the threshold for visible ambient occlusion
SSAO Strength: Determines the intensity of the shadows cast by ambient occlusion
SSAO Radius: Determines the filtersize (spread) of shadows cast by ambient occlusion

