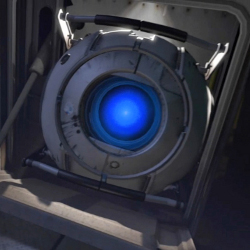
Wheatley
Some information on this page may contain plot spoilers. Continue reading at your own risk.
Wheatley is a blue-eyed personality core created by Aperture Science, that was once connected to GLaDOS.
Portal 2
Intro
He is first met at the beginning of the game, after Chell wakes in a hotel-esque room, she completes some very simple tests, then goes back to sleep only to wake up many decades or centuries in the future (evidenced by the excessive foliage covering and torn state of the facility she's in). This is the part of the game where Wheatley physically appears for the first time. He suggests that both he and Chell escape, and Chell agrees.
While Wheatley and Chell attempt to escape, they come across a tubular room in search of an escape pod. At this point, Wheatley accidentally makes the elevator in the room move upwards (he tries to stop the elevator, but ends up making it go faster), thus flipping a ton of switches while moving up and reactivating the long dead GLaDOS. When GLaDOS reactivates and comes back to life, she first crushes and kills Wheatley then drops Chell into a broken incinerator, so that she's forced to endure more tests.
During one of Chell's tests, she sees Wheatley again, alive (although more dirty looking and a with broken eye). Much later, the power gets shut down in one of Chell's tests, where Wheatley is seen yet again, but this time allows both him and Chell to continue their escape once more. GLaDOS does all she can to stop the two from escaping. Chell and Wheatley sabotage the neurotoxin system and turret production line, so that GLaDOS cannot use them and is overall less powerful.
Plot Twist
Both Wheatley and Chell eventually reach GLaDOS in her lair. GLaDOS attempts to kill Chell with the turrets, then the neurotoxin, although the plan fails as both were previously sabotaged. Wheatley catches up and joins Chell in the lair. At this time, the two manage to initiate a "core transfer", which detaches GLaDOS off her large robotic body and gets replaced with Wheatley, putting him in charge of the entire facility. Once Wheatley is attached to GLaDOS' body, he calls an escape lift for Chell so she can finally leave. Just as the lift rises, Wheatley becomes corrupt with power and lowers it back down, stating that he "did all this". The detached GLaDOS states that Wheatley did nothing, and that Chell did the work. This angers Wheatley, causing him to place GLaDOS inside a potato (making her PotatOS). At this point in the game, Wheatley now becomes an enemy, while GLaDOS inversely becomes an ally.
Seconds after GLaDOS becomes a potato, she realizes who Wheatley really is, and that the latter was once actually connected to GLaDOS to help regulate her behavior but only causes GLaDOS to have bad ideas and being a "tumor". GLaDOS also states that Wheatley is an "Intelligence Dampening Sphere", and that not only is Wheatley a moron, but he was specifically programmed to be a moron. These insulting facts enrage Wheatley, causing him to put the potato GLaDOS in the lift that Chell is standing in, and repeatedly smashes the lift down into the ground out of anger, causing the bottom of the lift to break away and send both GLaDOS and Chell falling miles down to the bottom and oldest part of the facility.
After GLaDOS and Chell return to the upper facility, GLaDOS tries to destroy Wheatley (who is seen through monitors) with a paradox but fails. Here, Wheatley reveals that the body he's in has an "itch" that makes it want to test constantly, so he makes Chell and GLaDOS perform multiple tests to satisfy the urge to test. Wheatley admits that making new tests is too hard for him, so he just mashes a bunch of other smaller tests that GLaDOS made, to save time. During one of Wheatley's "homemade" tests, Chell and GLaDOS stumble into a well-laid trap. Wheatley then explains that he doesn't need Chell and GLaDOS for testing anymore and now must kill the two, because he found two robots that were made for testing.
Final Fight
Chell and GLaDOS escape all of Wheatley's death traps and eventually make it to GLaDOS' old lair that Wheatley is residing in, and attach personality cores on him so he can be corrupt enough for another core transfer so GLaDOS can be reattached to her body. After Chell manages to make Wheatley's bombs hit himself and attaches three cores to him, she must finalize the core transfer by pushing the "Stalemate Resolution Button" which involves putting one portal under Wheatley, whom sets up trap bombs that explode right before Chell presses the button, sending her flying across the room. A very injured and floored Chell grabs the Portal Gun, and fires it one last time at the Moon exposed through the broken ceiling. This causes Chell, Wheatley and the cores connected to him to get sucked out, and Chell holds on to the still-connected Wheatley for her life. GLaDOS then hits Wheatley off the large robotic body, sending him flying into orbit while holding on to and pulling Chell back in.
Ending
After the game's ending credits, Wheatley is seen floating with the Space Core orbiting around him. Wheatley states that if he ever saw Chell again, he would apologize to her for all he's done.
