VGUI on entity
Intro
This tutorial will take you through how to make a vgui screen on an entity. It was originally from wavelength (http://articles.thewavelength.net/675/) But needed some updates.
Original Tutorial by Ask Jensen AKA Crazy01 ([email protected])
Updated by: --Lodle 02:13, 29 Nov 2007 (PST)
Modifying the RPG model
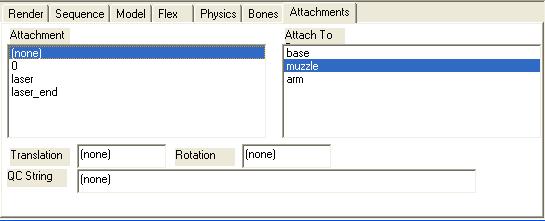
Lucky for us valve included the RPG model's source in the SDK, so we don't even have to brush up our modeling skills. Start up the model viewer that came with the SDK (it's in the "Source SDK" menu that's under "tools" in the "Play games" part of Steam). (NOTE: Make sure the Current Game drop down in the Source SDK tool is set to your mod before launching model viewer!) When it's loaded, go to File->Load Model... Then go to weapons\v_RPG.mdl. You should now see the RPG model in front of you. Go to the "Attachments" tab.
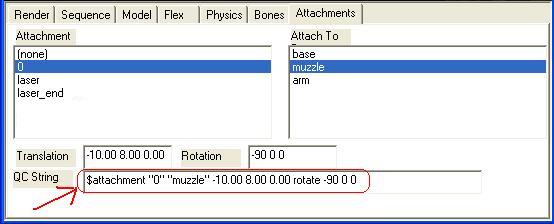
There's a list of attachments already. By clicking through them, you can see that they're all attached to "muzzle". Now, how do we create our own? We can't do that in here. But what we can do is find out where to place the two points. Select 0 on the list of attachments. Try changing the numbers in the Translation tekstbox. See the point move? Now, try and place the point where you would want you upper right corner. I used the value -10.00 8.00 0.00. Now change the Rotate numbers so the green line is pointing up, the red is pointing right and the blue pointing towards the player: -90 0 0. We have our first attachment point! Now, copy the text in the field named QC string and save it. It should read: $attachment "0" "muzzle" -10.00 8.00 0.00 rotate -90 0 0
Now we need to find the lower left attachment point. Let's make the screen 8x8, so the lower left translation should be -10.00 0.00 -8.00. Again, we need the QC string, so copy that from the textbox. We're done with the model viewer, so you can close it down.
Next, we need to actually modify the RPG model. Go to your steam folder\SteamApps\<steam-account>\sourcesdk_content\hl2\modelsrc\weapons\v_rocket_launcher\ The files you see are the source files for the RPG model. Open the V_Rocket_launcher.qc file. After the $attachment points paste your QC strings you just got from the model viewer, but change the 0 to "controlpanel0_ur" and "controlpanel0_ll" like so:
// attachment points
$attachment 0 "muzzle" 0 0 0
$attachment "laser" "muzzle" -9.00 -5.00 0.50
$attachment "laser_end" "muzzle" 100.00 -5.00 0.50

// Ask: attachment points for vguiscreen
$attachment "controlpanel0_ur" "muzzle" -10.00 8.00 0.00 rotate -90 0 0
$attachment "controlpanel0_ll" "muzzle" -10.00 0.00 -8.00 rotate -90 0 0
Now we need to compile the RPG with the new attachment points.
Open up command promt and go to your SteamApps\<steam-account>\sourcesdk\bin folder. now type in:
studiomdl ..\..\sourcesdk_content\hl2\modelsrc\weapons\v_rocket_launcher\V_Rocket_launcher.qc
The model should now compile, and if Steam is set up correctly your compiled models should be in your <modname>\models\Weapons\ directory. To check if everything went well, launch model viewer again, load up the RPG model and check if the attachment points are there. If not, try going through the steps again, if so: Wohoo! We now have the model ready for our VGUIScreen!
Adding GetControlPanelInfo() to CWeaponRPG
This is pretty simple. In weapon_rpg.h (in the dlls\hl2_dll\ folder) around line 182 under Drop() add:
    virtual void Drop( const Vector &vecVelocity );

    // Ask: Get the name of our attached vguiscreen
    void    GetControlPanelInfo( int nPanelIndex, const char *&pPanelName);

    int     GetMinBurst() { return 1; }
and in weapon_rpg.cpp (also under Drop()) add:
//-----------------------------------------------------------------------------
// Purpose: Ask: Get the name of our attached vguiscreen
//-----------------------------------------------------------------------------
void CWeaponRPG::GetControlPanelInfo( int nPanelIndex, const char *&pPanelName )
{
    pPanelName = "rpg_screen";
}
That's it. The name of the VGUIScreen we'll add in vgui_screens.txt will be "rpg_screen".
Adding the screen to vgui_screens.txt
Open up vgui_screens.txt (It's in your mod's folder under scripts). Add a new screen under teleport_countdown_screen like this:
    "rpg_screen"
    {
        // Ask: This is the vguiscreen attached to the RPG
        // this type is defined in c_rpg_screen.cpp
        "type"          "rpg_screen"

        // These describe the dimensions of the screen *in pixels*
        "pixelswide"    480
        "pixelshigh"    240

        // This is the name of the .res file to load up and apply to the vgui panel
        "resfile"       "scripts/screens/rpg_screen.res"
    }
There isn't very much to be explained here. We'll create the new screen type "rpg_screen" for the RPG later on. First we need to create the .res file.
Creating the layout (.res) file
Go to the screens directory in your scripts folder. There's already two files there; vgui_test_screen.res and teleport_countdown_screen.res. Let's take a look at vgui_test_screen.res:
"screen_basic.res"
{
    "Background"
    {
        "ControlName"   "MaterialImage"
        "fieldName"     "Background"
        "xpos"          "0"
        "ypos"          "0"
        "zpos"          "-2"
        "wide"          "480"
        "tall"          "240"

        "material"      "vgui/screens/vgui_bg"
    }

    "OwnerReadout"
    {
        "ControlName"   "Label"
        "fieldName"     "OwnerReadout"
        "xpos"          "10"
        "ypos"          "20"
        "wide"          "240"
        "tall"          "34"
        "autoResize"    "0"
        "pinCorner"     "0"
        "visible"       "1"
        "enabled"       "1"
        "tabPosition"   "0"
        "labelText"     "No Owner"
        "textAlignment" "center"
        "dulltext"      "0"
        "paintBackground" "0"
    }

    "HealthReadout"
    {
        "ControlName"   "Label"
        "fieldName"     "HealthReadout"
        "xpos"          "240"
        "ypos"          "20"
        "wide"          "240"
        "tall"          "34"
        "autoResize"    "0"
        "pinCorner"     "0"
        "visible"       "1"
        "enabled"       "1"
        "tabPosition"   "0"
        "labelText"     "Health: 100%"
        "textAlignment" "center"
        "dulltext"      "0"
        "paintBackground" "0"
    }

    "DismantleButton"
    {
            "ControlName"   "MaterialButton"
            "fieldName"     "Dismantle"
        ...
    }
}
As you can see, there are 4 controls in here. A MaterialImage, two Labels and a MaterialButton (If you're unsure about what I'm talking about, have a look at the Source SDK documentation here). I suggest we change this file to suit our needs. First, change line 1 from "screen_basic.res" to "rpg_screen.res". Then remove the MaterialButton "DismantleButton". We now have "Background", "OwnerReadout" and "HealthReadout" left. The background is simply an image, so let's keep that in. Change the "OwnerReadout"'s name and fieldName to "AmmoReadout" and the labelText to "Ammo:". This will just be a static label. Change the "HealthReadout"'s name and fieldName to "AmmoCountReadout" and the labelText to "0", save the file as "rpg_screen.res" in your scripts\screens\ folder. It should now look like this:
"rpg_screen.res"
{
    "Background"
    {
        "ControlName"   "MaterialImage"
        "fieldName"     "Background"
        "xpos"          "0"
        "ypos"          "0"
        "zpos"          "-2"
        "wide"          "480"
        "tall"          "240"

        "material"      "vgui/screens/vgui_bg"
    }

    "AmmoReadout"
    {
        "ControlName"   "Label"
        "fieldName"     "AmmoReadout"
        "xpos"          "10"
        "ypos"          "20"
        "wide"          "240"
        "tall"          "34"
        "autoResize"    "0"
        "pinCorner"     "0"
        "visible"       "1"
        "enabled"       "1"
        "tabPosition"   "0"
        "labelText"     "Ammo:"
        "textAlignment" "center"
        "dulltext"      "0"
        "paintBackground" "0"
    }

    "AmmoCountReadout"
    {
        "ControlName"   "Label"
        "fieldName"     "AmmoCountReadout"
        "xpos"          "240"
        "ypos"          "20"
        "wide"          "240"
        "tall"          "34"
        "autoResize"    "0"
        "pinCorner"     "0"
        "visible"       "1"
        "enabled"       "1"
        "tabPosition"   "0"
        "labelText"     "0"
        "textAlignment" "center"
        "dulltext"      "0"
        "paintBackground" "0"
    }
}
We now have our layout ready for our VGUIScreen. But this is all static. We still need to make the screen type that sets the AmmoCountReadout label to the number of missiles left.
Creating the "rpg_screen" screen type
Create a new file in your cl_dll\hl2_hud\ directory named c_rpg_screen.cpp and add it to your client project. Write the following:
//=============================================================================//
//
// Purpose: Ask: This is a screen we'll use for the RPG
//
//=============================================================================//
#include "cbase.h"

#include "C_VGuiScreen.h"
#include <vgui/IVGUI.h>
#include <vgui_controls/Controls.h>
#include <vgui_controls/Label.h>
#include "clientmode_hlnormal.h"

// memdbgon must be the last include file in a .cpp file!!!
#include "tier0/memdbgon.h"
Not much to explain here. Just the includes we'll need in our code.
//-----------------------------------------------------------------------------
//
// In-game vgui panel which shows the RPG's ammo count
//
//-----------------------------------------------------------------------------
class CRPGScreen : public CVGuiScreenPanel
{
    DECLARE_CLASS( CRPGScreen, CVGuiScreenPanel );

public:
    CRPGScreen( vgui::Panel *parent, const char *panelName );

    virtual bool Init( KeyValues* pKeyValues, VGuiScreenInitData_t* pInitData );
    virtual void OnTick();

private:
    vgui::Label *m_pAmmoCount;
};
Our RPGScreen class. Notice that under private we define our m_pAmmoCount pointer as a vgui::Label. This will be the label we'll update.
//-----------------------------------------------------------------------------
// Standard VGUI panel for objects
//-----------------------------------------------------------------------------
DECLARE_VGUI_SCREEN_FACTORY( CRPGScreen, "rpg_screen" );


//-----------------------------------------------------------------------------
// Constructor:
//-----------------------------------------------------------------------------
CRPGScreen::CRPGScreen( vgui::Panel *parent, const char *panelName )
    : BaseClass( parent, panelName, g_hVGuiCombineScheme )
{
}
Here we let Source know that the "rpg_screen" screen type is actually our CRPGScreen. As you can see in the constructor, we use the g_hVGuiCombineScheme scheme for our rpg_screen.res file. We could create our own, but this is alright for now.
//-----------------------------------------------------------------------------
// Initialization
//-----------------------------------------------------------------------------
bool CRPGScreen::Init( KeyValues* pKeyValues, VGuiScreenInitData_t* pInitData )
{
    // Load all of the controls in
    if ( !BaseClass::Init(pKeyValues, pInitData) )
        return false;

    // Make sure we get ticked...
    vgui::ivgui()->AddTickSignal( GetVPanel() );

    // Ask: Here we find a pointer to our AmmoCountReadout Label and store it in m_pAmmoCount
    m_pAmmoCount =  dynamic_cast<vgui::Label*>(FindChildByName( "AmmoCountReadout" ));

    return true;
}
As you can see, we get ahold of our Label in here. We also make sure we get ticked so we can update the Label.
//-----------------------------------------------------------------------------
// Ask: Let's update the label, shall we?
//-----------------------------------------------------------------------------
void CRPGScreen::OnTick()
{
    BaseClass::OnTick();

    // Get our player
    CBasePlayer *pPlayer = C_BasePlayer::GetLocalPlayer();
    if ( !pPlayer )
        return;

    // Get the players active weapon
    CBaseCombatWeapon *pWeapon = pPlayer->GetActiveWeapon();

    // If pWeapon is NULL or it doesn't use primary ammo, don't update our screen
    if ( !pWeapon || !pWeapon->UsesPrimaryAmmo() )
        return;

    // Our RPG isn't clip-based, so we need to check the player's arsenal of rockets
    int ammo1 = pPlayer->GetAmmoCount( pWeapon->GetPrimaryAmmoType() );

    // If our Label exist
    if ( m_pAmmoCount )
    {
        char buf[32];
        Q_snprintf( buf, sizeof( buf ), "%d", ammo1 );
        // Set the Labels text to the number of missiles we have left.
        m_pAmmoCount->SetText( buf );
    }
}
Adding the Define
The vgui panel code is not normaly added in to a standard compile. To include it you must define VGUI_CONTROL_PANELS in the server project only! Goto your server project properties and select C/C++ -> Preprocessor Definitions and add it to the list.
Fixing Valves Code
In the current sdk (ep1) there is a bug in the code which will mean your panels never get created. In the file goto the function void CBaseViewModel::SpawnControlPanels() and replace it with the following:
//-----------------------------------------------------------------------------
// This is called by the base object when it's time to spawn the control panels
//-----------------------------------------------------------------------------
void CBaseViewModel::SpawnControlPanels()
{
#if defined( VGUI_CONTROL_PANELS )
	char buf[64];

	// Destroy existing panels
	DestroyControlPanels();

	CBaseCombatWeapon *weapon = m_hWeapon.Get();

	if ( weapon == NULL )
		return;

	MDLCACHE_CRITICAL_SECTION();

	// FIXME: Deal with dynamically resizing control panels?

	// If we're attached to an entity, spawn control panels on it instead of use
	CBaseAnimating *pEntityToSpawnOn = this;
	char *pOrgLL = "controlpanel%d_ll";
	char *pOrgUR = "controlpanel%d_ur";
	char *pAttachmentNameLL = pOrgLL;
	char *pAttachmentNameUR = pOrgUR;


	Assert( pEntityToSpawnOn );

	// Lookup the attachment point...
	int nPanel;
	for ( nPanel = 0; true; ++nPanel )
	{
		Q_snprintf( buf, sizeof( buf ), pAttachmentNameLL, nPanel );
		int nLLAttachmentIndex = pEntityToSpawnOn->LookupAttachment(buf);

		Q_snprintf( buf, sizeof( buf ), pAttachmentNameUR, nPanel );
		int nURAttachmentIndex = pEntityToSpawnOn->LookupAttachment(buf);

		if (nLLAttachmentIndex <= 0)
			return;

		if (nURAttachmentIndex <= 0)
			return;

		const char *pScreenName;
		weapon->GetControlPanelInfo( nPanel, pScreenName );
		if (!pScreenName)
			continue;

		const char *pScreenClassname;
		weapon->GetControlPanelClassName( nPanel, pScreenClassname );
		if ( !pScreenClassname )
			continue;

		// Compute the screen size from the attachment points...
		matrix3x4_t	panelToWorld;
		bool a = pEntityToSpawnOn->GetAttachment( nLLAttachmentIndex, panelToWorld );

		matrix3x4_t	worldToPanel;
		MatrixInvert( panelToWorld, worldToPanel );

		// Now get the lower right position + transform into panel space
		Vector lr, lrlocal;
		bool b = pEntityToSpawnOn->GetAttachment( nURAttachmentIndex, panelToWorld );
		MatrixGetColumn( panelToWorld, 3, lr );
		VectorTransform( lr, worldToPanel, lrlocal );


		float flWidth = lrlocal.x;
		float flHeight = lrlocal.y;

		CVGuiScreen *pScreen = CreateVGuiScreen( pScreenClassname, pScreenName, pEntityToSpawnOn, this, nLLAttachmentIndex );

		pScreen->ChangeTeam( GetTeamNumber() );
		pScreen->SetActualSize( flWidth, flHeight );
		pScreen->SetActive( true );
		pScreen->MakeVisibleOnlyToTeammates( false );
		pScreen->SetAttachedToViewModel( true );
		int nScreen = m_hScreens.AddToTail( );
		m_hScreens[nScreen].Set( pScreen );

	}
#endif
}
Conclusion
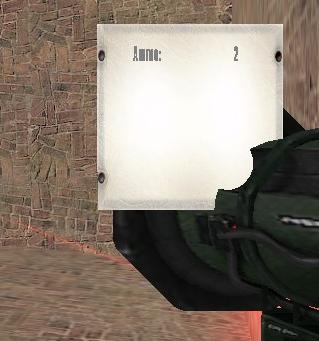
As the commenting say, we first get the local player, then its weapon, get the number of rockets and then update our label. And we're done! Compile and run your mod. If all went well your RPG now has a screen telling us how much ammo we have left!
Okay, not the prettiest in the world, but it's a start :)


