XSI Beginner Tutorial
By KillerMonkey
I can be reached at www.hl2world.com/bbs with the same username
Disclaimer
Well first off I just want to let you know this is my FIRST tutorial, I would like some feedback :) Also I will try to use as many visual aids as possible because I know text tutorials are worthless for me, and prolly you too.. now onto the meat!
Moving Around
Okay, the first thing we are going to discuss is how to move around in XSI's 3D screen. This is BY FAR the most important thing to master because when we start doing more complex things like texturing and splicing we will need to have precise control over our view otherwise much heartache and ingestion of caffeine will result.
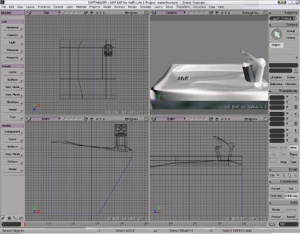
To start we have our XSI loaded up as seen in the picture to the right->
As you can see I have loaded up what looks like a waterfountain, and you are right, that is the first model I have made and will be releasing a tutorial on that pretty soon. You can download it off this thread: http://www.hl2world.com/bbs/viewtopic.php?p=278171
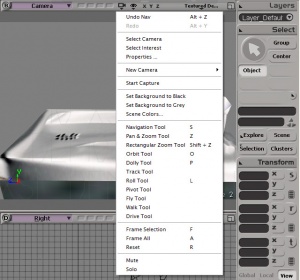
If you click the little camera looking icon (with the traingle undernieth) above the 3D view you will produce a pop-down menu that contains a crap load of choices, in the middle of that menu is all the different types of ways we can manipulate our view in order to better view our model.
My favorite two tools to use are the Navigation Tool (S) and the Pan/Zoom Tool (Z).
- Using the Nav Tool the left mouse button produces an effect similar to Black and White where you can drag your canvas around in a two dimensional sense. The Right mouse button allows you to rotate your model about the axis in the middle of your view in all directions (X Y Z). The middle mouse button is a bit decieving, you may think its a zoom, BUT ITS NOT!!! It actually changes the "Field of View" making it look like your looking through a fishbowl or something (VERY BAD if you are trying to make things straight and not curved lol).
The Pan/Zoom Tool
- Using the left mouse button does the same thing as the navigation tool. Using the right mouse button produces CORRECT zooming out from your model. Using the middle mouse button zooms in. Hold the buttons to do the zooming.
Thats all the panning tools that I use, the rest do the same thing with different mouse buttons and aren't very useful you can experiment with them if you want, I won't try to stop you :)
Making An Object
Everyone likes cubes, but cubes are damn boring, especially if all you have is a cube! So here we will take our cube and make a sweet looking thing out of it, or at least try!
Create the CUBE
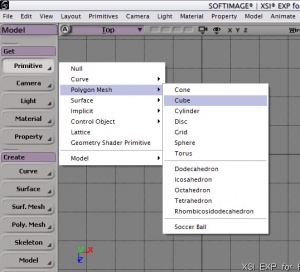
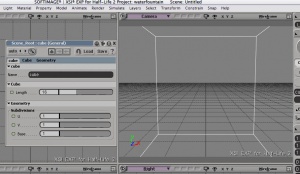
- Well you have to create the cube at least to start with, so click Primitive (under GET), then click polygon mesh, then cube! This will create a cube that is some size on all sides. Make the size of the cube 16 by moving that slider around, or just inputting 16 into the little box next to the slider (hit enter after putting in 16). Now you are the proud owner of a cube that is 16 lengths on each side!
Manipulate the VERTICIES
- One thing that I have noticed, when you scale or rotate an object in XSI, when you go to export it into the SMD file and later compile it and use it in your game... the model is all sorts of f-ed up! I have no clue why that's the case, but the best work around is to use vertex/edge/polygon manipulation to change the look of our cool cube. Anyway, I digress. Now that we have a cube you can use what we learned above to get it looking good in our views so that we can actually see what we are doing.
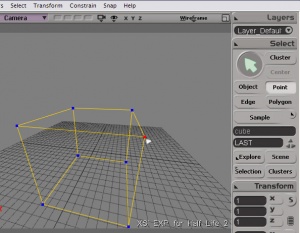
- In order to enter vertex manipulation mode press T or click Point undernieth the Select bar on the right hand side, I call them verticies, XSI calls them points, whatever. Moving on you can click a vertex in the 3D view or any 2D view and it will turn red if you did it right, if not you may be retarded? A word of caution in the 2D view if you click a vertex/edge/polygon it WILL select all that crap directly behind it as well out to infinity so I suggest doing it in 3D view unless that is your intention!
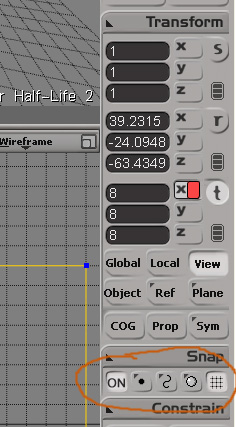
- Okay so you have your vertex selected there are about a MILLION ways to move it! You can do it in 3D view, 2D view, translations, etc. I suggest doing it in the 2D view with grid snap on (press CTRL or click the boxes to match the ones on the right). You can edit how much snap you have by scrolling your mouse wheel in a 2D view (you'll see a hatched box thingy moving). You can then press the T circular button on the right and enter translation mode (or press V). You can limit which axis you want to translate over by clicking the X,Y,Z buttons (highlighted means it can move in that direction). Now experiment with moving your vertex around, but when your done come back please!
Manipulating the EDGES
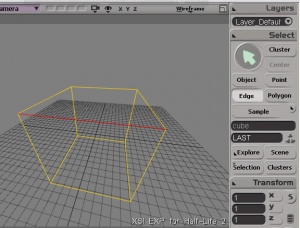
- This is exactly like doing verticies, except you are now moving edges. Edges are the bars you see connecting the verticies together, they create the shape and are the template the 3D engine uses in order to make the polygons that everyone talks about... this is like one of those hierarchy thingies hehe. Anyway, so now that you have the edge select you can move it around just like you do with the verticies, I won't waste time repeating how.
Manipulating the POLYGONS
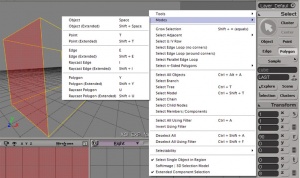
- The funny thing about polygons is you may soon find out, it is VERY HARD to select them!! I stumbled on something that makes life really easy. By pressing U you will enter "ray-cast polygon selecting mode of death" which will allow you to select polygons in the 3D view by just clicking on them. This also works in the 2D view. This, and many other ways to select stuff, is found in the SELECT menu on the right under tools and modes. Once again the manipulation of polygons is written above.
Some NOTES on SELECTING
- As you may have noticed by now it is a bitch to select and unselect anything in XSI... well thats only cause you don't know the keypad shortcut!! You have two options, if you use trillian I suggest option B because option A will actually maximize trillian (WIERD!) DESELECTING WITH MOUSE: just right click whatever you selected and it will inverse your selection, in other words if its selected it will be unselected and vice versa. TOTAL DESLECT: Option A - Press CTRL+SHIFT+A, Option B - Press CTRL+SHIFT+F. A word of caution with Option B, if you have a selection filter setup for some reason that will only deselect whatever that filter is set too, but I don't use filters so there!
Splitting, Beveling, Subdividing
Oh boy, this is by far my favorite part of XSI compared to any other 3D modeling program I have used thus far. In XSI there are about 15 kagillian different ways to make a very complex cube lol. I will detail three of them in this section of the tutorial: Splitting, Beveling, and Subdividing. All three of these are very complex beasts, and I am sure there are better ways to do the things I will show you, but with today's computing power what are 15 extra polygons going to do to you? Especially since I am only making props for maps! Here we go ^_^
Splitting Your Head
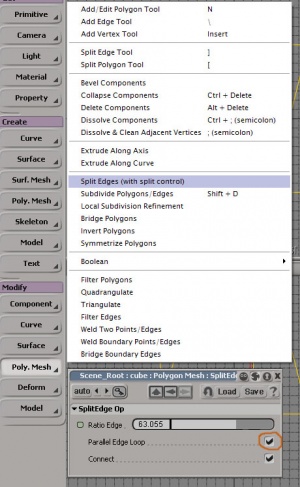
- The first step to splitting something is to select it. The most common thing to split is an edge because its pretty straight foward what you are splitting. So select an edge as described above and follow along closely. Under Modify click Poly Mesh then click Split Edges (With Split Control). Click the check box that says Parallel Edge Loop which creates an edge around the entire object you are currently working on, sorta like slicing it with a knife. You can now play with the slide bar to precisely position the split to the desired location on your cube (It's a percentage sorta thing). When your done just close the properties box there is no more need to play with the split, you can also uncheck the parallel edge check box if you only want it to split the edge you had selected and not all around the cube.
Beveling It To Death
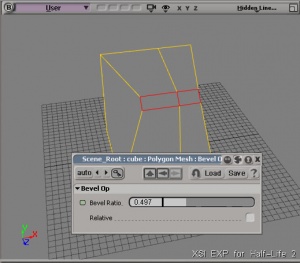
- And you thought splicing was way cool, wait till you see the sweet effects you can create with the bevel tool. If you refer back to the first picture you can see a somewhat rounded edge on the base of the spout of the water fountain, I achieved that using beveling. Believe it or not I took a cube and turned it into that spout in less than 30 minutes, and lots of cursing. Bck to beveling, you use beveling in order to create a more rounded edge on a corner or whatever, a lot like the arch tool in Hammer only this is taking an existing edge, splitting it twice, then making it adjustable! The first thing that needs to be done when you bevel is select each edge that you want the bevel to be applied to. After that, under the Modify section click Poly Mesh, then click Bevel. You will see that instantly your selections will be doubled and in the property box you can change the amount of bevel applied to your edges. Go ahead and play around with that, to achieve good smoothing results click the edge in the middle of the previously beveled components and bevel again, this will amaze your friends who think you are sitting there laying down verticies left and right!
Subdividing Like Crazy
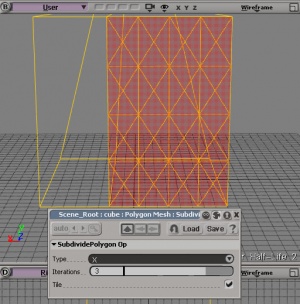
- Subdivisions can be thought of like displacements in Hammer only you don't need a NODRAW texture behind them, har har. To subdivide, you need to select a polygon (remember that ray-cast thingy U) or edge, then under the Modify section click Poly Mesh then click Subdivide. This will bring up a properties box and you will notice that your polygon is now a mess of diamonds or something like that. You have several options of subdividing at your disposal including: Plus Signs, Diamonds, X's, and the ever useless Triangle. I have no clue what you use triangle for only to piss you off when you realize you can only make one of them!? Well when you finally choose your pattern and the number of iterations (eg. the density of the new 'mesh'?) you can begin playing with you new creation by translating those points, edges, and polygons around to make a beautiful masterpiece! I you select an edge and subdivide that you will in fact do the same thing you did with splitting the edge, only you can split it many times, and the parallel loop does not go around the entire object (very helpful). For my water fountain I tried using subdivide at first to make the pathway the water goes to the drain by, but I quickly realized that it looked like shit no matter how hard I tried. I achieved my "3D texturing" by slitting the crap out of the top of the fountain at the designated points of texture denoted by my texture (wierd huh?) and it came out bitchin!
Conclusion
Well I hope that helped the aching questions you had about all those fundamental differences between XSI and the rest of the world. I sure as hell had a great time writing this tutorial. I will post a tutorial on all the specifics of texturing in XSI pretty soon, but that one is going to be advanced and technical so I want to get it right. If you have a burning desire for knowledge send me a PM and I will get back to you ASAP.
- Killer Monkey
