Authoring a Logical Entity
To begin, we’ll create a logical entity to perform a simple bit of work for us. This entity will store a value and increment that value every time it receives an input from another entity. Once the counter has reached a value we’ll define, the entity will fire an output to allow it to alert other entities of the condition.
Create a .CPP file for the new entity
- Create a file named
sdk_logicalentity.cpp. The file should go under the dlls folder under your source code folder. For example, if you installed the source code intoC:\MyMod\src, then you would create a file calledC:\MyMod\src\dlls\sdk_logicalentity.cpp. - Next, copy this code and paste it into this new file.
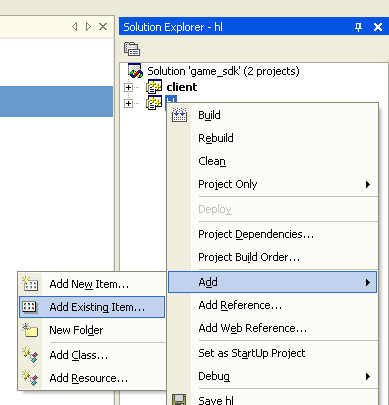
- Last, add this file to your server.dll project. If you opened the
game_sdk.slnsolution, then you can right-click on the hl project in the Solution Explorer window and choose Add, then Add Existing Item.
Walking Through The code
Class Definition
class CMyLogicalEntity : public CLogicalEntity
{
public:
       DECLARE_CLASS( CMyLogicalEntity, CLogicalEntity );
};
We descend our new entity from the CLogicalEntity class. This class is a server-side only entity and will not transmit data to the client. We also use the helper macro DECLARE_CLASS to assist in some behind the scenes bookkeeping. By declaring the relationship between CMyLogicalEntity and CLogicalEntity we are able to use the BaseClass type within this class. This will be useful later for calling up to the CLogicalEntity class we’re descended from.
Linking the class to an entity name
Next we’ll link the CMyLogicalEntity class to an actual entity classname that the game engine can reference.
LINK_ENTITY_TO_CLASS( logic_my_logical_entity, CMyLogicalEntity );
Here our class CMyLogicalEntity declares its classname as "my_logical_entity". This is the name that Hammer will use to refer to the entity type in the editor and is also how other entities will search and find our entity type. The classname varies from the targetname of the entity, which is a string that labels an individual or group of entities. The classname refers to all entities of a type, while the targetname can span multiple different types of entities (i.e. You may have an entity with a classname of env_splash belonging to a group of entities, all with the targetname of splash_group).
Adding member variables
int     m_nThreshold;  // Count at which to fire our output
int     m_nCounter;    // Internal counter
Here we declare two integer values, to be used later.
Declaring a data description for the entity
 . . .

public:
       DECLARE_CLASS( CMyLogicalEntity, CLogicalEntity);
       DECLARE_DATADESC();

 . . .

LINK_ENTITY_TO_CLASS( my_logical_entity, CMyLogicalEntity );
BEGIN_DATADESC( CMyLogicalEntity )

DEFINE_FIELD( m_nCounter, FIELD_INTEGER ),
DEFINE_KEYFIELD( m_nThreshold, FIELD_INTEGER, "threshold" ),

END_DATADESC()
The DECLARE_DATADESC macro must be included to let the compiler know that we’ll be adding a data description table later in the class implementation. The data description holds various definitions for the data members and special functions for this class. In this case, m_nCounter is defined for save/load functionality, and m_nThreshold is defined to tell the game to use the value named "threshold" to link this member variable to the entity keyvalue from Hammer. See the Data Description Table Document for more information.
Creating the output event
COutputEvent   m_OnThreshold;
DEFINE_OUTPUT( m_OnThreshold, "OnThreshold" ),

This outputevent will be triggered when we meet the defined threshold. For more information on outputs, see Entity Input and Outputs.
Creating the input function

void InputTick( inputdata_t &inputData );

void CMyLogicalEntity::InputTick( inputdata_t &inputData )
{
       // Increment our counter
       m_nCounter++;

       // See if we've met or crossed our threshold value
       if ( m_nCounter >= m_nThreshold )
       {
              // Fire an output event
              m_OnThreshold.FireOutput( inputData.pActivator, this );

              // Reset our counter
              m_nCounter = 0;
       }
}
This function simply increments a counter and fires an output when that counter reaches or exceeds a certain threshold value, as specified in the entity inside of Hammer. The function takes no parameters from Hammer.
Create The FGD Entry
To use the entity within Hammer, we’ll need to create an entry in our FGD file. Hammer will use this data to interpret the various keyvalues and functions the entity is exposing. See the FGD Format document for more information about FGD files.
If you haven't created a custom .FGD file for your mod, you may want to do it at this point. To do this, create an empty file with a .FGD extension anywhere on your hard drive (putting it under your mod's folder is a good idea). Then paste the code below into it. Go into Hammer and choose Tools->Options and add the .FGD file in the Game Data files section. The Game Configurations dialog is described in this document.
In this case we declare the "threshold" value we have linked to the m_nThreshold data member, the input function Tick and the OnThreshold output function.
@PointClass base(Targetname) = logic_my_logical_entity : "Tutorial logical entity."
[
       threshold(integer) : "Threshold" : 1 : "Threshold value."
       input Tick(void) : "Adds one tick to the entity's count."
       output OnThreshold(void) : "Threshold was hit."
]
