Setting up Source SDK Base 2013 Multiplayer
Setting Up
First Option
- Download GitHub for Windows or OS X depending on the operating system and install it.
- Open the following page, then click the Clone in Desktop button.
Second Option
- See these are instructions.
- Use the following command.
> git clone '''git@github.com:ValveSoftware/source-sdk-2013.git'''
Platform Specific Build Instructions
Creating Project & Makefiles
The 2013 SDK uses the Valve Project Creator (VPC) to generate platform-specific project files and makefiles. These files are platform specific and are required in order to build the SDK. Once you complete this step, there will be no need to run this step again unless an update requires new project files.
Windows
# Single Player Project
> <SDK_ROOT>/sp/src/creategameprojects.bat
> <SDK_ROOT>/sp/src/createallprojects.bat

# Multiplayer Project
> <SDK_ROOT>/mp/src/creategameprojects.bat
> <SDK_ROOT>/mp/src/createallprojects.bat
This step will create Visual Studio Project (.vcxproj) and Solution (.sln) files in the SRC directory.
Note: If you do not have Visual Studio installed, you will receive errors in the above process.
OS X & Linux
Note: OS X Mavericks users need to change some files in order to compile the project: Remove the -fpredictive-commoning flag from OTHER_CFLAGS in src/devtools/release.xcconfig. Change SDKROOT to macosx10.8 in src/devtools/base.xcconfig.
# Single Player Project
> <SDK_ROOT>/sp/src/creategameprojects
> <SDK_ROOT>/sp/src/createallprojects

# Multiplayer Project
> <SDK_ROOT>/mp/src/creategameprojects
> <SDK_ROOT>/mp/src/createallprojects
On OS X, this will create src/games.xcodeproj and src/everything.xcodeproj.
On Linux, this will create src/games.mak and src/everything.mak.
Information about VPC
For more information on how to use VPC, look at the scripts themselves or run the following command on any platform:
> <SDK_ROOT>/<gameType>/src/devtools/bin/vpc /help
Note on Git Repository & Ignored Files
The project files generated by VPC are listed in the .gitignore file so that they won't be committed to the repository. Individuals wanting to submit changes via a pull request should be aware of this when commiting.
Adding files to your project with VPC
VPC generates project files for all of the platforms that the SDK supports, so if you want to add files to your project in a way that will allow you to easily build on other platforms, consider using VPC. For example, to add a file to a multiplayer game, you could add a line to src/game/client/client_hl2mp.vpc.
Windows
Prerequisites
To build the Source SDK 2013 on Windows you will need Microsoft Visual Studio 2010 with Service Pack 1. It's also possible to use Visual Studio 2012 with the Visual Studio 2010 compiler by not "updating" the project settings to the new compiler.
If you want to build the phonemeextractor project you will need to download SAPI 5.1 from Microsoft. We aren't able to ship the Speech SDK with the Source SDK. Just download SpeechSDK51.exe, choose an extraction directory, and hit "Extract". Go to the directory with the extracted files and run the MSI installer. Locate "C:/Program Files (x86)/Microsoft Speech SDK 5.1" (or your desired installation path), copy it to "src/utils/", then rename the "Microsoft Speech SDK 5.1" folder to "sapi51" and phonemeextractor will be able to link.
Building
Remember to create project & make files first!
- Open the "everything" solution file for the project type you wish to make.
- everything.sln
- Build the above solution.
- Open the solution file for the game you are building the mod for.
- games.sln
- Build the above solution.
At this point you should have client.dll and server.dll to load with the Source Engine game you based the mod on.
Building Shaders
See Source SDK 2013: Shader Authoring.
Compiling Source SDK 2013 with Visual Studio 2012
Valve recommends that mod creators should use Visual Studio 2010 with Service Pack 1 to create a mod. However, this section describes how to compile a mod using Visual Studio 2012. Follow the guide on this page up until the Windows - Prerequisites section. In the Windows - Prerequisites section, it recommends that the mod creator does not update the Visual Studio projects and touches on the fact that the mod creator will have to obtain sapi.lib from Microsoft's Speech SDK. This section will describe instead how to 1. obtain and setup the Speech SDK library, 2. setup the necessary protobuf library and 3. setup and compile the Source SDK 2013 with Visual Studio 2012.
Setting up Microsoft Speech SDK (SAPI)
The Source SDK requires the Microsoft Speech SDK but doesn't come with it for licensing reasons. Download the Speech SDK 5.1 from here. This should download the SpeechSDK51.exe file. Run this and it should unzip contents to a selected folder. One of the contents it unzips is Microsoft SDK 5.1.msi. Running this with the default settings should create a directory in C:\Program Files (x86) called Microsoft Speech SDK 5.1. Copy the Microsoft Speech SDK 5.1 directory into the src/utils directory and rename it sapi51.
Compiling now shows a number of errors in the sphelper.h file. There is more than one way to fix these errors. This section will describe how to fix them manually.
Change the following lines t have the code shown below.
Line 769
const size_t ulLenVendorPreferred = wcslen(pszVendorPreferred); // no size_t
Line 1418
static long CoMemCopyWFEX(const WAVEFORMATEX * pSrc, WAVEFORMATEX ** ppCoMemWFEX) // missing long
Line 2368
   const WCHAR * PropertyStringValue() const
   {
       // Search for the first NULL and return pointer to the char past it.
       SPDBG_ASSERT(eEventId == SPEI_PROPERTY_STRING_CHANGE);
       const WCHAR * psz = (const WCHAR *)lParam; // moved this from for init
       for (; *psz; psz++) {}
       return psz + 1;
   }
Line 2560
SPPHONEID* pphoneId = (SPPHONEID*)((WCHAR *)dsPhoneId); // improper casting
Line 2634
pphoneId += wcslen((const wchar_t *)pphoneId) + 1; // improper casting
 Note:Building now might generate an error
 unresolved symbol _IID_IspPhoneticAlphabetSelection. This was perhaps caused because you had already built and the partial build is broken. This could be fixed by rebuilding the phonemeextractor project.Setting up protobuff
The Source SDK 2013 requires a protobuff version 2.3.0 library. A detailed set of instructions on obtaining and compiling the protobuf library can be found here on the Allied Modders Wiki.
Once compiled, copy the libprotobuf.lib file from protobuf-2.3.0\vsprojects\Debug or protobuf-2.3.0\vsprojects\Release, depending on which configuration it was built in, and paste it into the src\lib\public directory.
Setting up the Visual Studio Projects
Open everything.sln in either the source-sdk-2013\sp\src or source-sdk-2013\mp\src directory depending on if your mod is a single player or multiplayer mod, respectively. A prompt should appear asking if you want to update the VC++ compiler and libraries for each project in the solution. More details of this process can be found here. Click the Update button to update the projects and solution. If you don't get such a prompt or earlier chose not to update, the projects within the solution can be updated to the newest Visual Studio at any time by right-clicking on the solution and selecting Update VC++ Projects.
Select the project configuration to be build, either Debug or Release. This is done by right-clicking on the everything solution in the solution explorer, selecting properties, then navigating to Configuration Properties/Configuration Manager/Active Solution Configuration, selecting either Debug or Release (Debug is default), pressing Close and then Ok.
Now build the solution by right-clicking on the everything solution in the solution explorer and clicking Build All. Now close the everything solution, open the games solution and update the projects as you did for the everything solution. Continue the guided setup process from the Building Shaders section.
Note:Building the solution before updating sapi and updating the protobuf library may cause a number of compiler errors including missing sapi.lib and _MSC_VER: value '1600' doesn't match value '1700'. The following sections should fix these errors.Note:Once the build is complete, consider setting up your mod for debugging.OS X
Environment & Tools Setup
OS X, you will need Xcode 4.2 installed. You will also need to have "Command Line Tools" installed. You can find this at:
XCode Preferences -> "Downloads" -> "Components"
Building The Tools
Remember to create project & make files first!
To run the tools, run this command under Terminal:
> make -f games.mak
When successfully built, you should have client.dylib and server.dylib files to load with the Source SDK Base 2013 of your choice.
Linux
Steam Client Runtime
To build the Source SDK 2013 on Linux you should use the Steam Client Runtime to guarantee compatibility with most Linux distributions. It will only work on Debian-/Ubuntu-based systems though.
- Download the Steam Client Runtime Installer/Updater
- Run the following commands to extract the runtime, replace <version> with the version you just unpacked:
> tar xvf steam-runtime-sdk_latest.tar.xz
> cd steam-runtime-sdk_<version>
Download and setup the runtime, pick your architecture and debug/release preferences. Then answer Y to everything else.
> ./setup.sh
Run the (chroot) environment. This environment should be used to build your the SDK.
> ./shell.sh --arch=i386
SDK Build
Remember to create project & make files first!
With the above prerequisite installed, run the following:
> make -f games.mak
At this point you should have client.so and server.so files to load with the Source SDK Base 2013 of your choice. More instructions on using the Steam runtime can be found in README.txt in the installed runtime directory.
Known Errors
The error:
> /usr/include/features.h:374:25: fatal error: sys/cdefs.h: No such file or directory
Results from forgetting to run the above Steam Client Runtime Commands.
Code Organization
Naming Conventions
The Source SDK is split into two directories at the root for <gameType>, followed by source for <gameName>. If you are building a single player mod, use the "sp" directory. If you are building a multi-player mod you should base yourself on the code in the "mp" directory.
- <gameType>
- sp (singleplayer)
- mp (multiplayer)
- <gameName>
- hl2 (Half-Life 2)
- episodic (Half-Life 2 Episodes)
- hl2mp (Half-Life 2: Deathmatch)
Each directory has a matching Source SDK 2013 Base appID to use to get the base mod files:
- Source SDK Base 2013 Singleplayer
- Client AppID: 243730
- Source SDK Base 2013 Multiplayer
- Client AppID: 243750
- Server AppID: 244310 (see SteamCMD for instructions on how to install this one)
These two base apps are very similar, differing mostly in update schedule. The Singleplayer base will only update with HL2 and the Episodes do, which isn't very often. The Multiplayer base will update a few times a year to incorporate engine changes from TF2 and Counter-Strike: Source. None of these updates should break mod compatibility.
Directory Structure
Under each of these directories is a very similar directory structure:
- game - Runtime files for the mods themselves. Your mod content will go in here.
- src - All the source code for that kind of mod. The root of the src directory contains .sln or root level .mak files for building the source.
- common - A few files used by the server and client DLLs
- devtools - Scripts and utilities that are used to build the source. These are called by the makefiles and projects and you probably won't need to interact with them directly.
- game - All of the source code for the DLLs.
- client - Code used by client.dll (or client.dylib or client.so). There are also game-specific directories under here.
- server - Code used by server.dll. There are also game-specific directories under here.
- shared - Code used by both client.dll and server.dll.
- gcsdk - A couple of tools used to build the DLLs.
- lib - Binary versions of the libraries that the source code depends on. This is also the build target for vgui_controls, tier1, and mathlib.
- mathlib - Math utilities used by the game.
- public - Header files for all of the DLLs and libraries that are used by the game. Also includes a few source files.
- thirdparty - Third party libraries needed to build the source. At the moment this contains only the Google Protocol Buffers (protobuf) library.
- tier1 - Useful utility classes. Builds into tier1.lib
- utils - Various development utilities
- vgui2 - Source code for vgui_controls, which is used by client.dll.
We recommend that you follow the conventions here as you add files for your own mod.
Common Errors
Common errors encountered in SDK 2013. Please use Discussion before posting other solutions.
vgui_controls Doesn't Compile
As of 14 February 2014, Mangr0v3  had identified this as an artifact of building in a directory whose path contains spaces: vpc.exe will create .vcxproj files containing unquoted spaces in pathnames, some of which will then fail. See https://github.com/ValveSoftware/source-sdk-2013/issues/225
This problem was previously fixed by obtaining a fresh copy from the SDK distribution. If you're using a local GitHub repository, do a Sync (pull) on your repository. Otherwise you can download and reapply the ZIP file.
RegKey Errors While Generating Project Files
"ERROR: Unable to find RegKey for .vcproj files in solutions."
This problem is usually caused by missing file extensions associations in the your system registry.
Visual Studio 2010
 Warning:Make sure to have 2010 Visual Studio Service Pack 1 or later installed.
- Open Registry Editor
- Windows key + R
- Type 'regedit' without quotes and then hit Enter.
- Navigate to one of the following registry keys, based on the operating system you're currently using:
# For 32-bit (x86) Operating Systems:
HKEY_LOCAL_MACHINE\SOFTWARE\Microsoft\VisualStudio\10.0\Projects\{60dc8134-eba5-43b8-bcc9-bb4bc16c2548}

# For 64-bit (x64) Operating Systems:
HKEY_LOCAL_MACHINE\SOFTWARE\Wow6432Node\Microsoft\VisualStudio\10.0\Projects\{60dc8134-eba5-43b8-bcc9-bb4bc16c2548}
- At the key, you will need to create a new string value.
- Navigate to: New > String Value
- Fill out the following information:
- Name:
DefaultProjectExtension
- Value:
vcproj
- Click "OK" to save the registry key.
error MSB8008: Specified platform toolset (v120_xp) or (v120)
 Tip:If you have a problem in Microsoft visual C++ 2010 SP1 with the error MSB8008: Specified platform toolset (v120_xp), it can be corrected as follows:
1 - Select all Project Files
2 - Right-click on the file, then choose "Properties"
3 - Choose "Configuration Properties"
4 - And the last, choose in "Platform toolset" this -> (v100)
(Project->Properties->Configuration Properties->General->Platform toolset = Visual Studio 2010(v100))
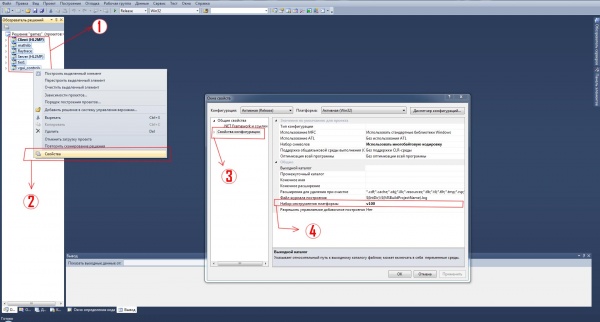
You can also see action in this screenshot.
It works with Microsoft visual C++ 2010 SP1, as in the "release" and in the "debug"
--Slam12f (talk) 02:08, 22 May 2015 (UTC)

Visual Studio 2012
A tool has been created by a member of the community to fix this type of error on Visual Studio 2012. Use at your own risk.
Download source from GitHub (AutoIt v3 is needed).
Releasing on Steam
If you have a Source Engine game that you are interested in releasing on Steam, please read this FAQ for more details.