Fr/Observation Room
Créer la map

Il faut tout d'abord créer une chambre de test. Créons un block de 512x512x256 box avec un petit piédestal de 32 unités au milieu pour poser le Portalgun. On ne crée pas de lumière pour conservé celle par défaut, intégrée au jeu. On texture les murs avec Modular Ceiling, le sol avec Observation Room floor, le plafond avec Observation Room ceil. On ajoute l'entité weapon_portalgun sur le piédestal, et une entité info_player_start. On lance la map voir si tout va bien.
La salle d'observation

On ajoute maintenant la chambre d'observation. On crée un block de 256x64x128, qu'on va placer dans la 2e moitié de la hauteur de la salle.
On applique les mêmes textures que la salle de test.
Créer un tube lumineux
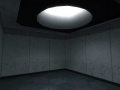
Ce guide va expliquer comment créer la source lumineux qu'on aperçoit dans les salle d'observation, à travers les glaces déformées. C'est une sorte de tube creux, dans lequel travers une source lumineuse.
Tutorial

Avec l'outil de clipping, on va créer un trou de 96x96 dans le toit de la chambre d'observation. Il va accueillir plus tard notre tube lumineux.

Utilisez l'outil de block (block tool; Shift+B) en sélectionnant 'Arch', et créez une brush de 80x80x48
Dans la zone de paramètres, mettez :
- Wall width : 16
- Number of sides : 6
- Arc : 90
Vous devrez arriver à quelque chose comme ceci.

Sélectionnez votre block et utilsez l'outil Vertex (Shift + V). Alignez le block sur la grille comme sur l'illustration.

Utilisez l'outil de clipping (Shift+X), et coupez les parties, comme sur l'illustration.

Copiez/collez cette brush, aplliquez un Flip, de façon à créer une forme semi-circulaire.

Copiez cette nouvelle forme, et alignez-là afin de créer une forme circulaire.

Build a frame around the base of the completed brush. Make each piece 8 units high, and 16 wide.

Appliquez dans le tube, la texture plastic_light002c, et sa base avec plastic_light002a. Pour la base, cochez treat as one, and use the "fit" button, to easily texture here.

Maintenant, il faut créer le contour qui va permettre de faire le joint avec le toit. Créer un block de 128x8x8. Utilisez l'outil Vertex, pour ajouter un angle. Cliquez sur Yes pour appliquer les vertices.

Utilisez l'outil Vertex, pour ajouter un angle de 45° sur chaque coin.

Copiez/collez et appliquez un flip pour les 4 côtés. Mettre la texture plastic_wall002a sur les côtés visibles.

Sélectionnez l'ensemble des blocks et appliquez l'entité func_detail (Ctrl + T; Tie to entity), et placez le tout dans le tout prévu dans votre toit.

Appliquez la texture white009 dans le fond de votre tube.
Vous pouvez changer l'intensité de la lumière avec la proportion de cette texture. La proportion par défaut est 0,25, qui donne une effet éclatant et brillant. Tandis qu'une valeur à 1,00 sera beaucoup plus atténué. Ce qui peut considérablement changer l'atmosphère de la map.

Clair
Sombre


A noter que sur la map d'exemple que Valve fournie, la valeur est mise à 50, ce qui équivaut à éteindre le tube. La lumière est quand à elle émulée avec deux entités light et light_spot. Sans doute pour avoir plus de liberté sur la gestion des lumières...
The Window Pane
Now we place a glass wall between the observation room and the test chamber. I filled in the hole, and made the pane of glass one unit thick (the smallest block you can make.)


I now apply the glass/glasswindow_refract01 texture on only one side of the window; the side facing into the test chamber. All other faces on the brush are marked nodraw, to make the room render that much faster!

Do not forget to tie the created glass brush to func_brush. This sadly happens to many mappers... Why do you have to do so? The reason is that a glass window dynamically changes the way you see things, but simple brushes are not able to do this. You have to make it an entity. If you do not do this, it will result in some sort of Hall of Mirrors effect. Compare the two pictures to the right; notice how what you see through the left window does not resemble what's behind, but the right one (func_brush) does.
Why this boring checkerboard? Simple. Do you want to wait for all those special effects to run while you are desparately trying to align entities or brushes? Didn't think so. (But give it a few years and we won't have to use checkers to sidestep this!) Also, this does a good job of being non distractive. But I digress.
Also notice that the texture doesn't effect the lighting effect of the room. There you go! The Observation room is our light source. Neat, huh?

Here's a tip. If the player will never enter an Examination room, you can put NODRAW textures on the inside side of the glass (and inside facing walls that the user will never see). This gives a glassy texture to the outside, while allowing the Source engine to ignore the inside triangles. Should your player be able to enter the room, you will need to put the glass texture on the inside of the window as well. (I got these by noclipping. How cool is noclip? Pretty cool.) I've also modified these pics so you can see the change.

As you can see here here, glass textures automatically disallow portals.
Also, you can see the neat distortion effect caused by the windows, through the window, through the portal, looking at Chell. Neat, huh?
Additional Lights in the Examination Room (or: How to light your test chamber)

The official test chambers are almost always lit only by the observation rooms. This works by having enough spy rooms around and putting spotlights into them. This can completely eliminate the need for any other lightning outside the observation rooms.

Just put a light_spot behind the glass pane, slightly rotated to face downwards (so it doesn't light the ceiling of your room but rather the lower areas). Fire up the object properties and assign 183 204 218 300 to Brightness, 183 204 218 150 to BrightnessHDR, 200000 to Constant.

See, this doesn't look too bad... however, the examination room is unlit in the rear areas. We'll fix this by placing a single light into the back half of the room, assign the same values as above to Brightness and BrightnessHDR and optionally adjust Constant to light up even further. (Shouldn't be needed in most cases however.) It also lightens up the chamber some more.
Autres liens
- Portal Level Creation:fr
- on the forums Article originale (en anglais)
- Traduit de l'article sur Thinkingwithportals
|}