Bump map: Difference between revisions
Jump to navigation
Jump to search
TomEdwards (talk | contribs) m (→See also) |
TomEdwards (talk | contribs) mNo edit summary |
||
| Line 24: | Line 24: | ||
==See also== | ==See also== | ||
*[[$bumpmap]], for adding a bump map to a [[material]] | *'''<code>[[$bumpmap]]</code>''', for adding a bump map to a [[material]] | ||
*[[Normal Map Creation]] | *[[Normal Map Creation]] | ||
**[[Normal Map Creation in The GIMP]] | **[[Normal Map Creation in The GIMP]] | ||
Revision as of 12:25, 12 July 2008

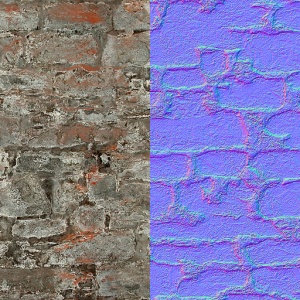
A material's albedo (left) compared to its bump map.

A bump map is an RGB image that can be used to simulate a three-dimensional surface through a process known as normal mapping.
Each color channel in a bump map has a meaning:
- The red channel defines horizontal facing (X-axis)
- 0 = left
- 128 = forward (facing viewer)
- 255 = right
- The green channel defines vertical facing (Y-axis)
- 0 = up
- 128 = forward (facing viewer)
- 255 = down
- The blue channel defines height (Z-axis)
- 0 = deepest
- 128 = maximum depth capable of receiving dynamic light (it's a bad idea to go under this)
- 255 = at the material's surface
The three channels between them allow the engine to calculate a normal vector for every pixel, allowing it to generate shadows and highlights on a two-dimensional surface.
A bump map is largely useless for really flat surfaces like smooth concrete or metal, but even rough concrete sometimes has enough depth to it to make one worthwhile.
See also
$bumpmap, for adding a bump map to a material- Normal Map Creation
- Normal2dudv a third party tool for converting normalmaps to Dx8-friendly du/dv maps.
- An old article that explains the concept well.