XSI Beginner Tutorial: Difference between revisions
| Line 96: | Line 96: | ||
===Subdividing=== | ===Subdividing=== | ||
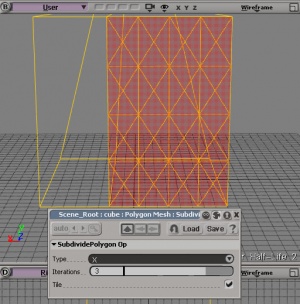
:[[Image:Xsi_beginner_11.jpg|thumb|right|Subdividing]]Subdivisions can be thought of like displacements in Hammer. To subdivide, you need to select a polygon (remember that ray-cast thingy '''U''') or edge, then under the '''Modify''' section click ''Poly Mesh'' then click ''Subdivide''. This will bring up a properties box and turn your polygon into a mess of diamonds, or something like that. You have several options of subdividing at your disposal, including: Plus Signs, Diamonds, X's, and the ever useless Triangle. I have no clue what you use triangle for, only to piss you off when you realize you can only make one of them!? Well, when you finally choose your pattern and the number of iterations (eg. the density of the new 'mesh'?), you can begin playing with your new creation by translating those points, edges, and polygons around to make a beautiful masterpiece! If you select an edge and subdivide, you will in fact do the same thing you did with splitting the edge, only you can split it many times, and the parallel loop does not go around the entire object, but can if selected (very helpful)! | :[[Image:Xsi_beginner_11.jpg|thumb|right|Subdividing]]Subdivisions can be thought of like displacements in Hammer. To subdivide, you need to select a polygon (remember that ray-cast thingy '''U''') or edge, then under the '''Modify''' section click ''Poly Mesh'' then click ''Subdivide''. This will bring up a properties box and turn your polygon into a mess of diamonds, or something like that. You have several options of subdividing at your disposal, including: Plus Signs, Diamonds, X's, and the ever useless Triangle. I have no clue what you use triangle for, only to piss you off when you realize you can only make one of them!? Well, when you finally choose your pattern and the number of iterations (eg. the density of the new 'mesh'?), you can begin playing with your new creation by translating those points, edges, and polygons around to make a beautiful masterpiece! If you select an edge and subdivide, you will in fact do the same thing you did with splitting the edge, only you can split it many times, and the parallel loop does not go around the entire object, but can if selected (very helpful)! | ||
==Freeze | ==Freeze== | ||
XSI | In XSI you edit (operate on) a kind of 'editable preview' of your model rather than the actual model itself. XSI records these operations in stacks. When you ''Freeze the operator stack'' you effectively ''apply'' or ''save'' the changes to your model. This means you can no longer '''undo''' those operations. | ||
Use '''Freeze All Transforms''' & '''Freeze''' (or '''Freeze M'''): | |||
* Before applying bones. | |||
* Before exporting. | |||
* If XSI is getting slow. | |||
'''Freeze All Transforms''': In order to export your model properly, you must use the '''Freeze All Transforms''' (translations, scalings, and rotations) function, which is buried in the context menu triggered by L-clicking the head (title) of the "Transform" panel. | |||
'''Freeze M''': clears the modelling stack, including any weight maps and texture projections that were applied in the modelling region. The '''Freeze M''' button lives in the "Edit" panel at the foot of the right hand sidebar. When your model is enveloped, '''Freeze''' will also clear weight map, so use '''Freeze M''' (Freeze Model changes) instead. | |||
'''Freeze''': (aka 'Freeze entire object') clears the entire construction history, including the modelling stack as well as any texture operator stacks and weight painting stacks. The '''Freeze''' button lives in the "Edit" panel at the foot of the right hand sidebar. Freezing removes any animation on the modelling operators (for example, the angle of a Twist deformation, and so on). The values at the current frame are used. | |||
{{note|If running XSI with lower than recommended vertical screen resolution, the "Edit" panel can be pushed off-screen by default! To find it, R-click on the head (title) of the "Transform" and/or "Select" panel to minimise them, and the "Edit" panel should become visible <code>;)</code>}} | |||
==Conclusion== | ==Conclusion== | ||
Revision as of 09:23, 6 November 2007
Disclaimer
- MAX to XSI Jumpstart
- DISCREET 3DS MAX TO SOFTIMAGE XSI TRANSITION TIPS
- Maya 2 XSI Quickstart Guide
- Lightwave 2 XSI Quick Start(pdf)
Moving Around
Moving around in XSI's 3D screen is BY FAR the most important skill to master, because when we start doing more complex things, like texturing and splicing, we will need to have precise control over our view. Otherwise, much heartache and ingestion of caffeine will result.
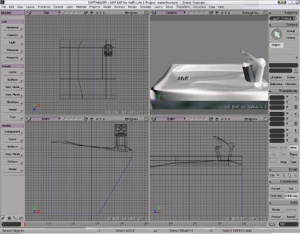
To start, have XSI loaded up as seen in the picture to your right.
As you can see, the scene loaded is what looks like a water fountain.
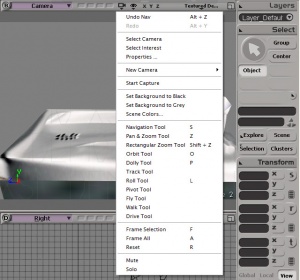
If you click the little camera looking icon (with the triangle underneath) above the 3D view, you will produce a pop-down menu that contains a lot of choices. In the middle of that menu are all the different types of ways we can manipulate our view in order to better view our model.
A few useful tools to know about, at least, is the Navigation Tool (S), Pan/Zoom Tool (Z), Orbit Camera (O), Dolly Camera (P), and Roll Camera (L). All tools show their mouse button assignments at the bottom right of the screen with left, middle, and right options respectively.
- Using the Nav Tool the left mouse button produces an effect similar to Black and White, where you can drag your canvas around in a two dimensional sense. The Right mouse button allows you to rotate your model about the axis in the middle of your view in all directions (X Y Z). The middle mouse button zooms in and out when held down and the mouse is moved up and down.
The Pan & Zoom Tool
- The left mouse button does the same thing as with the navigation tool. The right and middle mouse buttons are a bit decieving: you may think they zoom in and out, but they don't! They actually change the "Field of View," making it look like you're looking through a fishbowl or wide angle lens (everything you do will turn out looking different after exporting it, it can really mess you up). This tool is very useful in the 2D views because it allows for a precise zooming, but be careful about its use in a 3D view.
Orbit, Dolly, and Roll
- These tools are very useful when you end up getting to rendering because it will allow you to position your camera like a true movie director. In order to achieve life like animation of your camera you need to use orbit, dolly, and roll otherwise scenes tend to look artificial at best. (unless that is the look you are going for)
Walk/Fly Tool(WASD control)
If you want to control the camera using the W, A, S, & D keys, then click the small camera icon and choose Walk Tool or Fly Tool. You can aim with mouse and move with W A S D while you hold down the mouse button. This is similiar to pressing z in Hammer and flying around using the mouse and keyboard.
Camera shortcuts
- Navigation: S
- FOV: Z
- Orbit: O
- Dolly: P
- Roll: L
- Rectangle Zoom: Shift-Z
- Orbit: O
- Reset: R
- Frame: F
- Frame in all viewports: Shift-F
- Frame All: A
- Frame All in all viewports: Shift-A
- Camera Undo: Alt-Z
- Camera Redo: Alt-Y
If you forget how to operate these tools, check the status line at the bottom of the interface. It tells you what your mouse will do in that tool.
Making An Object
Everyone likes cubes, but cubes are damn boring, especially if all you have is a cube! So here we will take our cube and make a sweet looking object out of it, or at least try to! Remember that one unit in XSI is equal to one unit in HL2 which is roughly equal to an inch (2.5 cm).
Some Notes on Selections
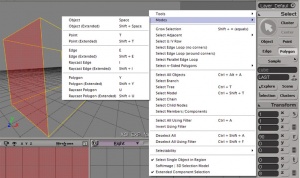
- You can't save your select mode preference in XSI Mod Tool. Everytime XSI Mod Tool is started it resets “Select Single Object in Region? and “Extended Component Selection‿ to enabled. The latter will keep things selected until you manually deselect them using middle mouse button click or
Ctrl+Shift+Awhich also disables right click context menus.
I recommend you to uncheck "Extended Component Selection" everytime you run the appication unless you were familiar with Softimage|3D.
- In the latest Download this can be found in File > Preferences. It comes under the "Select" category and is named "extcomponetsel"
Creating a Cube
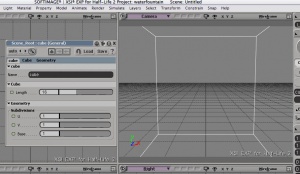
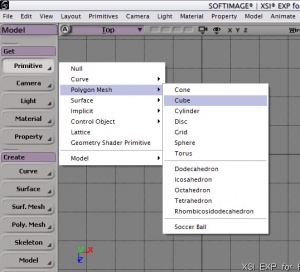
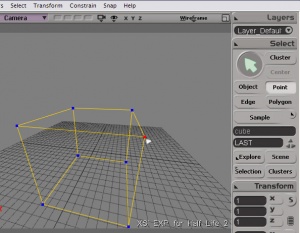
- You have to create the cube to start with, so click Primitive (under GET), then click polygon mesh, then cube! This will create a cube that is the same size on all sides (default is 4 units). Make the size of the cube 16 by moving that slider around, or just inputting 16 into the little box next to the slider (hit enter after putting in 16). Now you are the proud owner of a cube that is 16 units on all sides!
Manipulate Vertices
- One thing that I have noticed: when you scale or rotate an object in XSI, then go to export it into the SMD file, compile it, and use it in your game...the model's shape looks incorrect. To avoid this, make sure and use the freeze all transforms command under the transform section of the Main command Panel (MCP). This resets the surface normals to thier correct values. Now that we have a cube, you can use what we learned above to get it looking good in our views, so that we can actually see what we are doing.
- In order to enter vertex manipulation mode, press T or click Point underneath the Select bar on the right hand side. I call them vertices, XSI calls them points, same difference. Moving on, you can click a vertex in the 3D view or any 2D view, and it will turn red if you did it right. A word of caution: in the 2D view, if you click a vertex/edge/polygon, it WILL select all vertices directly behind it as well out to infinity, so I suggest doing it in 3D view unless that is your intention!
For your reference, you use your left mouse button to select vertices, and your right (or middle) mouse button to deselect vertices if extended component selection is turned on. If it is turned off pressing CTRL will deselect already selected objects and SHIFT will continue selection of objects.
- Another good tool for editing components (like points, edges, and polygons) is the tweak component tool, "M" this lets you move freely between editing points, edges, and polygons. (XSI v5.0 ONLY) with the tweak component tool, you may also use to target welds on components.
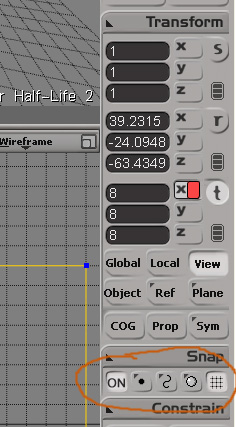
- Okay so now that you have your vertex selected, there are about a lot of ways to move it! You can do it in 3D view, 2D view, translations, etc. My suggestion is doing it in the 2D view with grid snap on (press CTRL or click the boxes to match the ones on the right). You can edit how much snap you have by scrolling your mouse wheel in a 2D view (you'll see a hatched box moving). You can then press the T circular button on the right and enter translation mode (or press V). You can limit which axis you want to translate over by clicking the X, Y, or Z buttons (highlighted means it can move in that direction). Now experiment with moving your vertex around, but when you're done, come back please!
Manipulating Edges
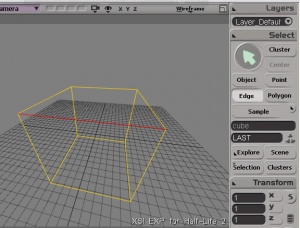
- This is exactly like doing vertices, except you are now moving edges. Edges are the bars you see connecting the vertices together; they create the shape and are the template the 3D engine uses in order to make the polygons that everyone talks about. Anyway, so now that you have the edge selected, you can move it around just like you do with the vertices; I won't waste time repeating how.
Manipulating Polygons
- The funny thing about polygons, as you may soon find out, is that they are VERY HARD to select, but by pressing U, you will enter "ray-cast polygon selecting mode", which will allow you to select polygons in the 3D view by just clicking on them. This also works in the 2D view. This, along with many other ways to select stuff, is found in the SELECT menu on the right under tools and modes. Once again, the manipulation of polygons is exactly the same as written above.
More Selection Options
- F7: Rectangle selection
- F8: Lasso selection
- F9: Freeform selection
- F10: Raycast selection
- Shift+F10: Rectangle-Raycast
- F11: Paint selection
- Alt-LMB two components: Range selection
- If Extended Component Selection is on
- Ctrl-MMB: Loop selection
- If Extended Component Selection is off
- Alt-MMB: Loop selection
Splitting, Beveling, and Subdividing
Oh boy, this is by far my favorite part of XSI compared to any other 3D modeling program I have used thus far. In XSI there are about 15 billion different ways to make a very complex cube. I will give details on three of them in this section of the tutorial. All three of these are very complex beasts, and I am sure there are better ways to do the things I will show you, but with today's computing power, what are 15 extra polygons going to do to you? Here we go. [grin]
Splitting
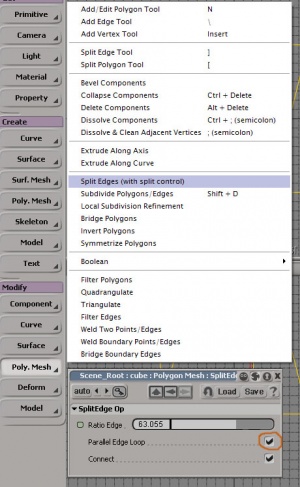
- The first step to splitting something is to select it. The most common thing to split is an edge, because it's pretty straightfoward what you are splitting. So select an edge as described above and follow along closely. Under Modify, click Poly Mesh then click Split Edges (With Split Control). Click the checkbox that says Parallel Edge Loop, which creates an edge around the entire object you are currently working on, sort of like slicing it with a knife while keeping both sides together. You can now play with the slide bar to precisely position the split to the desired location on your cube (it's a percentage sort of thing). When you're done, close the properties box; there is no more need to play with the split. Uncheck the parallel edge check box if you only want to split the selected edge, rather than all around the cube.
Beveling
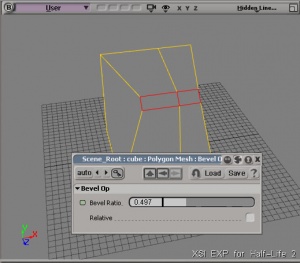
- You thought splicing was way cool? Wait until you see the sweet effects you can create with the bevel tool. If you refer back to the first picture, you can see a somewhat rounded edge on the base of the spout of the water fountain. This is achieved by using beveling. Believe it or not, that was made from a cube. Anyway, beveling is used to taper edges, corners, or whatever. It's like the arch tool in Hammer, only this is taking an existing edge, splitting it twice, then making it adjustable! First, select each edge that you want the bevel to be applied to. After that, under the Modify section, click Poly Mesh, then click Bevel. You will see that instantly your selections will be doubled, and in the property box you can change the amount of bevel applied to your edges. Go ahead and play around with that. To achieve good smoothing results, click the edge in the middle of the previously beveled components and bevel again. This will amaze your friends who think you are sitting there laying down vertices left and right! Either that or they'll beat you up for being an uber dork...
Subdividing
- Subdivisions can be thought of like displacements in Hammer. To subdivide, you need to select a polygon (remember that ray-cast thingy U) or edge, then under the Modify section click Poly Mesh then click Subdivide. This will bring up a properties box and turn your polygon into a mess of diamonds, or something like that. You have several options of subdividing at your disposal, including: Plus Signs, Diamonds, X's, and the ever useless Triangle. I have no clue what you use triangle for, only to piss you off when you realize you can only make one of them!? Well, when you finally choose your pattern and the number of iterations (eg. the density of the new 'mesh'?), you can begin playing with your new creation by translating those points, edges, and polygons around to make a beautiful masterpiece! If you select an edge and subdivide, you will in fact do the same thing you did with splitting the edge, only you can split it many times, and the parallel loop does not go around the entire object, but can if selected (very helpful)!
Freeze
In XSI you edit (operate on) a kind of 'editable preview' of your model rather than the actual model itself. XSI records these operations in stacks. When you Freeze the operator stack you effectively apply or save the changes to your model. This means you can no longer undo those operations.
Use Freeze All Transforms & Freeze (or Freeze M):
- Before applying bones.
- Before exporting.
- If XSI is getting slow.
Freeze All Transforms: In order to export your model properly, you must use the Freeze All Transforms (translations, scalings, and rotations) function, which is buried in the context menu triggered by L-clicking the head (title) of the "Transform" panel.
Freeze M: clears the modelling stack, including any weight maps and texture projections that were applied in the modelling region. The Freeze M button lives in the "Edit" panel at the foot of the right hand sidebar. When your model is enveloped, Freeze will also clear weight map, so use Freeze M (Freeze Model changes) instead.
Freeze: (aka 'Freeze entire object') clears the entire construction history, including the modelling stack as well as any texture operator stacks and weight painting stacks. The Freeze button lives in the "Edit" panel at the foot of the right hand sidebar. Freezing removes any animation on the modelling operators (for example, the angle of a Twist deformation, and so on). The values at the current frame are used.
;)Conclusion
Well, I hope that helped the aching questions you had about all those fundamental differences between XSI and the rest of the world. I sure as hell had a great time writing this tutorial. o orbit Shift + a frame all p dolly F12 max view z pan Ctrl + Tab restore s navigate a frame l roll Alt + Enter property Ctrl + ` close g grid Ctrl + cmd supress r reset Alt + 7 texture q quick
t point 8 scene u ray poly 3 render e edge 6 layer i ray edge 7 tree y rectangle ' tip Ctrl+Shift + i invert = cluster SP recto Ctrl + l cluster Ctrl + g group v translate Ctrl+Shift + g remove x scale c rotate Ctrl + d duplicate m move Ctrl + i instantiate Ctrl+Shift + d extrude n poly tool TE F7 Rectangle r rotate clock F8 Lasso Shift + r rotate count F9 Freeform Alt + r aspect clock F10 Raycast Alt+Shift + r aspect count F11 Paint RMB Left Middle Right TE toolbars X Y Z 2D origin
