How to add new subtitles for L4D2: Difference between revisions
m (Lt.Mori moved page Closed Captions l4d2 to Valve Developer Community:How to add new subtitles for L4D2: me equivoque de titulo xd) |
No edit summary |
||
| Line 1: | Line 1: | ||
= | = How to Create Custom Subtitles in Left 4 Dead 2 = | ||
Hello everyone, this will be a guide divided into sections on how to add new subtitles. | |||
{{note| | {{note|It is assumed that you are familiar with using Hammer, and handling files such as '''.lmp''' and '''level_sounds.txt''', since this involves modifying maps.}} | ||
== | == Sections == | ||
* | * Adding new subtitles to official campaigns | ||
* | * Adding new subtitles to custom campaigns | ||
* | * Adding subtitles to your own custom campaign | ||
== | == Adding new subtitles to official campaigns == | ||
=== | === First step === | ||
Have the audio file(s) you want to subtitle ready, then create a folder named <code>maps</code> and add 2 files inside: | |||
* | * A <code>.lmp</code> file | ||
* | * A <code>level_sounds.txt</code> file | ||
=== | === Second step === | ||
Open the map's <code>level_sounds.txt</code> file. | |||
{{note| | {{note|Official maps do not come with this file, so you'll have to create a new one. This is easy: just find the map's name and create the corresponding <code>level_sounds.txt</code>.}} | ||
* | *Example:* | ||
Dark Carnival | Dark Carnival map 4 = <code>c2m4_barns</code> | ||
→ | → The file should be named: <code>c2m4_concert_level_sounds.txt</code> | ||
{{note| | {{note|If you don't know the map's base name, open the game console and type <code>map </code>. You'll see the names there.}} | ||
=== | === Third step === | ||
Simply define the sound name and edit the values. | |||
Example: | |||
<pre> | <pre> | ||
| Line 43: | Line 43: | ||
</pre> | </pre> | ||
Once done, copy the name above the curly braces <code>{ }</code> and use it later in Hammer. | |||
=== | === Fourth step === | ||
Open the decompiled map in Hammer. Instead of linking directly to the <code>.wav</code> file, insert the sound name (e.g., <code>npc.map4_hippie1</code>). | |||
Then compile the map. | |||
=== | === Fifth step === | ||
Open the <code>.lmp</code> file that you previously extracted from the <code>.bsp</code> (located in <code>left4dead2/maps</code>). | |||
Example: | |||
<pre> | <pre> | ||
| Line 58: | Line 58: | ||
</pre> | </pre> | ||
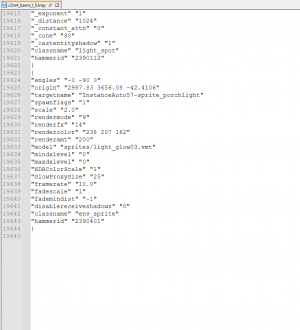
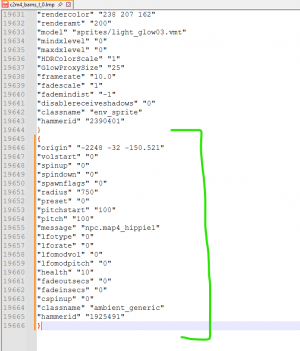
Once opened, scroll to the end of the file. Then open the new compiled <code>.bsp</code> and copy the edited lines. | |||
[[File:Ejemplo.png|thumb|left|300px| | [[File:Ejemplo.png|thumb|left|300px|Add the lines you created at the end]] | ||
<br clear="all" /> | <br clear="all" /> | ||
[[File:Captura_de_pantalla_2025-08-30_230518.png|thumb|left|300px| | [[File:Captura_de_pantalla_2025-08-30_230518.png|thumb|left|300px|Something like this]] | ||
<br clear="all" /> | <br clear="all" /> | ||
Once that's done, drag the <code>.lmp</code> file into the <code>lmpfix</code> program so it can fix it. | |||
=== | === Sixth step === | ||
Create a folder named <code>resource</code> and inside it, a file: | |||
<code> | <code>closecaption_your_language.txt</code> | ||
Basic content: | |||
<pre> | <pre> | ||
// | // TEMPLATE | ||
"lang" | "lang" | ||
{ | { | ||
"Language" " | "Language" "Your language" | ||
"Tokens" | "Tokens" | ||
{ | { | ||
"testcommands" "<clr:255,0,0>This is red<I> italics<B> bold <cr><clr:255,255,255>white again." | "testcommands" "<clr:255,0,0>This is red<I> italics<B> bold <cr><clr:255,255,255>white again." | ||
" | "title_name" "<clr:255,255,255>Subtitle line" | ||
} | } | ||
} | } | ||
</pre> | </pre> | ||
Example: | |||
<pre> | <pre> | ||
// | // EXAMPLE | ||
"lang" | "lang" | ||
{ | { | ||
| Line 95: | Line 95: | ||
"Tokens" | "Tokens" | ||
{ | { | ||
"npc.map4_hippie1" "<clr:255,255,255>hippie: | "npc.map4_hippie1" "<clr:255,255,255>hippie: Hello world" | ||
} | } | ||
} | } | ||
</pre> | </pre> | ||
Save the file. | |||
=== | === Seventh step === | ||
Create a <code>gameinfo.txt</code> file in the same folder, like this: | |||
<pre> | <pre> | ||
resource > " | resource > "closecaption_your_language.txt" | ||
gameinfo.txt | gameinfo.txt | ||
</pre> | </pre> | ||
=== | === Eighth step === | ||
Drag the <code>closecaption_your_language.txt</code> file onto <code>captioncompiler.exe</code> (found in the <code>bin</code> folder). | |||
This should generate: <code>closecaption_your_language.dat</code> in the <code>resource</code> folder. | |||
{{note| | {{note|If it doesn’t work, open CMD and type:}} | ||
<pre> | <pre> | ||
cd C:\Program Files (x86)\Steam\steamapps\common\Left 4 Dead 2\left4dead2 | cd C:\Program Files (x86)\Steam\steamapps\common\Left 4 Dead 2\left4dead2 | ||
"../bin/captioncompiler" "../../left4dead2_subtitles_custom/resource/ | "../bin/captioncompiler" "../../left4dead2_subtitles_custom/resource/closecaption_your_language.txt" | ||
</pre> | </pre> | ||
( | (Make sure to adjust the path and folder name according to your installation.) | ||
== | == Conclusion == | ||
Done! That’s everything you need to do for subtitles to appear in official campaigns, in case you want to add new ones. | |||
Revision as of 20:59, 30 August 2025
How to Create Custom Subtitles in Left 4 Dead 2
Hello everyone, this will be a guide divided into sections on how to add new subtitles.
Sections
- Adding new subtitles to official campaigns
- Adding new subtitles to custom campaigns
- Adding subtitles to your own custom campaign
Adding new subtitles to official campaigns
First step
Have the audio file(s) you want to subtitle ready, then create a folder named maps and add 2 files inside:
- A
.lmpfile - A
level_sounds.txtfile
Second step
Open the map's level_sounds.txt file.
level_sounds.txt.- Example:*
Dark Carnival map 4 = c2m4_barns
→ The file should be named: c2m4_concert_level_sounds.txt
map . You'll see the names there.Third step
Simply define the sound name and edit the values. Example:
"npc.map4_hippie1"
{
    "channel"    "CHAN_VOICE"
    "volume"     "1.0"
    "pitch"      "PITCH_NORM"
    "soundlevel" "SNDLVL_90dB"
    "wave"       "map4/hippy/hippie1.wav"
}
Once done, copy the name above the curly braces { } and use it later in Hammer.
Fourth step
Open the decompiled map in Hammer. Instead of linking directly to the .wav file, insert the sound name (e.g., npc.map4_hippie1).
Then compile the map.
Fifth step
Open the .lmp file that you previously extracted from the .bsp (located in left4dead2/maps).
Example:
c2m4_barns_l_0.lmp
Once opened, scroll to the end of the file. Then open the new compiled .bsp and copy the edited lines.
Once that's done, drag the .lmp file into the lmpfix program so it can fix it.
Sixth step
Create a folder named resource and inside it, a file:
closecaption_your_language.txt
Basic content:
// TEMPLATE
"lang"
{
    "Language" "Your language"
    "Tokens"
    {
        "testcommands" "<clr:255,0,0>This is red<I> italics<B> bold <cr><clr:255,255,255>white again."
        "title_name" "<clr:255,255,255>Subtitle line"
    }
}
Example:
// EXAMPLE
"lang"
{
    "Language" "english"
    "Tokens"
    {
        "npc.map4_hippie1" "<clr:255,255,255>hippie: Hello world"
    }
}
Save the file.
Seventh step
Create a gameinfo.txt file in the same folder, like this:
resource > "closecaption_your_language.txt"
gameinfo.txt
Eighth step
Drag the closecaption_your_language.txt file onto captioncompiler.exe (found in the bin folder).
This should generate: closecaption_your_language.dat in the resource folder.
cd C:\Program Files (x86)\Steam\steamapps\common\Left 4 Dead 2\left4dead2
"../bin/captioncompiler" "../../left4dead2_subtitles_custom/resource/closecaption_your_language.txt"
(Make sure to adjust the path and folder name according to your installation.)
Conclusion
Done! That’s everything you need to do for subtitles to appear in official campaigns, in case you want to add new ones.

