User:Pinsplash/Before and After Screenshots: Difference between revisions
Jump to navigation
Jump to search
(Created page with "File:WiseGarageDoor01 beforeafter.png|250px|thumbnail|right|Final result using these steps. Sure, you could upload two images separately as well, but the method I'm showing...") |
(changed the method to be a lot simpler. why didn't i do this before *facepalm*) |
||
| Line 1: | Line 1: | ||
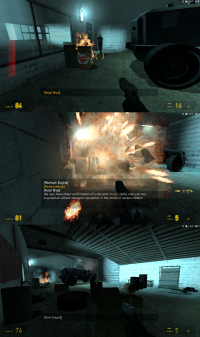
[[File:Barrel explosion effects.png|200px|thumbnail|right|You can extend this to three or more images, too.]] | [[File:Barrel explosion effects.png|200px|thumbnail|right|You can extend this to three or more images, too.]] | ||
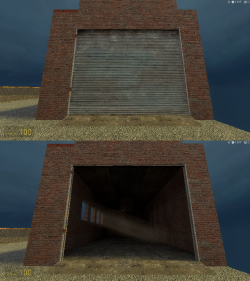
[[File:WiseGarageDoor01 beforeafter.png|250px|thumbnail|left|Final result using these steps. Sure, you could upload two images separately as well, but the method I'm showing here will be a little less clutter for wiki pages, and one less image that needs to be uploaded.]] | |||
Hi! This is a quick tutorial on how I prefer to do before and after screenshots, for things like doors moving, a visual issue and the result after fixing it, how something looks in Hammer vs. ingame, etc. | Hi! This is a quick tutorial on how I prefer to do before and after screenshots, for things like doors moving, a visual issue and the result after fixing it, how something looks in Hammer vs. ingame, etc. | ||
| Line 7: | Line 7: | ||
#'''Get your first screenshot.''' Most keyboards have a {{key|Prt Sc}} button on them. It may also say "Print Screen" or something like that. This will put everything currently on your screen into an image on your system's clipboard. You may have to hold your {{key|fn}} key too, if you have one. This is the fastest way to take a screenshot for Windows. Sometimes it won't work correctly, especially Goldsource games. If you need an alternative, I recommend [http://www.fraps.com/ Fraps]. | #'''Get your first screenshot.''' Most keyboards have a {{key|Prt Sc}} button on them. It may also say "Print Screen" or something like that. This will put everything currently on your screen into an image on your system's clipboard. You may have to hold your {{key|fn}} key too, if you have one. This is the fastest way to take a screenshot for Windows. Sometimes it won't work correctly, especially Goldsource games. If you need an alternative, I recommend [http://www.fraps.com/ Fraps]. | ||
#'''Open a new image in paint.net and paste your screenshot in.''' Use {{key|Ctrl|V}} for quick pasting. If it asks you if you want to expand the canvas (the space used for image editing) or keep it the same size, click '''Expand canvas'''. Also, if you see any additional white space after pasting, go to '''Image, Crop to Selection''' or press {{key|Ctrl|Shift|i}} to get rid of it. | #'''Open a new image in paint.net and paste your screenshot in.''' Use {{key|Ctrl|V}} for quick pasting. If it asks you if you want to expand the canvas (the space used for image editing) or keep it the same size, click '''Expand canvas'''. Also, if you see any additional white space after pasting, go to '''Image, Crop to Selection''' or press {{key|Ctrl|Shift|i}} to get rid of it. | ||
#''' | #'''Double the canvas width or height.''' Which dimension you double is up to you. Go to '''Image, Canvas Size...''' or press {{key|Ctrl|Shift|R}} to open the canvas size dialog box. Change either the width or height to double the number currently in the box. If your height was 720, put 1440. The '''Anchor''' section will determine on what sides of the image the new space is generated. You probably want to choose the '''Top Left''' or click the top left box. Click '''OK'''.{{clr}} | ||
#'''Get your "after" screenshot, and paste it adjacent to the first one.''' To move it, open the Tools window with {{key|F5}} or click the small icon with the hammer in the top right, and then click on the Move Selected Pixels button (looks like a blue triangle with a plus). If it feels kind of hard to get it in the perfect spot, use the zoom buttons in the bottom right so you can get a better view.{{clr}} | |||
#''' | |||
Save it and you're done. Also consider adding numbers to your image, to show it's a sequence of events if not clear. | Save it and you're done. Also consider adding numbers to your image, to show it's a sequence of events if not clear. You may also want to scale the image down, as this image is now double the data of a regular screenshot. | ||
Latest revision as of 17:44, 29 July 2018
Hi! This is a quick tutorial on how I prefer to do before and after screenshots, for things like doors moving, a visual issue and the result after fixing it, how something looks in Hammer vs. ingame, etc.
My preferred image editor is paint.net. It's not overly complex for the job, like Adobe Photoshop, but is sophisticated enough, unlike say, Microsoft Paint. Also, it's free. Paint.net is what I'll be using for this. Other programs will have to follow alternate steps at some points.
- Get your first screenshot. Most keyboards have a Prt Sc button on them. It may also say "Print Screen" or something like that. This will put everything currently on your screen into an image on your system's clipboard. You may have to hold your fn key too, if you have one. This is the fastest way to take a screenshot for Windows. Sometimes it won't work correctly, especially Goldsource games. If you need an alternative, I recommend Fraps.
- Open a new image in paint.net and paste your screenshot in. Use Ctrl+V for quick pasting. If it asks you if you want to expand the canvas (the space used for image editing) or keep it the same size, click Expand canvas. Also, if you see any additional white space after pasting, go to Image, Crop to Selection or press Ctrl+⇧ Shift+i to get rid of it.
- Double the canvas width or height. Which dimension you double is up to you. Go to Image, Canvas Size... or press Ctrl+⇧ Shift+R to open the canvas size dialog box. Change either the width or height to double the number currently in the box. If your height was 720, put 1440. The Anchor section will determine on what sides of the image the new space is generated. You probably want to choose the Top Left or click the top left box. Click OK.
- Get your "after" screenshot, and paste it adjacent to the first one. To move it, open the Tools window with F5 or click the small icon with the hammer in the top right, and then click on the Move Selected Pixels button (looks like a blue triangle with a plus). If it feels kind of hard to get it in the perfect spot, use the zoom buttons in the bottom right so you can get a better view.
Save it and you're done. Also consider adding numbers to your image, to show it's a sequence of events if not clear. You may also want to scale the image down, as this image is now double the data of a regular screenshot.

