Ladders: Difference between revisions
No edit summary |
(Minor edits, and added proper captions to HL2 ladder images.) |
||
| Line 9: | Line 9: | ||
By SixThree | By SixThree | ||
To create a ladder for CS:S, create a prop_static with a ladder model (props_c17). You can also create a brush-based ladder using a simple brush and a ladder texture. In front of the object/brush you want to be climbable, create another brush as close as you can to it, but without touching. Make sure the face is the same width/height as the climbable object. Assign the material ''toolsnodraw'' to this brush and then hit CTRL+T to create an entity. Select func_ladder from the Object Properties dialog. You now have a climbable face which is in front of the object/brush. This gives the illusion that you are climbing the model ladder, where in fact you are scaling the invisible ladder entity just in front of it. | |||
To create a ladder for CS:S, create a prop_static with a ladder model (props_c17). You can also create a brush-based ladder using a simple brush and a ladder texture. | |||
[[Image:ladtut1.jpg]] | [[Image:ladtut1.jpg]] | ||
| Line 22: | Line 21: | ||
To create a ladder you must define the volume in which the player will move through space while on the ladder. This includes a starting and end position. The volume is described via the <code>func_useableladder</code> entity. The entity has two positions: a starting point and an ending point <i>(See Fig. 1a)</i> . These can be typed into the key-value fields, or more typically the ladder can be defined by using the visual ladder tool, visible when the entity is selected <i>(See Fig. 1b)</i> . Using this tool you can drag the start and end point of the ladder into appropriate positions in the 2D view. The ladder's start and ending point may be of arbitrary orientation and length <i>(See Fig. 1c)</i>. Simply pull the endpoints where you want them and the player will move between these points while on the ladder. | To create a ladder you must define the volume in which the player will move through space while on the ladder. This includes a starting and end position. The volume is described via the <code>func_useableladder</code> entity. The entity has two positions: a starting point and an ending point <i>(See Fig. 1a)</i> . These can be typed into the key-value fields, or more typically the ladder can be defined by using the visual ladder tool, visible when the entity is selected <i>(See Fig. 1b)</i> . Using this tool you can drag the start and end point of the ladder into appropriate positions in the 2D view. The ladder's start and ending point may be of arbitrary orientation and length <i>(See Fig. 1c)</i>. Simply pull the endpoints where you want them and the player will move between these points while on the ladder. | ||
{| | {| border=0 cellspacing=0 cellpadding=0 | ||
|[[Image:hammer_ladders1.jpg | Fig. 1a - Ladder points]] | | [[Image:hammer_ladders1.jpg|frame|left|Fig. 1a - Ladder points]] | ||
| [[Image:hammer_ladders2.jpg|frame|left|Fig. 1b - Changing orientation]] | |||
| [[Image:hammer_ladders3.jpg|frame|left|Fig. 1c - Slanted ladder points]] | |||
|} | |} | ||
The ladder's volume must be clear of obstructions. If a solid brush surfaces passes through the space you define, the ladder may not be climbable. | The ladder's volume must be clear of obstructions. If a solid brush surfaces passes through the space you define, the ladder may not be climbable. | ||
[[Image:hammer_ladders4.jpg | Fig. 1d - Dismounts]] | [[Image:hammer_ladders4.jpg|frame|left|Fig. 1d - Dismounts]] | ||
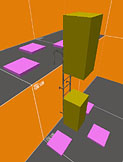
Along with the volume of movement, the ladder also needs "dismount" points (See Fig. 1d). These points are defined using the <code>info_ladderdismount</code> entity. These are markers in space that define where a player can exit a ladder from. They are most easily thought of as hints to good positions to place the player in. When a player reaches the top or bottom of a ladder, the code attempts to find the nearest dismount point to where the player is standing and in the direction the player is looking. If there is a dismount point within a certain threshold tolerance, the player will automatically dismount the ladder and move onto that dismount point. The entity has a keyvalue field called <i>LadderName</i> which holds the name of the ladder it is used by. Like the ladder volume, the dismount points must be free of obstruction and allow the player to stand at their position without intersecting solid world geometry. | Along with the volume of movement, the ladder also needs "dismount" points (See Fig. 1d). These points are defined using the <code>info_ladderdismount</code> entity. These are markers in space that define where a player can exit a ladder from. They are most easily thought of as hints to good positions to place the player in. When a player reaches the top or bottom of a ladder, the code attempts to find the nearest dismount point to where the player is standing and in the direction the player is looking. If there is a dismount point within a certain threshold tolerance, the player will automatically dismount the ladder and move onto that dismount point. The entity has a keyvalue field called <i>LadderName</i> which holds the name of the ladder it is used by. Like the ladder volume, the dismount points must be free of obstruction and allow the player to stand at their position without intersecting solid world geometry. | ||
Generally these are best placed around the base of the ladder from center, left and right. | Generally these are best placed around the base of the ladder from center, left and right.<br style="clear:both" /> | ||
=Testing= | =Testing= | ||
Revision as of 15:37, 28 June 2005
Ladders
Because the environments of Half-Life 2 became more complex than their successors, the demand for a better system of navigating ladders also arose. In previous iterations of the engine, ladders were simply a surface property that could be applied to brush surfaces. This process has become slightly more complicated to provide better control for the level designer and player alike.
Counter-Strike: Source Method
By SixThree
To create a ladder for CS:S, create a prop_static with a ladder model (props_c17). You can also create a brush-based ladder using a simple brush and a ladder texture. In front of the object/brush you want to be climbable, create another brush as close as you can to it, but without touching. Make sure the face is the same width/height as the climbable object. Assign the material toolsnodraw to this brush and then hit CTRL+T to create an entity. Select func_ladder from the Object Properties dialog. You now have a climbable face which is in front of the object/brush. This gives the illusion that you are climbing the model ladder, where in fact you are scaling the invisible ladder entity just in front of it.
File:Ladtut1.jpg File:Ladtut2.jpg File:Ladtut3.jpg
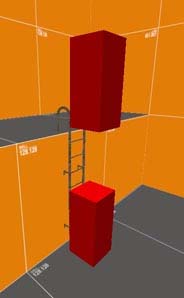
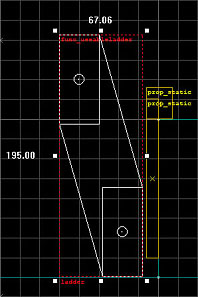
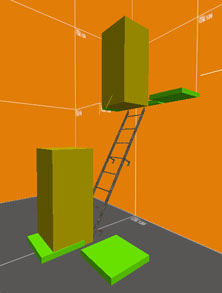
The first picture shows the ladder model without the invisible climable face. If you were to compile at this point, you would find an unclimable ladder. The next pic represents the combination of model + toolsnodraw assigned brush, with the brush being tied to "func_ladder". The last screenie shows the side view of the setup in the Hammer editor. The purple lines represent the toolsnodraw brush, the yellow lines show the ladder model, and the blue/teal lines show the ledge and the floor. **Make sure that the toolsnodraw brush IS NOT touching the ground, or you will find slits/leaks in your floor.** Compile and enjoy your camptastic perch.
Half-Life 2/DM Method
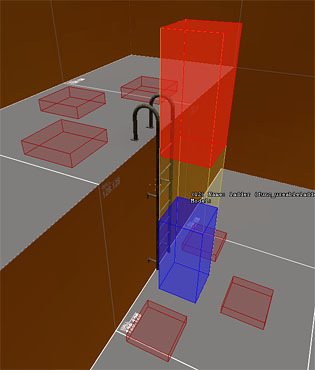
To create a ladder you must define the volume in which the player will move through space while on the ladder. This includes a starting and end position. The volume is described via the func_useableladder entity. The entity has two positions: a starting point and an ending point (See Fig. 1a) . These can be typed into the key-value fields, or more typically the ladder can be defined by using the visual ladder tool, visible when the entity is selected (See Fig. 1b) . Using this tool you can drag the start and end point of the ladder into appropriate positions in the 2D view. The ladder's start and ending point may be of arbitrary orientation and length (See Fig. 1c). Simply pull the endpoints where you want them and the player will move between these points while on the ladder.
The ladder's volume must be clear of obstructions. If a solid brush surfaces passes through the space you define, the ladder may not be climbable.
Along with the volume of movement, the ladder also needs "dismount" points (See Fig. 1d). These points are defined using the info_ladderdismount entity. These are markers in space that define where a player can exit a ladder from. They are most easily thought of as hints to good positions to place the player in. When a player reaches the top or bottom of a ladder, the code attempts to find the nearest dismount point to where the player is standing and in the direction the player is looking. If there is a dismount point within a certain threshold tolerance, the player will automatically dismount the ladder and move onto that dismount point. The entity has a keyvalue field called LadderName which holds the name of the ladder it is used by. Like the ladder volume, the dismount points must be free of obstruction and allow the player to stand at their position without intersecting solid world geometry.
Generally these are best placed around the base of the ladder from center, left and right.
Testing
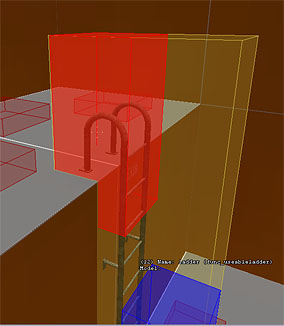
Once the func_useableladder entity and its info_ladderdismount points have been placed, you can compile your map and test them. Using the sv_showladders console command, you can cause the engine to draw debugging information about the ladder system (Note: You'll have to restart a map if one is already running when you enable this console command). This information will show you the start and end points of the ladder, as well as the dismount points (See Fig. 2a).
If any of these entities is not setup properly (commonly due to interpentration with solid world geometry or the prop model of the ladder itself), it will display this. (See Fig. 2b).
 |
|
