Fr/Bump map: Difference between revisions
Anarkia777 (talk | contribs) No edit summary |
Anarkia777 (talk | contribs) No edit summary |
||
| Line 2: | Line 2: | ||
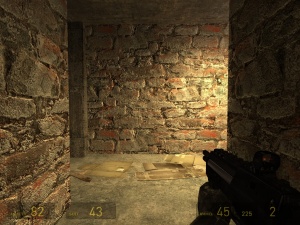
[[Image:Example of bump mapping.jpg|thumb|The above material in-game.]] | [[Image:Example of bump mapping.jpg|thumb|The above material in-game.]] | ||
Dans la réalité le sol, les murs et beaucoup de surface ne sont pas lisse comme dans les moteur 3D en temsp réels, il ont beaucoup de discontinuité et la lumière, lorsqu'elle tape sur ces surface donne des ombrage qui permettent de donner la direction de la source de la lumière. | |||
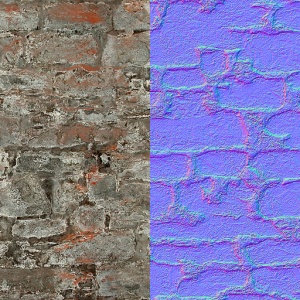
Il n'est pas pensable de modeliser toute ces discontinuité pour des raison de temps et de ressource matériel, on à donc devellopé le "Bump Maping." Cette technique consiste a donner du relief sur une surface pourtant lisse. Le moteur Source utilise une des technique du Bump : Le normal maping. Une texture en 3 couche RVB, donc chacune donne des indications sur le sens du bump : | |||
# Le '''red''' canal définie la face horizontal (X-axis) | |||
# | |||
#:0 = left | #:0 = left | ||
#:128 = forward (facing viewer) | #:128 = forward (facing viewer) | ||
#:255 = right | #:255 = right | ||
# | # Le '''green''' canal définie la face vertical (Y-axis) | ||
#:0 = up | #:0 = up | ||
#:128 = forward (facing viewer) | #:128 = forward (facing viewer) | ||
#:255 = down | #:255 = down | ||
# The '''blue''' | # The '''blue''' canal définie la hauteur, la force du bump (Z-axis) | ||
#:0 = | #:0 = profondeur maximal | ||
#:128 = | #:128 = profondeur maximal capable de recevoir les lumière dynamique (eviter de descendre en dessous) | ||
#:255 = | #:255 = epaisseur maximal | ||
The three channels between them allow the engine to calculate a normal vector for every pixel, allowing it to generate shadows and highlights on a two-dimensional surface. | The three channels between them allow the engine to calculate a normal vector for every pixel, allowing it to generate shadows and highlights on a two-dimensional surface. | ||
Revision as of 11:18, 1 November 2008

Dans la réalité le sol, les murs et beaucoup de surface ne sont pas lisse comme dans les moteur 3D en temsp réels, il ont beaucoup de discontinuité et la lumière, lorsqu'elle tape sur ces surface donne des ombrage qui permettent de donner la direction de la source de la lumière. Il n'est pas pensable de modeliser toute ces discontinuité pour des raison de temps et de ressource matériel, on à donc devellopé le "Bump Maping." Cette technique consiste a donner du relief sur une surface pourtant lisse. Le moteur Source utilise une des technique du Bump : Le normal maping. Une texture en 3 couche RVB, donc chacune donne des indications sur le sens du bump :
- Le red canal définie la face horizontal (X-axis)
- 0 = left
- 128 = forward (facing viewer)
- 255 = right
- Le green canal définie la face vertical (Y-axis)
- 0 = up
- 128 = forward (facing viewer)
- 255 = down
- The blue canal définie la hauteur, la force du bump (Z-axis)
- 0 = profondeur maximal
- 128 = profondeur maximal capable de recevoir les lumière dynamique (eviter de descendre en dessous)
- 255 = epaisseur maximal
The three channels between them allow the engine to calculate a normal vector for every pixel, allowing it to generate shadows and highlights on a two-dimensional surface.
A bump map is largely useless for really flat surfaces like smooth concrete or metal, but even rough concrete sometimes has enough depth to it to make one worthwhile.
See also
$bumpmap, for adding a bump map to a material$ssbump, for Valve's new self-shadowing bump maps.- Normal Map Creation
- Normal2dudv a third party tool for converting normalmaps to Dx8-friendly du/dv maps.
- An old article that explains the concept well.
