Hammer Manual Configuration: Difference between revisions
Jump to navigation
Jump to search
 Warning:In most cases, Hammer will configure itself and you do not need to follow this procedure. If you have problems, it is much simplier to reset the game configuration instead.
m (added spanish otherlang) |
m (→Read this first!: ? I'm not sure) |
||
| Line 3: | Line 3: | ||
If you launch the Hammer editor with no proper game configurations set up, the Hammer Editor has not automatically configured itself after installing the '''Source SDK'''. You can follow these steps to manually configure it. Before following these steps to repair a bad configuration, it is ''strongly suggested'' that you first attempt to fix your configuration by following the steps outlined in [[Incorrect Hammer configuration]]. | If you launch the Hammer editor with no proper game configurations set up, the Hammer Editor has not automatically configured itself after installing the '''Source SDK'''. You can follow these steps to manually configure it. Before following these steps to repair a bad configuration, it is ''strongly suggested'' that you first attempt to fix your configuration by following the steps outlined in [[Incorrect Hammer configuration]]. | ||
{{warning|In most cases, Hammer will configure itself and you '''do not''' need to follow this procedure. If you have problems, it is much | {{warning|In most cases, Hammer will configure itself and you '''do not''' need to follow this procedure. If you have problems, it is much simplier to [[Incorrect Hammer configuration|reset the game configuration]] instead.}} | ||
== Adding a new Game Configuration == | == Adding a new Game Configuration == | ||
Revision as of 01:39, 16 July 2008
Read this first!
If you launch the Hammer editor with no proper game configurations set up, the Hammer Editor has not automatically configured itself after installing the Source SDK. You can follow these steps to manually configure it. Before following these steps to repair a bad configuration, it is strongly suggested that you first attempt to fix your configuration by following the steps outlined in Incorrect Hammer configuration.
Adding a new Game Configuration
- Run Hammer from the Source SDK Launcher.
- When you see the First Time Setup dialog box, click the No button:
- This Configure Hammer dialog should appear next.
- If this dialog does not appear, choose Options from the Tools menu, and then select the Game Configurations tab.
- Click on the topmost Edit button, next to the Configuration drop-down list. The Edit Game Configurations dialog appears:
- Press the Add button. This will open the Add a game dialog:
- Type in "Counter-Strike", "cstrike", "Half-Life 2", "HL2DM" or an equivalent to name your configuration. This is the name that will appear in the Source SDK Launcher where it says Current Game. The exact name is unimportant, what's important is that it makes sense to you. Press OK to confirm your choice and close the dialog.
- Press the Close button in the Edit Game Configurations dialog.


Setting game directory and basic parameters
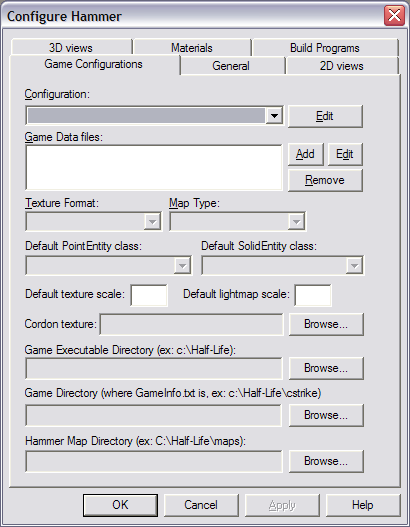
- You should now be back in the Configure Hammer dialog with your entry in the Configuration drop-down list:
- Press Add to the right of the Game Data files list. An Open dialog will appear:
- Open the appropriate .FGD file for your configuration:
- For a Counter-Strike: Source configuration, click on
cstrike.fgdand then the Open button. - For a Half-Life 2 configuration, click on
halflife2.fgdand then the Open button. - For a Half-Life 2 Deathmatch configuration, click on
hl2mp.fgdand then the Open button.
- For a Counter-Strike: Source configuration, click on
- Now you'll be back in the Configure Hammer dialog with these fields filled out:
- Type
0.25into the Default texture scale field. Typetools\toolsskyboxinto the Cordon texture field. - Under Game Executable Directory, hit Browse and go to where you have the the game installed.
- For example:
C:\Program Files\Valve\Steam\SteamApps\username\counter-strike source
- where username should be your Steam Login name.
- For example:
- Under Game Directory, copy what you entered into Game Executable Directory, paste it into Game Directory, and add the game directory to the end. The game directory for Counter-Strike is
\cstrike. For Half-Life 2, it is\hl2. For Half-Life 2 Deathmatch, it is\hl2mp.- For example, for a Counter-Strike configuration, your Game Directory might be:
C:\Program Files\Valve\Steam\SteamApps\username\counter-strike source\cstrike
- For a Half-Life 2, your Game Directory might be:
C:\Program Files\Valve\Steam\SteamApps\username\half-life 2\hl2
- For a Half-Life 2 Deathmatch, your Game Directory might be:
C:\Program Files\Valve\Steam\SteamApps\username\half-life 2 deathmatch\hl2mp- Again, where username should be your Steam Login name.
- Under Hammer Map Directory, you should enter in where you wish to save your .VMF map source files. Using the Source SDK Files and Directory Structure, you should enter the appropriate
mapsrcdirectory:- Example for Counter-Strike:
C:\Program Files\Valve\Steam\SteamApps\username\sourcesdk_content\cstrike\mapsrc
- Example for Half-Life 2:
C:\Program Files\Valve\Steam\SteamApps\username\sourcesdk_content\hl2\mapsrc
- Example for Half-Life 2 Deathmatch:
C:\Program Files\Valve\Steam\SteamApps\username\sourcesdk_content\hl2mp\mapsrc


Setting up the Build Programs
- Click on the Build Programs tab:
- Copy and paste the Game executable Directory you entered into the Game Configurations tab previously, then add
\hl2.exeon the end.- For example, for a Counter-Strike configuration, your Game Executable might be:
C:\Program Files\Valve\Steam\SteamApps\username\counter-strike source\hl2.exe
- For a Half-Life 2 configuration, your Game Executable might be:
C:\Program Files\Valve\Steam\SteamApps\username\half-life 2\hl2.exe
- For a Half-Life 2 Deathmatch configuration, your Game Executable might be:
C:\Program Files\Valve\Steam\SteamApps\username\half-life 2 deathmatch\hl2.exe- Again, where username should be your Steam Login name.
- For BSP executable, enter the location of the
vbsp.exe:C:\Program Files\Valve\Steam\SteamApps\username\sourcesdk\bin\vbsp.exe
- For VIS executable, enter the location of the
vvis.exe:C:\Program Files\Valve\Steam\SteamApps\username\sourcesdk\bin\vvis.exe
- For RAD executable, enter the location of the
vrad.exe:C:\Program Files\Valve\Steam\SteamApps\username\sourcesdk\bin\vrad.exe
- For Place compiled maps in this directory before running the game, add
\mapsthe end of the Game Directory:- Example for Counter-Strike:
C:\Program Files\Valve\Steam\SteamApps\username\counter-strike source\cstrike\maps
- Example for Half-Life 2:
C:\Program Files\Valve\Steam\SteamApps\username\half-life 2\hl2\maps
- Example for Half-Life 2 Deathmatch:
C:\Program Files\Valve\Steam\SteamApps\username\half-life 2 deathmatch\hl2mp\maps
- Press OK. Hammer is now configured for use.
