Rigging in XSI: Difference between revisions
(note: creation of the rig takes a long time, spelling, POV, what may be seen) |
(→Rigging Your Character - The Easy Way: - POV editing) |
||
| Line 2: | Line 2: | ||
''By Dominic Laflamme From Softimage'' | ''By Dominic Laflamme From Softimage'' | ||
=Rigging | =Rigging A Character Model - The Easy Way= | ||
==Anatomy of the Valve Character Rig== | ==Anatomy of the Valve Character Rig== | ||
[[Image:CreatingaCustomCharacter_1.gif|thumb|300px|[[Media:CreatingaCustomCharacter_1.gif|A image of the urban_reference.scn file]]]] | [[Image:CreatingaCustomCharacter_1.gif|thumb|300px|[[Media:CreatingaCustomCharacter_1.gif|A image of the urban_reference.scn file]]]] | ||
Characters in Half-Life 2 are enveloped (skinned) to a skeletal rig. The skeletal rig is then animated to deform the envelope. These animations are then stored in the XSI Mixer and later exported to individual SMD | Characters in Half-Life 2 are enveloped (skinned) to a skeletal rig. The skeletal rig is then animated to deform the envelope. These animations are then stored in the XSI Mixer and later exported to individual SMD files. | ||
The character used as a base in this tutorial is a Counter-Strike character included in the source SDK. | |||
* Start XSI Mod Tool | * Start XSI Mod Tool | ||
* Select File->Open | * Select File->Open | ||
* Select the Source SDK sample scene called urban_reference.scn | * Select the Source SDK sample scene called urban_reference.scn | ||
<code>\sourcesdk_content\cstrike\modelsrc\urban\xsi\urban_reference.scn</code> | |||
Once loaded, | Once loaded, the character is seen in what is called the reference pose (neutral pose). The colored spheres and boxes are animation controllers (implicit geometry). They are simple helpers attached to the underlying skeletal rig (which is currently hidden). They make it simple to animate a complex rig without seeing the entire skeleton on screen. | ||
Next, open up the XSI Scene Explorer by either selecting it from the Application menu (Application->Views->Explorer) or hitting the 8 key. | Next, open up the XSI Scene Explorer by either selecting it from the Application menu (Application->Views->Explorer) or hitting the 8 key. | ||
The explorer is a powerful tool to manage your scene. With the explorer, | {{note|The explorer is a powerful tool to manage your scene. With the explorer, the hierarchy of the scene can be navigated, objects can be re-parented, properties can be viewed, etc.}} | ||
| Line 26: | Line 26: | ||
[[image:CreatingaCustomCharacter_2.gif|thumb|400px|none|[[Media:CreatingaCustomCharacter_2.gif|How the urban_reference.scn file is setup]]]] | [[image:CreatingaCustomCharacter_2.gif|thumb|400px|none|[[Media:CreatingaCustomCharacter_2.gif|How the urban_reference.scn file is setup]]]] | ||
The rig is located under the model called urban_mdl. This model is simply a "container" object. The actual IK rig is located under the node called Bip01. At the bottom of the model, | The rig is located under the model called urban_mdl. This model is simply a "container" object. The actual IK rig is located under the node called Bip01. At the bottom of the model, there are three groups. Groups are also container objects that point to other objects in the scene. They can be used for grouping similar objects together. | ||
'''Envelope Deformers''' is a group that contains | '''Envelope Deformers''' is a group that contains the objects (bones) that actually deform the mesh. That is, each deformer influences at least 1 vertex in the mesh. | ||
'''hidden_distractions''' simply contains all objects that are not immediately useful to the animator and | '''hidden_distractions''' is simply a group that contains all the objects that are not immediately useful to the animator and should be hidden (e.g., parent nulls, IK chain roots and effectors). | ||
'''Plotted''' is a group that contains all bones that should be considered when creating an animation clip. | '''Plotted''' is a group that contains all bones that should be considered when creating an animation clip. More about this group is discussed below. | ||
==Understanding XSI Envelopes and Weights== | ==Understanding XSI Envelopes and Weights== | ||
[[image:CreatingaCustomCharacter_urban_mesh.gif|thumb|200px|[[Media:CreatingaCustomCharacter_urban_mesh.gif|different parts of the original mesh.]]]] | [[image:CreatingaCustomCharacter_urban_mesh.gif|thumb|200px|[[Media:CreatingaCustomCharacter_urban_mesh.gif|different parts of the original mesh.]]]]Another part of the scene will be examined, the part that will be replaced with a custom mesh. Before replacing it, the different parts should be understood. | ||
When | When the urban_mesh polygonal mesh object is expanded in the Explorer window, a property called "Polygonal Mesh" can be seen. This is where all operators that affect the mesh in any way can be found. In the accompanying image, note that this mesh has an Envelope Operator under it's animation set. A little lower in the listing, there a list of clusters containing two clusters. One cluster is the WeightMap; the other is the UV coordinates. XSI uses clusters to store per-vertex attributes. For the weight map cluster, these are the weights or ratios for each bone that are applied to the vertices that the bone deforms. The Texture_Coordinate_AUTO group contains UV coordinates for each vertex. | ||
The cluster that is | The cluster that is of interest for now is the WeightMap. This WeightMap will be applied to the new character mesh instead of re-enveloping the character mesh manually. This automatic assignment of weights will save hours of tedious mesh weighting. | ||
Included in the Valve Source Addon for XSI is | Included in the Valve Source Addon for XSI is an export plugin called WeightMap Export. See below: | ||
[[image:CreatingaCustomCharacter_3.gif|thumb|300px|none|[[Media:CreatingaCustomCharacter_3.gif|The Weightmap Export Option]]]] | [[image:CreatingaCustomCharacter_3.gif|thumb|300px|none|[[Media:CreatingaCustomCharacter_3.gif|The Weightmap Export Option]]]] | ||
Export the urban mesh weight map as follows: | |||
* | * Select the mesh that has the weight map to be exported. I.e., select the urban_mesh object. | ||
* From the ValveSource menu, select WeightMap Export | * From the ValveSource menu, select WeightMap Export. | ||
* | * Enter a meaningful filename for the weight map and save the map. | ||
==Importing | ==Importing A Custom Character Mesh== | ||
The XSI Mod Tool comes built in with several importers available under the File->Import menu. | The XSI Mod Tool comes built in with several importers available under the File->Import menu. | ||
| Line 60: | Line 60: | ||
The following is the mesh | The following is the mesh that will used for the custom character in this tutorial. | ||
[[image:CreatingaCustomCharacter_5.gif|thumb|300px|none|[[Media:|CreatingaCustomCharacter_5.gif|The new unskined mesh]]]] | [[image:CreatingaCustomCharacter_5.gif|thumb|300px|none|[[Media:|CreatingaCustomCharacter_5.gif|The new unskined mesh]]]] | ||
Of course, | Of course, a character meshed can be created from scratch directly in the Mod Tool using it's powerful modeling toolset. Here is a small list of modeling tutorials for XSI. | ||
http://www.xsibase.com/tutorials/modeling.php | http://www.xsibase.com/tutorials/modeling.php | ||
| Line 89: | Line 89: | ||
http://veazie.org/Tutorials/hl2%20tutorials.html | http://veazie.org/Tutorials/hl2%20tutorials.html | ||
The | The following steps involve moving and scaling the new character mesh (and possibly moving some points as well) to match the position of the original urban model mesh as closely as possible. The new mesh does not have to fit perfectly on top on the original mesh, but the better the fit, the better will be the resulting envelope. However, it is important that the joints (like elbows, knees, ankles, etc.) be at the same position. If they aren't, the arms and legs will bend in the wrong position. | ||
[[image:CreatingaCustomCharacter_6.jpg|thumb|300px|none|[[Media:CreatingaCustomCharacter_6.jpg|The new mesh overlaying the original]]]] | [[image:CreatingaCustomCharacter_6.jpg|thumb|300px|none|[[Media:CreatingaCustomCharacter_6.jpg|The new mesh overlaying the original]]]] | ||
Once | Once the new character mesh has been placed on top of the urban model mesh, the urban model mesh can be deleted as it is used only to provide a guide for positioning. Delete the urban model mesh by <code>branch-selecting</code> the urban_mesh object and hitting the delete key. <code>Branch-selection</code> selects the mesh and everything under it as well. An object can be <code>branch-selected</code> by middle-clicking on the object's name in the Explorer window, or by left-clicking the object's name and using the Select->Branch from the Select menu. | ||
Next, | Next, the saved weight map will be imported to apply the weights to our new mesh. | ||
* Select the mesh | * Select the mesh to which the weights are to be applied, i.e., the new character mesh. | ||
* Use the ValveSource->WeightMap Import menu. | * Use the ValveSource->WeightMap Import menu. | ||
* Select the weightmap file | * Select the weightmap file saved earlier and click OK. | ||
[[image:CreatingaCustomCharacter_7.gif|thumb|300px|none|[[Media:reatingaCustomCharacter_7.gif|WeightMap Import Before]]]] | [[image:CreatingaCustomCharacter_7.gif|thumb|300px|none|[[Media:reatingaCustomCharacter_7.gif|WeightMap Import Before]]]] | ||
The WeightMap Import plugin will transfer the WeightMap by averaging the weights according to vertex positions. The results are not perfect, but again, it will save | The WeightMap Import plugin will transfer the WeightMap by averaging the weights according to vertex positions. The results are not perfect, but again, it will save hours of envelope tweaking. The following image shows the results after the weights have been imported. | ||
[[image:CreatingaCustomCharacter_8.gif|thumb|200px|none|[[Media:CreatingaCustomCharacter_8.gif|WeightMap Import After]]]] | [[image:CreatingaCustomCharacter_8.gif|thumb|200px|none|[[Media:CreatingaCustomCharacter_8.gif|WeightMap Import After]]]] | ||
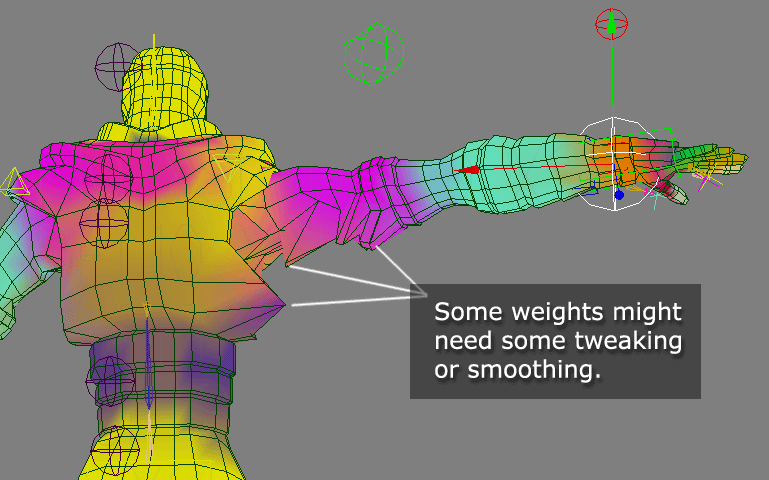
The WeightMap can be tested by moving the rig around. As seen in the image below, some weights might need some tweaking. | |||
{| | {| | ||
Revision as of 15:41, 27 June 2006
By Dominic Laflamme From Softimage
Rigging A Character Model - The Easy Way
Anatomy of the Valve Character Rig

Characters in Half-Life 2 are enveloped (skinned) to a skeletal rig. The skeletal rig is then animated to deform the envelope. These animations are then stored in the XSI Mixer and later exported to individual SMD files.
The character used as a base in this tutorial is a Counter-Strike character included in the source SDK.
- Start XSI Mod Tool
- Select File->Open
- Select the Source SDK sample scene called urban_reference.scn
\sourcesdk_content\cstrike\modelsrc\urban\xsi\urban_reference.scn
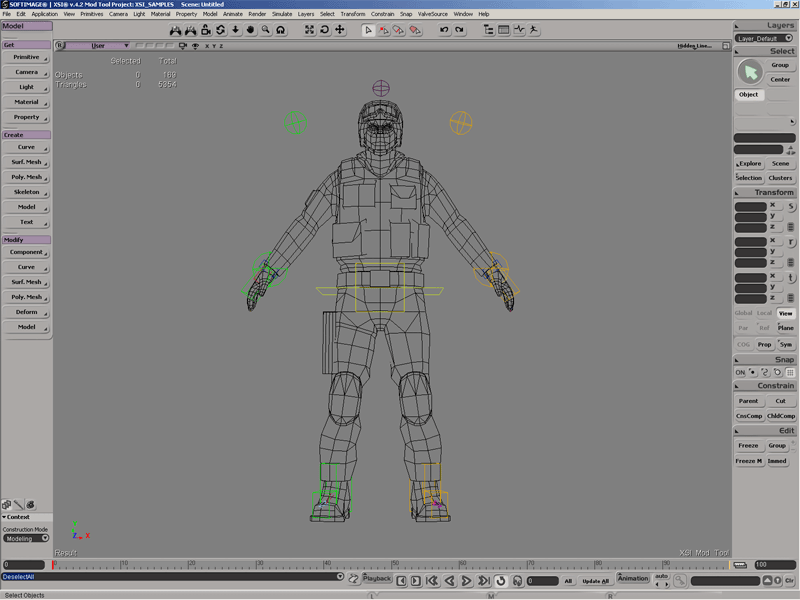
Once loaded, the character is seen in what is called the reference pose (neutral pose). The colored spheres and boxes are animation controllers (implicit geometry). They are simple helpers attached to the underlying skeletal rig (which is currently hidden). They make it simple to animate a complex rig without seeing the entire skeleton on screen.
Next, open up the XSI Scene Explorer by either selecting it from the Application menu (Application->Views->Explorer) or hitting the 8 key.
This image shows How the Scene is setup.

The rig is located under the model called urban_mdl. This model is simply a "container" object. The actual IK rig is located under the node called Bip01. At the bottom of the model, there are three groups. Groups are also container objects that point to other objects in the scene. They can be used for grouping similar objects together.
Envelope Deformers is a group that contains the objects (bones) that actually deform the mesh. That is, each deformer influences at least 1 vertex in the mesh.
hidden_distractions is simply a group that contains all the objects that are not immediately useful to the animator and should be hidden (e.g., parent nulls, IK chain roots and effectors).
Plotted is a group that contains all bones that should be considered when creating an animation clip. More about this group is discussed below.
Understanding XSI Envelopes and Weights

Another part of the scene will be examined, the part that will be replaced with a custom mesh. Before replacing it, the different parts should be understood.
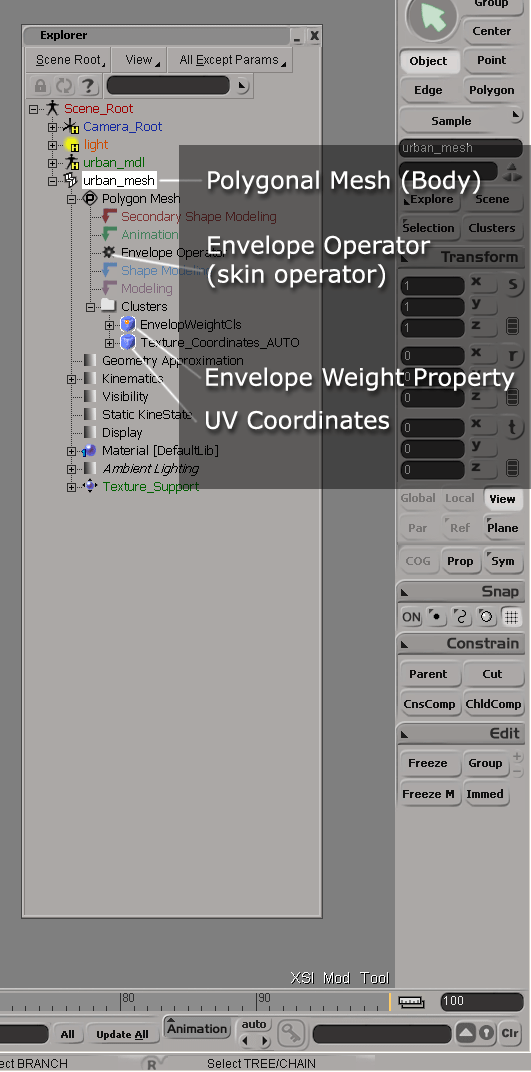
When the urban_mesh polygonal mesh object is expanded in the Explorer window, a property called "Polygonal Mesh" can be seen. This is where all operators that affect the mesh in any way can be found. In the accompanying image, note that this mesh has an Envelope Operator under it's animation set. A little lower in the listing, there a list of clusters containing two clusters. One cluster is the WeightMap; the other is the UV coordinates. XSI uses clusters to store per-vertex attributes. For the weight map cluster, these are the weights or ratios for each bone that are applied to the vertices that the bone deforms. The Texture_Coordinate_AUTO group contains UV coordinates for each vertex.
The cluster that is of interest for now is the WeightMap. This WeightMap will be applied to the new character mesh instead of re-enveloping the character mesh manually. This automatic assignment of weights will save hours of tedious mesh weighting.
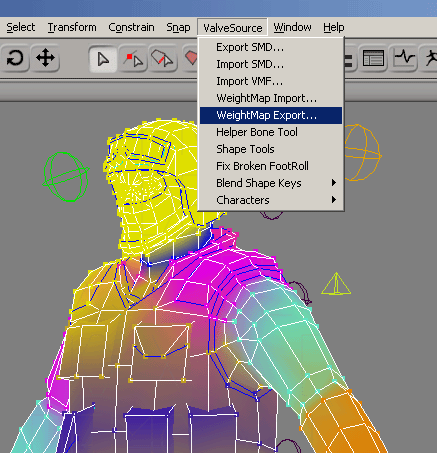
Included in the Valve Source Addon for XSI is an export plugin called WeightMap Export. See below:

Export the urban mesh weight map as follows:
- Select the mesh that has the weight map to be exported. I.e., select the urban_mesh object.
- From the ValveSource menu, select WeightMap Export.
- Enter a meaningful filename for the weight map and save the map.
Importing A Custom Character Mesh
The XSI Mod Tool comes built in with several importers available under the File->Import menu.
- dotXSI - Softimage Open File Format
- .3ds - Autodesk legacy format
- .obj - Alias Scene(non Functional at this time)
- .x - Microsoft DirectX file.
The following is the mesh that will used for the custom character in this tutorial.

Of course, a character meshed can be created from scratch directly in the Mod Tool using it's powerful modeling toolset. Here is a small list of modeling tutorials for XSI.
http://www.xsibase.com/tutorials/modeling.php
http://www.mindspring.com/%7Ebblakesley/Tutorial1/main.html
http://www.chnl1.tv/tutorial_1.htm
http://www.chnl1.tv/tutorial_2.htm
http://www.anikoleez.com/tuto/tuto02.htm
http://www.onionboy.co.uk/tutorials_eye.html
http://www.joncrow.com/tutorials/xsi_tuts/rotoscope_technique/rotoscoping_technique.htm
http://www.joncrow.com/tutorials/xsi_tuts/Symmetrical%20Shape%20Anim/sym_shape_anim_compressed.avi
http://www.thejaco.com/tutorials/3_tire.avi
http://www.anotherhell.com/tutorials.htm
http://veazie.org/Tutorials/hl2%20tutorials.html
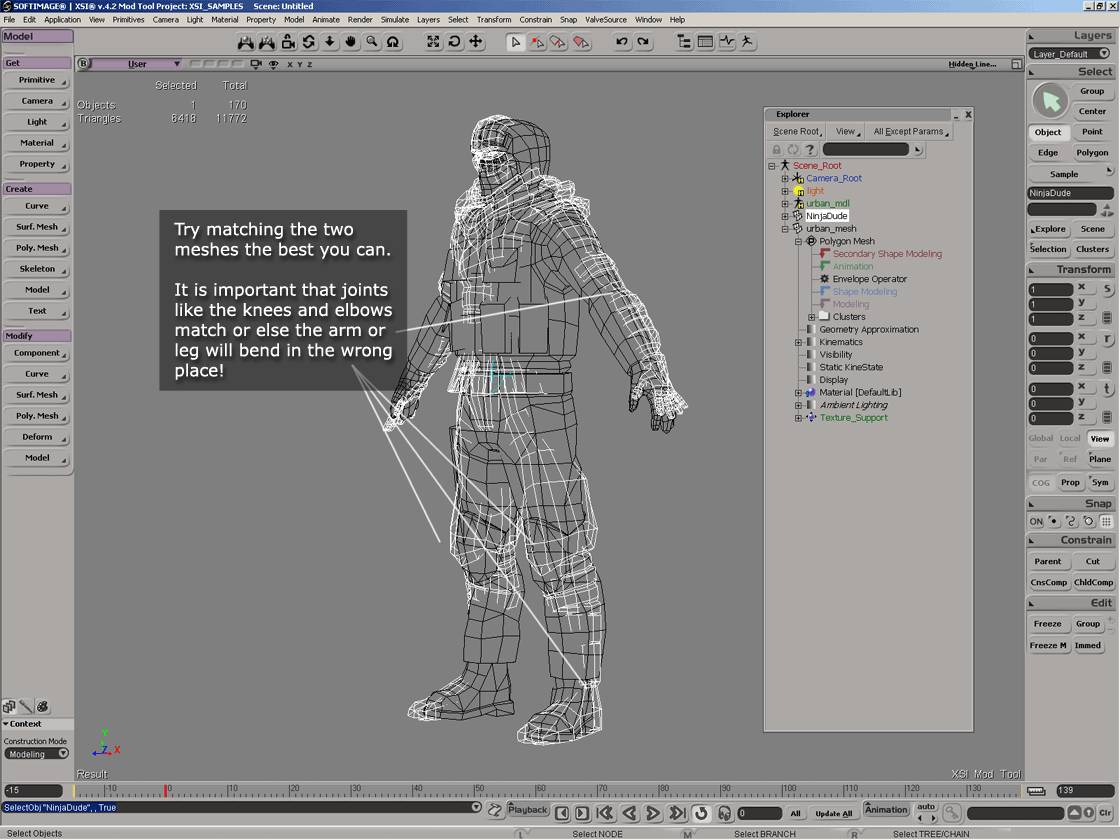
The following steps involve moving and scaling the new character mesh (and possibly moving some points as well) to match the position of the original urban model mesh as closely as possible. The new mesh does not have to fit perfectly on top on the original mesh, but the better the fit, the better will be the resulting envelope. However, it is important that the joints (like elbows, knees, ankles, etc.) be at the same position. If they aren't, the arms and legs will bend in the wrong position.

Once the new character mesh has been placed on top of the urban model mesh, the urban model mesh can be deleted as it is used only to provide a guide for positioning. Delete the urban model mesh by branch-selecting the urban_mesh object and hitting the delete key. Branch-selection selects the mesh and everything under it as well. An object can be branch-selected by middle-clicking on the object's name in the Explorer window, or by left-clicking the object's name and using the Select->Branch from the Select menu.
Next, the saved weight map will be imported to apply the weights to our new mesh.
- Select the mesh to which the weights are to be applied, i.e., the new character mesh.
- Use the ValveSource->WeightMap Import menu.
- Select the weightmap file saved earlier and click OK.

The WeightMap Import plugin will transfer the WeightMap by averaging the weights according to vertex positions. The results are not perfect, but again, it will save hours of envelope tweaking. The following image shows the results after the weights have been imported.

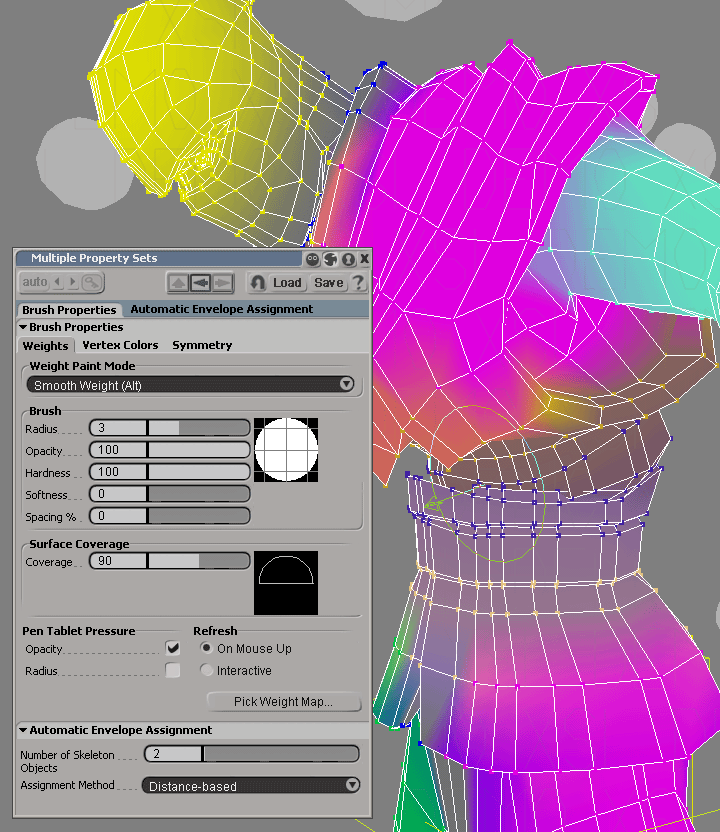
The WeightMap can be tested by moving the rig around. As seen in the image below, some weights might need some tweaking.


Rigging Your Character - From Scratch
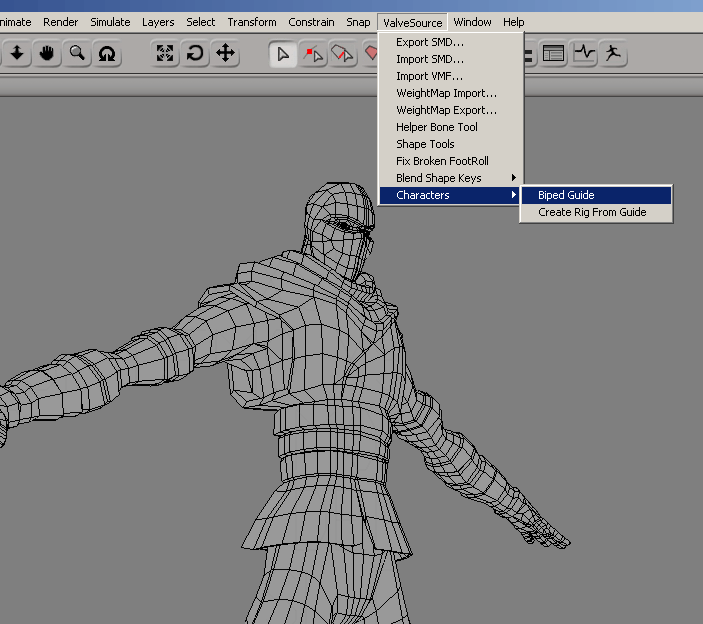
The Biped Guide
In chapter one we saw how to automatically envelope a character using the weightmap of an existing character. While this method saves time, it might not be suitable for every character in your game. If you character have very different topology for instance a child character and a adult male, the method described in chapter one is less than ideal.
The solution is use the Valve Biped Guide.
First import your character mesh. I will re-use the Ninja mesh used in chapter one, but this time, his arms are not in a neutral pose, they are closer to the the so-called Da Vinci pose. This would have been impossible to envelope with the method describe in chapter one.
After you have imported your mesh, get a Biped Guide Rig from the Valve Source Menu.

The Biped Guide, is a dummy rig that is used to guide the creation of a real functional rig. You use this guide by positionning the cube at each end of each chain to the position in which your character is.
This is what the scene looks like before the guide is positioned in the mesh.

Use the guide to position your bones in the mesh. Here is the result. Note that before I started positionning cubes inside the mesh, I turned off the "selectability" property of the Ninja mesh so that I don't accidently select it when I want to select a cube. You do this by un-checking the "Selectability" property under the mesh's Visibility Property Page.

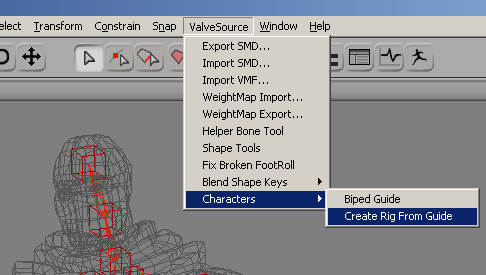
Creating Rig From Guide

Once the guide has been positioned in the proper place, a fully functional Valve Biped rig can be created from it.
Select the menu Create Rig From Guide from the ValveSource menu to start the process.
During the creation of the rig, there may be multiple warning messages stating that a cycle has been created. Click OK and ignore these warnings.
Following the creation of the rig, multiple property and expression editor windows may appear. They may be safely closed.
Enveloping
Now that you have your rig, you can safely delete the Biped Guide by branch selecting it from the Explorer and hitting 'delete' since we have no more use for it. This will also un-clutter the scene a bit.
Next we want to envelope our mesh to the rig. If you remember from chapter one, the rig was setup with a group called Envelope_Deformers. These are all the objects that deform the mesh, these are the object which we will use to create our envelope.
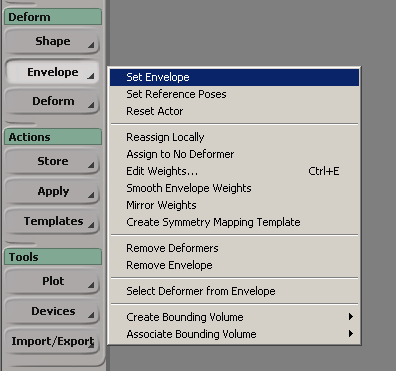
To create an envelope in XSI, first
- Select the mesh
- Hit '2' to switch to the Animate Toolbar
- Select Envelope->Set Envelope from the Animation->Deform toolbar

- Hit '8' to open up an explorer (or select one from the Application->Views menu)
- Expand the ValveBiped model and select the Envelope_Deformer group
- Finally right click anyway to end the pick-session

Your mesh should now be enveloped to the rig. Note that this automatic assignment of weight that XSI does is not perfect. It does a pretty good job, but you still need to clean up certain areas of the weightmap such as under the arms and legs. You can use all the weightmap tools (like smoothing, etc.) to properly envelope the mesh.

This tutorial will not teach you how to cleanup weight maps in XSI, but here's a tutorial on XSI envelopes that should be helpful.
- This link has since been taken down by XSI--Skidz 18:08, 8 Jun 2006 (PDT)