Ru/Collision mesh: Difference between revisions
< Ru
Jump to navigation
Jump to search
No edit summary |
No edit summary |
||
| Line 17: | Line 17: | ||
; Все элементы столкновений должны быть изолированы | ; Все элементы столкновений должны быть изолированы | ||
: Там вообще может не быть никаких отверстий. Это условие вычисляется путём изучения [[vertex normal|нормалей вершин]], поэтому все края должны быть гладкими. Если studiomdl говорит: "Model has 2-dimensional geometry" (модель имеет 2-х мерную геометрию) - вы сделали ошибку (или должны слегка уплотнить сетку). | : Там вообще может не быть никаких отверстий. Это условие вычисляется путём изучения [[vertex normal|нормалей вершин]], поэтому все края должны быть гладкими. Если studiomdl говорит: "Model has 2-dimensional geometry" (модель имеет 2-х мерную геометрию) - вы сделали ошибку (или должны слегка уплотнить сетку). | ||
== Сглаживание == | |||
В этом разделе рассказывается о том, как создать сглаженную сетку столкновений в различных пакетах моделирования. Помните, что ни в одной выпуклой форме не должно быть отверстий. | |||
=== Blender === | |||
# In {{IconLabel|File:BlenderObject.png|Object Mode}}, run the "Shade Smooth" operator on your mesh. | |||
# Remove the {{IconLabel|File:BlenderModEdgeSplit.png|Edge Split}} modifier if you've added it for some odd reason. | |||
=== Maya === | |||
# Use the Combine command to combine every part into a single editable mesh. | |||
# Do NOT append edges or merge verticies after using the Combine command. | |||
# Set selection mode to Edges, then select all edges in your collision mesh, then click on the Normals menu and click Soften Edge. | |||
# Set up a very basic UVW map, such as an Automatic unwrap. | |||
=== XSI === | |||
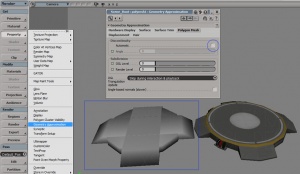
[[Image:Xsicollision.jpg|thumb|A collision mesh created in XSI 6.01. The reference mesh has been moved aside for visibility.]] | |||
# Select every part of the collision mesh and use ''Model -> Create -> Polymesh -> Merge'' to combine them into one object. | |||
# Use ''Render -> Get-> Property-> Geometry Approximation''. In the '''Polygon Mesh''' tab, uncheck '''Discontinuity: Automatic'''. All hard edges on the model will disappear. | |||
# Apply a texture and a projection to the collision mesh. Anything will do. | |||
=== 3DS Max === | |||
# Use the Attach function to combine every part into a single editable mesh. (optional) | |||
# Do NOT weld vertices together after using the Attach function. All objects within the mesh should be individually selectable using the "Select Element" option within the Edit Mesh modifier. | |||
# Select every element (in the mesh) individually and set them all to a different smoothing groups. If you work on a very complex model that requires more than 32 smoothing groups, you can create "additional smoothing groups" by combining them. For instance, an element set to smoothing groups 1 '''and''' 3 will be properly differentiated from elements set to smoothing groups 1 '''or''' 3. | |||
# Apply your model's material to the collision mesh with at least a basic UWV map. | |||
=== SketchUp === | |||
# Build a collision mesh out of one or more groups of faces. Each group must form a solid convex shape. | |||
# Smooth each edge in the group by selecting all the faces inside and then right clicking and selecting "Smooth/Unsmooth edges". Set the slider to the 180 degrees to smooth all edges. | |||
# Apply the same material to each face of the collision model. Note you must apply the material to each face, not the group as a whole. | |||
# Combine multiple groups of faces into a single component. | |||
# Set the axis of the component to the same as your reference model. | |||
=== Lightwave === | |||
# Build a collision mesh out of primitives such as boxes and cylinders. As noted above, make sure each primitive is entirely solid and a separate object. | |||
# Hit Q to add the mesh to a new surface, and give it a name. | |||
# In the Surface Editor (F5), select the new surface, and check the smoothing checkbox. Give it a smoothing threshold of 180. | |||
=== Cinema 4D === | |||
# Build a collision mesh out of primitives. Each group must form a solid convex shape. | |||
# Create a new Connect Object and drag every primitive into it. | |||
# Remove all tags from the primitives (Phong, Textures..) except the UVW tag. | |||
# Apply your model's material to the Connect Object and export as SMD. | |||
== См. также == | == См. также == | ||
Revision as of 08:47, 2 March 2016
Сетка столкновений - простая 3D-модель, использующая физические взаимодействия. Иногда её называют моделью столкновений. После того, как объект C++ будет загружен в движок, создаётся модель, вершины которой привязываются к сетке.
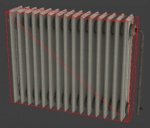
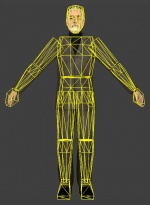
Сетка столкновений невидима, и должна быть сильно проще видимых компонентов модели (см. две картинки справа). Недостаток точности незаметен, кроме того, что он не приводит симуляцию в ступор.
Пояснения
- Сетки столкновений состоят только из выпуклых элементов
- Чтобы создать вогнутую сетку, соберите отдельные выпуклые объекты, пересекающие друг друга (если необходимо), и скомпилируйте с помощью $concave. Каждая выпуклая часть бережно относится к ресурсам симуляции.
- Все элементы столкновений должны быть изолированы
- Там вообще может не быть никаких отверстий. Это условие вычисляется путём изучения нормалей вершин, поэтому все края должны быть гладкими. Если studiomdl говорит: "Model has 2-dimensional geometry" (модель имеет 2-х мерную геометрию) - вы сделали ошибку (или должны слегка уплотнить сетку).
Сглаживание
В этом разделе рассказывается о том, как создать сглаженную сетку столкновений в различных пакетах моделирования. Помните, что ни в одной выпуклой форме не должно быть отверстий.
Blender
- In
 Object Mode, run the "Shade Smooth" operator on your mesh.
 - Remove the
 Edge Split modifier if you've added it for some odd reason.
Maya
- Use the Combine command to combine every part into a single editable mesh.
- Do NOT append edges or merge verticies after using the Combine command.
- Set selection mode to Edges, then select all edges in your collision mesh, then click on the Normals menu and click Soften Edge.
- Set up a very basic UVW map, such as an Automatic unwrap.
XSI
- Select every part of the collision mesh and use Model -> Create -> Polymesh -> Merge to combine them into one object.
- Use Render -> Get-> Property-> Geometry Approximation. In the Polygon Mesh tab, uncheck Discontinuity: Automatic. All hard edges on the model will disappear.
- Apply a texture and a projection to the collision mesh. Anything will do.
3DS Max
- Use the Attach function to combine every part into a single editable mesh. (optional)
- Do NOT weld vertices together after using the Attach function. All objects within the mesh should be individually selectable using the "Select Element" option within the Edit Mesh modifier.
- Select every element (in the mesh) individually and set them all to a different smoothing groups. If you work on a very complex model that requires more than 32 smoothing groups, you can create "additional smoothing groups" by combining them. For instance, an element set to smoothing groups 1 and 3 will be properly differentiated from elements set to smoothing groups 1 or 3.
- Apply your model's material to the collision mesh with at least a basic UWV map.
SketchUp
- Build a collision mesh out of one or more groups of faces. Each group must form a solid convex shape.
- Smooth each edge in the group by selecting all the faces inside and then right clicking and selecting "Smooth/Unsmooth edges". Set the slider to the 180 degrees to smooth all edges.
- Apply the same material to each face of the collision model. Note you must apply the material to each face, not the group as a whole.
- Combine multiple groups of faces into a single component.
- Set the axis of the component to the same as your reference model.
Lightwave
- Build a collision mesh out of primitives such as boxes and cylinders. As noted above, make sure each primitive is entirely solid and a separate object.
- Hit Q to add the mesh to a new surface, and give it a name.
- In the Surface Editor (F5), select the new surface, and check the smoothing checkbox. Give it a smoothing threshold of 180.
Cinema 4D
- Build a collision mesh out of primitives. Each group must form a solid convex shape.
- Create a new Connect Object and drag every primitive into it.
- Remove all tags from the primitives (Phong, Textures..) except the UVW tag.
- Apply your model's material to the Connect Object and export as SMD.
См. также
- Физика и рэгдоллы
- $collisionmodel:ru - QC-команда для сетки коллижена без каких-либо подвижных частей
- $collisionjoints:ru - команда для коллижен-мешей с наличием подвижных частей


