Nav Mesh: Difference between revisions
| Line 37: | Line 37: | ||
However, careful hand-tuning of the Navigation Mesh can markedly improve the performance of Bots. In addition, manually decorating the mesh with ''Place Names'' allows the Bots to tell others where events occur, enhances the Counter-Strike radar and includes Place Names in all radio messages. | However, careful hand-tuning of the Navigation Mesh can markedly improve the performance of Bots. In addition, manually decorating the mesh with ''Place Names'' allows the Bots to tell others where events occur, enhances the Counter-Strike radar and includes Place Names in all radio messages. | ||
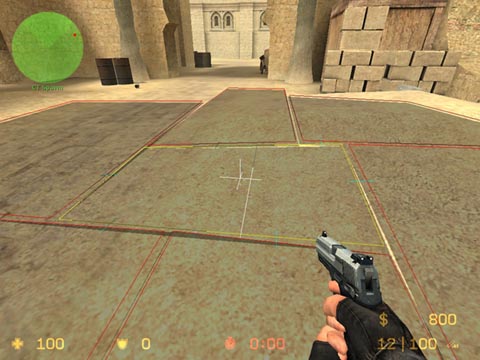
[[Image:nav_edit.jpg|frame|Enabling the Navigation Mesh editor in de_dust]] | |||
===The Navigation Mesh Editor=== | ===The Navigation Mesh Editor=== | ||
To enable the editor, type <code>nav_edit 1</code> in the console (type <code>nav_edit 0</code> to disable it). | To enable the editor, type <code>nav_edit 1</code> in the console (type <code>nav_edit 0</code> to disable it). | ||
* The white cross in the center of your view is the ''cursor''. | |||
* The Navigation Area you are pointing at is the ''selected area'' and is shown with a yellow outline. | |||
* Navigation Areas that can be reached from the selected area are shown in red. | |||
* The white line in the selected area denotes where the area will be split if the <code>nav_split</code> command is executed. | |||
---- | ---- | ||
Addition information can be found [http://www.turtlerockstudios.com/forums/csbot/viewtopic.php?t=725 here]. | Addition information can be found [http://www.turtlerockstudios.com/forums/csbot/viewtopic.php?t=725 here]. | ||
Revision as of 16:52, 28 June 2005
Introduction
A Navigation Mesh represents the "walkable areas" of a map. This data is required by Bots and Hostages in Counter-Strike:Source, allowing them to "know" how to move around in the environment.
Navigation Mesh data is stored in a .nav file corresponding to the map file (.bsp) for which it is used. For example, the nav mesh for cstrike\maps\de_dust.bsp is stored in cstrike\maps\de_dust.nav.
To support the many community-created maps, Counter-Strike:Source includes an automatic mesh generation system. The first time you attempt to play a custom map with bots, the generation system will build a .nav file for that map. Depending on the size and complexity of the map, this may take a few minutes to a few hours. Most maps take about 5 minutes to auto-generate a .nav file. Once the generation is complete, a .nav file is saved to your hard drive for future use.
What is Computed During Generation
The following steps occur during Navigation Mesh generation:
- Starting at a player spawn point, walkable space is sampled by "flood-filling" outwards from that spot, searching for adjacent walkable points
- Rectangular Navigation Areas are constructed from the sampled data
- Hiding and Sniper spots are computed
- Encounter Spots and Approach Points are computed (this can take awhile)
- Initial Encounter areas are computed
Manually Starting the Generation Process
To start the generation process manually, type nav_generate from the console.
To see the resulting Navigation Mesh, type nav_edit 1. To turn the mesh editor off, type nav_edit 0.
Explicity Marking Walkable Areas (ie: "There's no mesh upstairs")
Some maps that have very steep stairs, ramps, or hills may confuse the generation system, resulting in the Navigation Mesh not covering the entire map. To solve this, you can manually place additional walkable markers that tell the generator to search outwards from that point during its sampling phase.
To add one or more walkable markers, first aim your view towards a known walkable spot in your map, then type nav_mark_walkable in the console. When you are finished placing markers, type nav_generate to re-generate the mesh.
Quickly Generating Meshes for Testing
The analysis phase of the generator can be quite time consuming. To skip it, type nav_quicksave 1 in the console.
NOTE: "Quicksaving" skips the analysis phase, and the resultant nav mesh will be missing important data required by the CS Bots and Hostages higher-level planning and attention systems. While useful for testing, editing, and tuning a nav mesh, be sure to do a full analyze (ie: with
nav_quicksave 0) before publishing your nav file to others.
The automated Navigation Mesh generator does a reasonable job of constructing a mesh, allowing you to start using Bots and Hostages on custom maps easily.
However, careful hand-tuning of the Navigation Mesh can markedly improve the performance of Bots. In addition, manually decorating the mesh with Place Names allows the Bots to tell others where events occur, enhances the Counter-Strike radar and includes Place Names in all radio messages.
To enable the editor, type nav_edit 1 in the console (type nav_edit 0 to disable it).
- The white cross in the center of your view is the cursor.
- The Navigation Area you are pointing at is the selected area and is shown with a yellow outline.
- Navigation Areas that can be reached from the selected area are shown in red.
- The white line in the selected area denotes where the area will be split if the
nav_splitcommand is executed.
Addition information can be found here.
