P2 Multichunk Tool: Difference between revisions
No edit summary |
Thunder4ik (talk | contribs) m (Unicodifying, replaced: See Also → See also, [[image: → [[File: (11)) |
||
| (7 intermediate revisions by 3 users not shown) | |||
| Line 1: | Line 1: | ||
{{portal2}} The '''P2Multichunker''' offers an easy way for | {{pov}} | ||
::{{Warning|The tool will ''probably'' work for other games aside [[ | {{p2 topicon}} | ||
{{portal2}} The '''P2Multichunker''' offers an easy way for a [[Portal 2]] mod to pack the assets onto multi-chunked [[vpk]] files. | |||
::{{Warning|The tool will ''probably'' work for other games aside [[Portal 2]] if the vpk path name be changed and adapt the process, but, since it wasn't tested it can't be 100% guarantee it works.}} | |||
= Installation = | = Installation = | ||
# [https://github.com/gsgouvea91/P2Multichunker Download the executable.] | # [https://github.com/gsgouvea91/P2Multichunker Download the executable.] | ||
# Place the executable in | # Place the executable in the Mod folder | ||
[[ | [[File:Mod folder.png|400px|.exe inside the mod folder (picture 1)]] | ||
= How to use = | = How to use = | ||
1. When | 1. When first executing the tool, this is what it will display: | ||
[[ | [[File:New_main.JPG|600px|First run)]] | ||
By default in the first execution, the tool will auto-set it's .vpk path to the following defaut path: | By default in the first execution, the tool will auto-set it's .vpk path to the following defaut path: | ||
| Line 19: | Line 21: | ||
C:\Program Files (x86)\Steam\steamapps\common\Portal 2\bin | C:\Program Files (x86)\Steam\steamapps\common\Portal 2\bin | ||
The path is stored on the file <code>data.json</code> that it's created when | The path is stored on the file <code>data.json</code> that it's created when the tool run for the first time. | ||
| Line 25: | Line 27: | ||
2. Choose option <code>"2 - Execute P2Multichunker"</code>, the following screen will display: | 2. Choose option <code>"2 - Execute P2Multichunker"</code>, the following screen will display: | ||
[[ | [[File:generating.png|500px|First run)]] | ||
Do not close the prompt untill the process is done, when it's done, it will require | Do not close the prompt untill the process is done, when it's done, it will require a key to be pressed and then will bring it back to the main menu. | ||
3. | 3. The mod folder must now look like this. | ||
[[ | [[File:Mod_folder_after.png|400px|First run)]] | ||
If | If so then it's done, the vpk's where successfully generated, the amount of files generated will depend on how many assets it will be there to pack, it is necessary to delete the vpk's and repeat the process in order to add new assets to them, so it's best to do this near release. | ||
=Changing the default VPK Path= | =Changing the default VPK Path= | ||
#Choose Option <code>'1 - VPK.exe path'</code> | #Choose Option <code>'1 - VPK.exe path'</code> | ||
#The tool will display | #The tool will display the current path and ask to confirm the change, choose <code>'y'</code>: | ||
#Insert the new path without the <code>"\vpk.exe"</code> and press enter. | #Insert the new path without the <code>"\vpk.exe"</code> and press enter. | ||
#Done, | #Done,the path was successfully changed. | ||
=Changing the .vpk prefix (experimental)= | =Changing the .vpk prefix (experimental)= | ||
This tool auto-sets itself by default to work with [[Portal 2]] <code>vpk.exe</code>, but, it will probably work with other games too, | This tool auto-sets itself by default to work with [[Portal 2]] <code>vpk.exe</code>, but, it will probably work with other games too, due the many naming conventions used for Valve Games .VPK's a funcition was added in order for the prefix to be changed as deemed necessary. | ||
1.Choose Option <code>'4-Change .vpk file prefix'</code>, it will be prompted by the current prefix "pak01" that is the default, and a question asking if it will be changed. | |||
1 | [[File:Prf1.JPG|500px|Step 1]] | ||
2.Input <code>'y'</code> , then type the new name the prefix will change to, in this case is 'newPrefix' | |||
2 | [[File:Prf2.JPG|500px|Step 2]] | ||
3.Press enter and the prefix will be updated, now check in option 4 again to see that now it displays the new name 'newPrefix': | |||
3 | [[File:Prf3.JPG|500px|Step 3]] | ||
4.Now when the program execute again, the .vpk is now named after whatever it was set the prefix to, in this case 'newPrefix'. | |||
[[File:Prf4.JPG|300px|Step 4]] | |||
[[ | |||
=Managing extensions (experimental)= | =Managing extensions (experimental)= | ||
Some games have their files (vmt's, vtf's, sounds), separated into several .vpk's groups, so in order to try to expand this tool to work with other games as easily as it does with [[Portal 2]], | Some games have their files (vmt's, vtf's, sounds), separated into several .vpk's groups, so in order to try to expand this tool to work with other games as easily as it does with [[Portal 2]], It was included a new option that can either ADD or REMOVE from the list the extensions the program will scan while building the responsefile. | ||
1.Choose Option <code>'5-Manage Extensions'</code>, | 1.Choose Option <code>'5-Manage Extensions'</code>, it will show the current search parameters, displayed on the very top of the terminal window. | ||
[[ | [[File:Src1.JPG|500px|Step 1]] | ||
2. In order to REMOVE an extension from the search, in this case I selected <code>1).vtf</code> so, type the number and press enter, the terminal will display a message pointing the option removed, and the search parameters below will be updated: | 2. In order to REMOVE an extension from the search, in this case I selected <code>1).vtf</code> so, type the number and press enter, the terminal will display a message pointing the option removed, and the search parameters below will be updated: | ||
[[ | [[File:Src2.JPG|500px|Step 2]] | ||
3. In order to ADD the extension back, type the number again, in this case <code>1).vtf</code>, and press enter, the terminal will display a message pointing the option added, and the option will appear on the search parameters again on the far right: | 3. In order to ADD the extension back, type the number again, in this case <code>1).vtf</code>, and press enter, the terminal will display a message pointing the option added, and the option will appear on the search parameters again on the far right: | ||
[[ | [[File:Src3.JPG|500px|Step 3]] | ||
4. In the event | 4. In the event it is needed a full reset on the search parameters, it can be done by either re-starting the program, or, choosing option | ||
<code>11).RESET SEARCH PARAMETERS</code>. | <code>11).RESET SEARCH PARAMETERS</code>. | ||
= See | = See also = | ||
* [[VPK]] | * [[VPK]] | ||
Latest revision as of 01:48, 7 January 2024
![]() The P2Multichunker offers an easy way for a Portal 2 mod to pack the assets onto multi-chunked vpk files.
The P2Multichunker offers an easy way for a Portal 2 mod to pack the assets onto multi-chunked vpk files.
 Warning:The tool will probably work for other games aside Portal 2 if the vpk path name be changed and adapt the process, but, since it wasn't tested it can't be 100% guarantee it works.
Installation
- Download the executable.
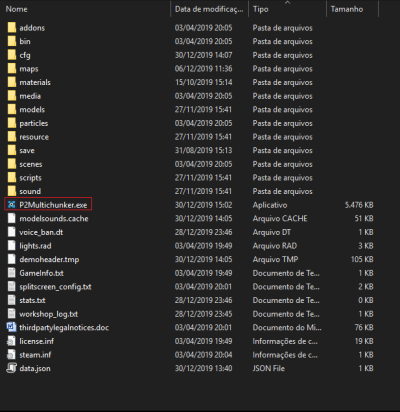
- Place the executable in the Mod folder
How to use
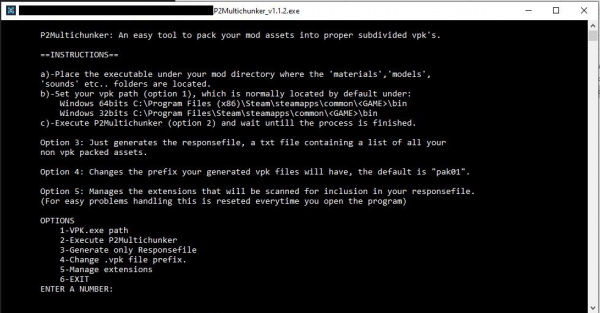
1. When first executing the tool, this is what it will display:
By default in the first execution, the tool will auto-set it's .vpk path to the following defaut path:
C:\Program Files (x86)\Steam\steamapps\common\Portal 2\bin
The path is stored on the file data.json that it's created when the tool run for the first time.
2. Choose option "2 - Execute P2Multichunker", the following screen will display:
Do not close the prompt untill the process is done, when it's done, it will require a key to be pressed and then will bring it back to the main menu.
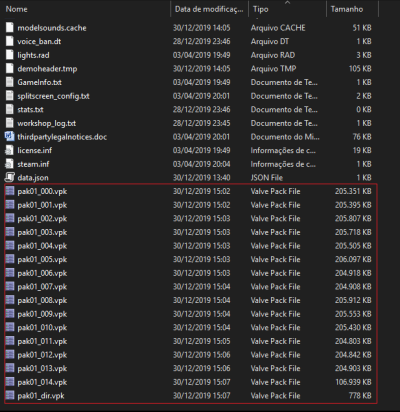
3. The mod folder must now look like this.
If so then it's done, the vpk's where successfully generated, the amount of files generated will depend on how many assets it will be there to pack, it is necessary to delete the vpk's and repeat the process in order to add new assets to them, so it's best to do this near release.
Changing the default VPK Path
- Choose Option
'1 - VPK.exe path' - The tool will display the current path and ask to confirm the change, choose
'y': - Insert the new path without the
"\vpk.exe"and press enter. - Done,the path was successfully changed.
Changing the .vpk prefix (experimental)
This tool auto-sets itself by default to work with Portal 2 vpk.exe, but, it will probably work with other games too, due the many naming conventions used for Valve Games .VPK's a funcition was added in order for the prefix to be changed as deemed necessary.
1.Choose Option '4-Change .vpk file prefix', it will be prompted by the current prefix "pak01" that is the default, and a question asking if it will be changed.
2.Input 'y' , then type the new name the prefix will change to, in this case is 'newPrefix'
3.Press enter and the prefix will be updated, now check in option 4 again to see that now it displays the new name 'newPrefix':
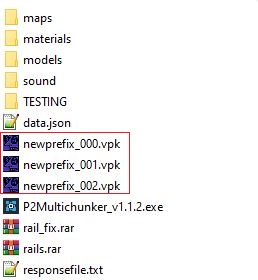
4.Now when the program execute again, the .vpk is now named after whatever it was set the prefix to, in this case 'newPrefix'.
Managing extensions (experimental)
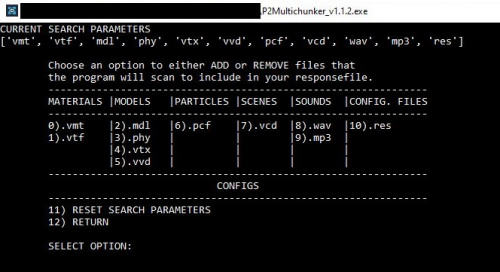
Some games have their files (vmt's, vtf's, sounds), separated into several .vpk's groups, so in order to try to expand this tool to work with other games as easily as it does with Portal 2, It was included a new option that can either ADD or REMOVE from the list the extensions the program will scan while building the responsefile.
1.Choose Option '5-Manage Extensions', it will show the current search parameters, displayed on the very top of the terminal window.
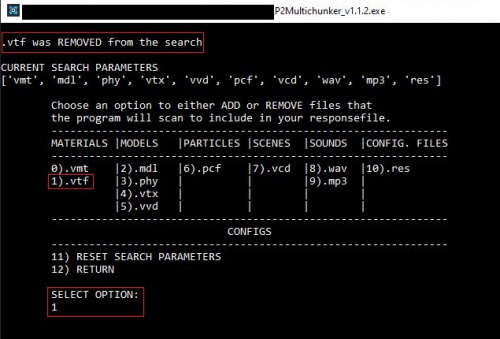
2. In order to REMOVE an extension from the search, in this case I selected 1).vtf so, type the number and press enter, the terminal will display a message pointing the option removed, and the search parameters below will be updated:
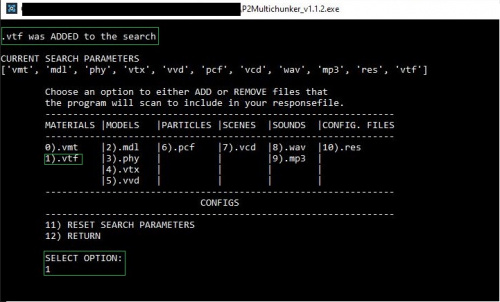
3. In order to ADD the extension back, type the number again, in this case 1).vtf, and press enter, the terminal will display a message pointing the option added, and the option will appear on the search parameters again on the far right:
4. In the event it is needed a full reset on the search parameters, it can be done by either re-starting the program, or, choosing option
11).RESET SEARCH PARAMETERS.
See also
- VPK
- VPK File Format (technical details)
- Releasing A Portal 2 Map
- Portal 2 Level Design
- VPK Compare GUI Tool for finding conflicts between VPK files
- Source Multi-Tool (VPK Creator - GUI)
