3DF Zephyr 360° degree object tutorial
January 2024
You can help by adding links to this article from other relevant articles.
January 2024
Photogrammetry with 3DF Zephyr
3DF Zephyr is a standalone, commercial photogrammetry tool available for Microsoft Windows. A Free personal edition is available as well as a Steam Edition.
This page is a brief object reconstruction tutorial roughly based on the official getting started tutorial, however focused on 360° degrees reconstruction (meaning that you will obtain a full 3D model, with no holes or occluded sided).
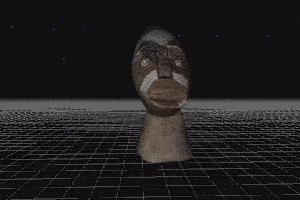
The gif on the right to see what you will get by following this tutorial with the proposed dataset: the full, 360° reconstruction of this small statue.
We will cheat Zephyr to exclude all available background, so that the statue can be reconstructed as a whole.
Contents
- 1 Photogrammetry with 3DF Zephyr
- 1.1 Prerequisites
- 1.2 Installation
- 1.3 Getting started
- 1.4 Step 1 - Taking pictures
- 1.5 Step 2 - Masking
- 1.6 Step 3 - Actual processing
- 1.7 Step 4 - Camera orientation and sparse point cloud generation
- 1.8 Step 5 - Dense point cloud generation
- 1.9 Step 6 - Mesh generation
- 1.10 Step 7 - Texture extraction
- 1.11 Step 8 - Mesh export
- 1.12 See also
Prerequisites
3DF Zephyr works officially only on microsoft windows, however a Wine tutorial is available if you want to run Zephyr on GNU/Linux systems.
The full systems requirements are available here.
- Microsoft 64-bit only Windows: Vista or newer
- A graphics card with DirectX 9 support, possibly with CUDA support
- At least 8 GB of RAM, preferably 16 or more
- Any camera to take your own pictures
- A set of photos suitable for photogrammetry
- 3DF Zephyr Free (or other paid versions)
Installation
3DF Zephyr comes in different versions. For this tutorial, we'll be using 3DF Zephyr Free which can be downloaded as a standalone package or by installing the demo from the Steam Edition. The free edition can be used for personal use and has some limitations, most importantly we can process up to 50 photos only. The full features and limitations comparison of 3DF Zephyr is available on the company website.
Getting started
You can take your own pictures (photogrammetry photography guide available here) or you can download the "dismal souvenir" dataset from 3dflow's website. Regardless, please make sure to read all the steps below.
Step 1 - Taking pictures
When reconstructing small objects, it's usually a good idea to plan the acquisition phase so that we can reconstruct every side of the object. However, in order to do, we must move the object in order to capture its bottom. By doing so however, the object and the scene background won't be consistent anymore: photogrammetry works by matching pixels in between different images, and completely rotating and object is often a problem. To avoid this, we have two options:
- use a lightbox of a completetly uniform color (very hard, as there will always be shadows interacting with the object)
- remove the background (masking)
Step 2 - Masking
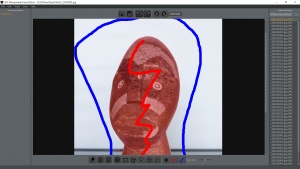
Masking can be done either with external software, such as photoshop, or we can use the included 3DF Masquerade Tool. 3DF Masquerade is an assisted masking tool which works especially well if you are using a lightbox or a uniform background. By roughly stroking the background (blue marker) and the foreground (red marker) you are telling masquerade to keep only the foreground for zephyr processing. If you downloaded the dataset, you will already find the masks (.bim files). In case you want to make your own, simply:
- drag the images in masquerade
- clear the mask (if .bim files are in the same directory, Masquerade will automatically load them) using the rubber icon
- use the red marker to stroke the foreground
- use the blue marker to stroke the background
- try to use the gear icon to automatically compute the next image
You can also find a 3DF Masquerade video tutorial
Masks are generally optional, however are required when creating a 360° model most of the times.
Step 3 - Actual processing
Once all required masks are generated, we are now ready to process the images in Zephyr: all the background has been removed, so we are cheating the software into thinking that the object is actually floating mid air. You can follow the getting started tutorial but keep in mind that we also have to tell zephyr to use masks.
Step 4 - Camera orientation and sparse point cloud generation
The first step will compute the calibration of the camera and reconstruct the camera position and orientation in 3D space. At the end of this step you'll end up with a sparse point cloud.
- From the "Workflow" menu, select "New Project". The new project wizard will appear.
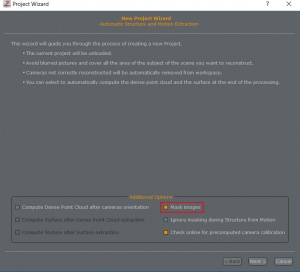
- Make sure to check "Mask images" in the new project wizard and then press "Next"
- Either drag and drop all the images or click the big plus button and then select all your images. Once you have done so, you should see all the images listed. When ready to proceed, simply press "Next"
- 3DF Zephyr is completetly autocalibrated, so in the next window (the "Camera Calibration Page") we can simply click "Next"
- Select "Close Range" as category and "Default" as preset. Simply click Next.
- When ready, click "Run"
After a while, Zephyr will finish the first phase and present you a small report. You should see all 50 images correctly reconstructed. Click finish.
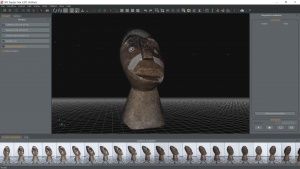
Take your time to familiarize with the workspace navigation. You can overlay your view by clicking any thumbnail in the "camera navigator" tab (in the bottom of the window) or you can freely move around with orbit/pivot with orbit or WASD movement (you must first select the navigation mode using the appropriate icon or from the Scene -> Camera menu).
Step 5 - Dense point cloud generation
As you will see, the workflow in 3DF Zephyr is very user friendly and streamlined, as every step follows the same Wizard Template.
- From the "Workflow" menu, select "Dense point cluod Generation". The dense cloud generation wizard will appear.
- Click next from the welcome page
- Select "Close Range" as category and "Default" as preset (or try "Fast" or "High details" :) ) - be aware the Ultra should be used very rarely, as it take a lot of time and does not give significant improvements over high details. Click next.
- Click Run.
After a while, the dense point cloud generation will be completed. Click Finish.
Step 6 - Mesh generation
Zephyr allows you to have more objects in the workspace. For example, if you don't like the generated dense point cloud, you can repeat step 5 with different presets. More dense point cloud objects will appear in the left "Project" dock. You can enable/disable them in the rendering window by simply checkin/unchecking the corresponding checkbox.
- From the "Workflow" menu, select "Mesh Extraction". The mesh extraction wizard will appear.
- Select your input dense point cloud (if you only created one dense point cloud, you will only have one option). Click next.
- Select "Close Range" as category and "Default - Smooth surface" as preset since this specific statue is very smooth. When dealing with sharp edges such as corners, you should always select the "Sharp features" preset. Click next when ready.
- Click run.
After a while, the mesh generation will be completed. Click finish.
Step 7 - Texture extraction
All that is left to do is to generate a textured mesh. Please note that at any time, you can use the tools and filters that zephyr offers, for example to close holes in the mesh or to clean the point cloud. More details over these details are available on the tutorials page.
- From the "Workflow" menu, simply select "Textured mesh generation"
- Select the input mesh and then click next.
- If you wish, change the texture generation settings (8192x8192 with 50% image resolution should work well with most datasets) and then click next.
- Click run
Click finish and you're done!
Step 8 - Mesh export
When you're happy with the reconstruction, you can export the textured mesh in many formats. 3DF Zephyr Free offers PLY, OBJ/MTL and sketchfab upload, however keep in mind that Lite and other versions have many more options available (for example .fbx).
For Destinations, you should always export in OBJ/MTL with JPG textures and rescale to the nearest power of two texture. Refer to this tutorial for more information.
Simply click on the "Export" menu and select "Export Textured Mesh", select your settings and click Export!
See also
To learn more about 3DF Zephyr
General knowledge
- 3DF Zephyr Official page
- 3DF Zephyr Steam Edition page (demo available as Free Edition)
- 3DF Zephyr Free Official page
- Free 3DF Zephyr Lite trial


