Choreography creation/Creating Events/Facial expressions
Facial expressions (Flex) are the headline news of Source's choreography system. Using the Facial Action Coding System developed by professor Paul Ekman, you are able to create any possible expression from scratch simply by manipulating a collection of Flex Sliders. While the tools are simple however, creating flowing, believable and meaningful animations with them takes flair and talent that does not come without practice.
In this tutorial, facial animation is placed after body animations and before generic events and lip synching. This is in order to suggest a productive workflow; however, there is nothing to stop you performing the four stages in any order you choose, or in no order, if you find doing so more helpful.
Facial animation types
There are two basic facial animation types in FacePoser: static Expressions and animated Flex events. Expressions are single-frame states created with the Flex Sliders tool which stand independent of any one scene file; Flex events are full animations stored within the scene and created with the Flex Animation event and tool.
Creating Expressions is a good way to start learning facial animation. With only one frame to worry about, you can concentrate on getting used to the Flex sliders and conveying emotion and meaning without worrying about the extra dimension of timing.
Creating static Expressions
Expressions are standalone and reusable Flex configurations that do not animate. They are useful for making an Actor hold a certain expression for a long time, or in situations where you want the same expression used many times, and also for learning how to use Source's facial animation system.
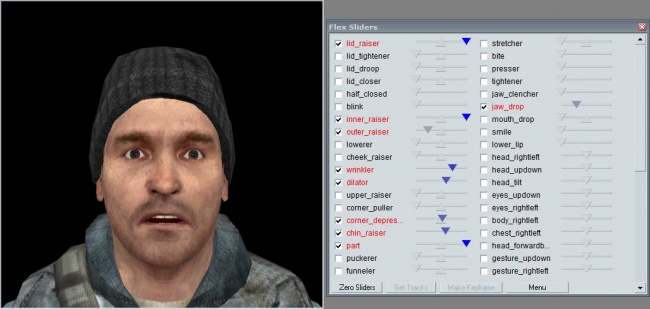
All you need to create an Expression is an Actor with Flex animation support, which for Valve's content is anyone with an unmasked face, and the Flex Sliders tool, which can be accessed from the tray tab at the bottom of the screen or Windows in the menu strip at the top. If you are not already zoomed to the Actor's face, use the Options > Center on Face menu strip option.
The Flex Sliders in front of you each control one or one pair of the Actor's digital muscles. The left mouse button alters the intensity (top, blue pip) and the right mouse button alters the left/right balance across the face (bottom, red pip), if the Flex supports it. Creating an Expression is as simple as moving these sliders into a desirable position–it is very hard to go too wrong. Once you build up a detailed Expression, you can use each Flex's checkbox to quickly deconstruct it.
The best way to move forward at this point is through experimentation; try making different expressions, both subtle and strong. The Flex names are quite self-explanatory, and even if you don't fully understand the meaning of one grabbing and sliding it will provide an immediate demonstration.
If you make an Expression you like and think might be useful, you might want to consider saving it for later use.
Creating Animations from Expressions
The Get Tracks and Make Keyframe buttons synchronise the Flex Sliders tool with the Flex Animation tool (see below), copying to and from Flex Sliders respectively. The position of the Scrubber within the selected Flex Animation event determines what slider data will be copied.
Creating Flex Animations
Creating Flex animation is a large step up from creating a static Expression. You now have to concern yourself with movement and timing, adding a whole new dimension to your work. Don't expect to step straight in and produce animated Flex as well as you can produce static!
Flex animations are stored in the scene VCD, so before you can start you must create a new Channel under your current Actor, use the context menu to add a Flex Animation event, and finally open the Flex Animation tool with your new event selected in the Timeline.
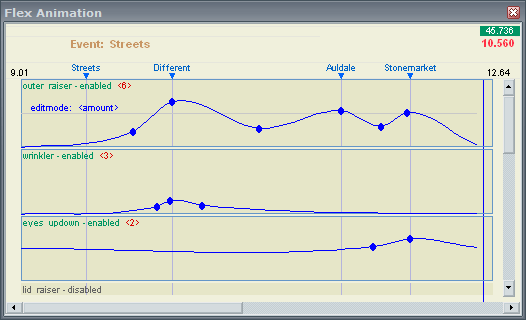
The Flex Animation tool is a different way of looking at the same information as is in the Flex Sliders tool, except that now there is also chronology to consider. The rows you can see are collapsed graphs that plot time against intensity for each Flex muscle. Double-click on one to open it and you will be presented with a blue-outlined area that behaves in exactly the same way as the Ramp: Ctrl+click creates a point, and variations on dragging manipulate it.
There are several other interactions on top of the standard Ramp shortcuts and tools:
- Spacebar
- Switch between the time/intensity graph (
editmode: <amount>) and the time/balance graph (editmode: <left/right>) for the selected Flex muscle. - The inactive graph is displayed in the background of the active one, in pale blue.
- Edge Properties do not currently apply to the
<left/right>graph. - Ctrl+C
- Ctrl+V
- Copy and Paste respectively all points from one Flex graph to another. Overwrites the destination graph.
- Be aware that pasting will not activate a disabled Flex. You must use the context menu to enable it before or after pasting.
- Drag grey handle
- Resize the selected graph. Does not affect the scene.
There are further options available from the context menu, which should make their purpose clear from their names. Pay particular attention to the Sort submenu, which can be very useful for fitting more Flex graphs into the same screen area.
Suggested workflow
A large challenge when creating Flex animations is workflow. Treat the process as you would an Expression and you will end up with an animation that flips unconvincingly from one state to another. It is generally best to work horizontally, one Flex at a time, considering how that particular area would move in reaction to the scene's events before moving on to the next. As the animations are built from the same cues they will hopefully need only very little 'vertical' adjustment to create a convincing performance when played back together.
General tips
- Avoid steep curves
- Unless you specifically want a sharp animation, anything above around 45 degrees should be treated with caution (unless your characters are meant to look cartoony). Obviously, keep in mind the zoom level may differ for
- Each graph point is a movement
- The default curve between points is the one that creates the smoothest motion. Be aware that by adding points that disturb it too much you are making changes that are picked up by the brain as a new movements.
- Expanded/Collapsed and Active/Disabled are not synonymous
- A collapsed Flex graph can still affect your animation if it has points and has not been disabled through the context menu. Collapsed simply means it has been "minimized" to expand your view.
- Disable Gestures
- Double-click on your Gestures channel to disable it and ensure that your actor does not move and obscure your view as you block out your flex. Once you're into the tweaking phase be sure to turn it back on.
- The eyebrows have it
- It's generally said that the eyes are the window to the soul -- actually, it's the brows. They are the most expressive part of the face, so be SURE to make good use of them. Even if you feel the current scene does not deserve hours of effort, the eyebrows are the one almost essential muscle to move. For reference, the muscles controlling eyebrow movement are outer_raiser (generally signals they're aware, surprised), inner_raiser (sympathetic, sorry, afraid), and lowerer (angry, moody)
- The brain sees more than the eyes
- It's often the things you don't notice that shape your impression the most. Don't delete good animation as cruft just because it seems to become lost in other movements.
Tricks and techniques
- Stick the chin out
- Increase
head updown - Decrease
head forwardback - One brow up
- Right-click inner_raiser and go to Edit Left/Right.
- At the right time, move the keyframe to the top or bottom.
- Right-click and go back to Edit Amount.
- Increase inner_raiser
- Do the opposite process for lowerer (swap left for right, up for down)
When not to use facial animation
- When animating detailed head movements
- While it is true that any muscle can be given a Flex definition, most Actor models do not link neck movements to the system. This restricts the amount of head movement that can be believably created in FacePoser. Most actors have nodding, shaking, and other such 'head and neck' animations that ought to be used instead of Flex approximations, and the level of timing that can be used for them mostly compensates for custom neck movements.
- Small, simple and/or slow motions are perfectly feasible, however.
- When directing Actor facing
- Actors cannot be reliably or effectively made to look at a precise location through Flex unless it is specifically named. info_target or npc_bullseye entities should instead be placed in the map and treated with the Look at Actor or Face Actor events.

