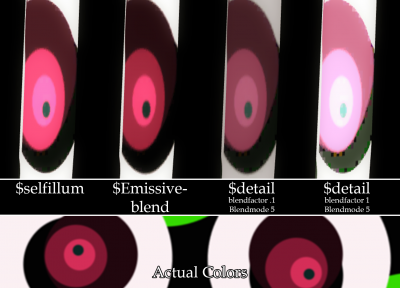
Glowing textures (Source)
A glowing texture is one that does not require another form of light to be lit up. It can create its own lightmap independent of all lighting sources and may even create light itself. This does not mean that the surface will appear pure white, just that the face will ignore any light it would receive. This is a key feature as a "glowing" black stays black and does not get brighter. The face achieves what is called fullbright, where the texture's pixels appear exactly the same color as they were saved.
There are several different ways to create this effect available in the Source engine.
For glowing textures on models or brush faces:
$selfillumparameter, specified in a material's VMT. - Use this for most purposes, not compatible with transparency.$detailparameter with$detailblendmodevalue of 5 or 6, specified in a material's VMT - Same as$selfillum, but more rudimentary and compatible with transparency.$emissiveblendparameter, specified in a material's VMT. - Also compatible with Transparency, can be animated via flowtexture like water.UnlitGenericshader, specified in a material's VMT - Does not emit light, forces face to ignore all lighting, making it fullbright.- Using
info_lightingto "fool" a model into "thinking" it is brightly illuminated.
For glowing textures on brush faces only:
- Using the Minimum Light Level entity keyvalue.
- RAD file, mainly used for glowing textures on brushes ("texlights"). RAD files are the only form of glowing textures that generate any map light. The file is processed line-by-line; each line is simply the name of the texture, the RGB value of the light, and then the brightness of the light.
Common selfillum textures can be found in White.
Contents
$selfillum
Self illumination applies "fake" light to a surface, regardless of the true light that the surface receives from the environment. This is useful for parts of a model that emit their own visible light, like the filament in a light bulb or a glowing LED on a control panel. The self illumination effect can be masked with a texture.
$selfillum cannot be used with $translucent or $alphatest on models. Use the UnlitGeneric shader instead or the $detail workaround.$selfillummask and $basemapalphaphongmask
sv_pure to be set to -1 in some games; see $detail method for a workaround.LightmappedGeneric { $basetexture props/tvscreen005a $selfillum 1 }
By default, $selfillum uses the alpha channel of the base texture as a mask. If the alpha channel of your base texture is used for something else, you can specify a separate $selfillummask texture.
LightmappedGeneric
{
    $basetexture props/tvscreen005a
    $selfillum 1
    $selfillummask <texture>
}
With an opaque mask, $selfillum effectively works like UnlitGeneric. The surface will ignore all light from the environment and appear fullbright.
Mask values below 1.0 apply a minimum brightness effect to the surface, while still allowing it to receive light from the environment. This threshold effect is useful for objects like computer screens, which should be visible in darkness but become overwhelmed in bright sunlight.
Additional Parameters
VertexLitGeneric in  Note:Works like a color map.
 Bug:Doesn't work on overlays in
  Counter-Strike: Global Offensive.
 Warning:Not on
 LightmappedGeneric, must use Alpha Channel of the$basetextureinstead. ($selfillum 1only) Warning:Doesn't work on
 VertexLitGeneric, with$bumpmap. Does work when$phongis present in Alien Swarm!
 Warning:
 Source 2007 MUST use this!
$envmapmask.
 Note:
Note:$selfillum_envmapmask_alphareplaces the original$selfillumcommand, so they cannot be used together. Note:this mask is multiplied by 8. So to archive same results as other mask methods remember to divide
 $selfillumtintby 8 Warning:Only on
 VertexLitGeneric- Note that$envmapmaskdoes not work with$bumpmapor$phongon VertexLitGeneric.
 Note:Deprecated since
  Source 2007.
 Note:use
 $emissiveblendinstead
 Warning:Breaks
 $envmapif$normalmapalphaenvmapmaskis enabled. Warning:Requires
 $bumpmap.
$phongfresnelranges.
- The first value is the minimum illumination, second value is the maximum illumination and the final value is the Fresnel exponent.
$detail
If $selfillum is not a viable option, a $detail texture can be used instead. It can bypass the sv_consistency check on some games (on modern branches, sv_pure set to anything other than -1), such as in ![]() Counter-Strike: Source or
Counter-Strike: Source or ![]() Left 4 Dead 2, to allow glowing textures where textures with
Left 4 Dead 2, to allow glowing textures where textures with $selfillum would cause you to be kicked from the server.
VMT lines required for a $detail glow:
$detail   "models/weapons/pose/briefcase/briefcase_pickedup_red"

$detailscale 1        // scales the detail texture to same size as diffuse texture.

$detailblendmode 5    // 6 also works. 1 can be used if both are unavailable
                      // (such as on LightmappedGeneric), although it will still
                      // be affected by lighting.
$detailblendfactor can additionally be used to make the texture less bright.
The detail texture itself must be completely black with the parts that should be glowing colored. Dark colors will glow less. You cannot make a black glowing texture this way.
$emissiveblend
$Emissiveblend is another alternative if $selfillum and $detail can not be used.
As an example, melee weapons in ![]() Left 4 Dead 2 that use $phong can not use $selfillum because $selfillum breaks when $bumpmap is used, which $phong requires. They also can't use $detail for glow, because the blood overlay already uses $detail. So the only option is $emissiveblend
Left 4 Dead 2 that use $phong can not use $selfillum because $selfillum breaks when $bumpmap is used, which $phong requires. They also can't use $detail for glow, because the blood overlay already uses $detail. So the only option is $emissiveblend
Originally, $emissiveblend is supposed to be used for glowing and flowing textures, specifically the Vortigaunts blue shimmer in ![]() Half-Life 2: Episode Two where Alyx is being healed. However, it can also function as a basic selfillum alternative.
Half-Life 2: Episode Two where Alyx is being healed. However, it can also function as a basic selfillum alternative.
Static
This is an example of a static $emissiveblend texture. It will appear just like $selfillum does.
$EmissiveBlendEnabled 		1					// Enable EmissiveBlend. Like $selfillum 1
$EmissiveBlendStrength 		1 					// how strong the entire glow effect is.
$EmissiveBlendTexture 		vgui/white			// This will be useless, but is required.
$EmissiveBlendBaseTexture 	Glow_texture_color	// this is the glowing texture.vtf
$EmissiveBlendFlowTexture 	vgui/white	 		// EmmisiveBlend can "flow" or move. But ours is static, so a white texture is used.
$EmissiveBlendTint 			" [ 1 1 1 ] "		// RGB glow intensity. Leave at 1 1 1. This can be used to change how strong each color should glow. So instead of using a darker red color, you may use [.5 1 1] to have red glow half as strong.
$EmissiveBlendScrollVector " [ 0 0 ] " // makes the EmmissiveBlend flow in either direction if a proper EmissiveBlendFlowTexture were set. But ours is static, so leave at 0 0![]() Left 4 Dead 2 Should you want a material that allows Envmaps with masks, Phong with mask, Detail and EmissiveBlend glows together, you may use this premade material:
Left 4 Dead 2 Should you want a material that allows Envmaps with masks, Phong with mask, Detail and EmissiveBlend glows together, you may use this premade material:
VertexLitGeneric
{
	//Textures
	$baseTexture 				baseTexture_with_envmap_mask	//alpha mask is the envmap mask
	$bumpmap 					bumpmap_with_phong_mask			//alpha mask contains mask for phong.

	//Envmap Stuff
	$basealphaenvmapmask 		1
	$envmap 					env_cubemap

	//Phong Stuff
	$phong 						1
	$phongboost 				10
	$phongexponent 				1
	$phongfresnelranges 		"[.1 .4 2]"

	//Glow Stuff
	$EmissiveBlendEnabled 		1
	$EmissiveBlendStrength 		1
	$EmissiveBlendTexture 		vgui/white
	$EmissiveBlendBaseTexture 	Glow_texture_color	//change this to your desired static glow.
	$EmissiveBlendFlowTexture 	vgui/white
	$EmissiveBlendTint 			" [ 1 1 1 ] "
	$EmissiveBlendScrollVector 	" [ 0 0 ] "

	//Detail Stuffs
	$detail 					"models/infected/hunter/hunter_01_detail.vtf"
	$detailscale 				"1.75"
	$detailblendfactor 			1
	$detailblendmode 			0
	$detailAmount 				0
}
Flowing
This is an example of a flowing $emissiveblend texture. It will appear like as if water is flowing across a model.
$EmissiveBlendEnabled 		1						// Enable EmissiveBlend. Like $selfillum 1
$EmissiveBlendStrength 		1 						// how strong the entire glow effect is.
$EmissiveBlendTexture 		Glow_texture_color		// this is the glowing texture.vtf
$EmissiveBlendBaseTexture 	Glow_texture_mask		// This is the glowing texture's mask, like $selfillummask.  SHOULD BE VTF i8 FORMAT, NOT DXT5!!!
$EmissiveBlendFlowTexture 	Glow_texture_mask_flow	// EmmisiveBlend can "flow" or move. This here is the flowmap used, just like water.
$EmissiveBlendTint 			" [ 1 1 1 ] "			// RGB glow intensity. Leave at 1 1 1. This can be used to change how strong each color should glow. So instead of using a darker red color, you may use [.5 1 1] to have red glow half as strong.
$EmissiveBlendScrollVector 	" [ 0 0 ] " 			// makes the EmmissiveBlend flow in either direction if a proper EmissiveBlendFlowTexture were set. But ours is static, so leave at 0 0
Using envmaps for a Solid-Color Glow
If for some reason you can't use $selfillum and can't do glow with $detail, you can still do a solid-color glow on the material. As reflections are not affected by lighting and appear to glow in the dark, specular reflections using cubemaps can be used.
Unlike $selfillum, you can only make pixels glow in a color additively, i.e., you can't make part of a texture glow, only add a single-color glow over it. Can be done using a white cubemap and making the cubemap reflection visible only in some places per-pixel through an $envmapmask. You can also tint the cubemap glow to any color by $envmaptint.
.rad files
example\exampletexture 128 192 96 400
Unlike $selfillum or the UnlitGeneric shader, lights of the specified color and brightness are generated in front of the world brush's face during VRAD complation. The brightness of the created lights is also affected by the density of the lightmap. Higher densities will produce a greater effect. The texture itself does not become fullbright, but the lights in front often make it seem so.
If a texture is specified in multiple places, it will be overridden by the latest information. If both lights.rad and <mapname>.rad specified the same texture, but <mapname>.rad was brighter, the light emitted in the compiled map would be the brighter <mapname>.rad version.
More info on how this light system works can be found here.
UnlitGeneric Textures
The UnlitGeneric shader forces the entire face to be fullbright. The surface does not emit light, and light has no visible effect on the surface. Mainly used when the texture should appear to be a light source without forcing any light into creation. All that is required for the effect is to specify the materials shader as UnlitGeneric. Because UnlitGenerics are their own shader, they can be applied to both models and world brushes.
UnlitGeneric
{
	$basetexture example\exampletexture
}
A common use is that of skybox textures, the sky is always bright and the face the texture will appear on has no form of lighting itself.
$model 1 in your .vmt if you're using an UnlitGeneric on a model, otherwise the surface may not show up.Minimum Light Level Values
This is not strictly a glowing texture per se but another way that a texture can be made to appear to glow (without shedding any actual light). By placing it on certain entities, you will be able to set the Minimum Light Level float value to control the minimum amount of ambient light the surface will reflect. The most common of these is func_brush. Setting the Minimum Light Level high (from 5 to 50 or more, depending on how light the texture is) will result in the textures on the brush glowing brightly.
Use of info_lighting
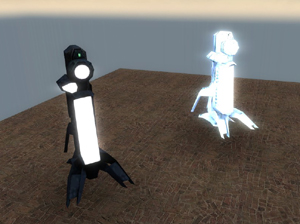
Models can be made to glow brightly (though they do not actually emit any light) if their lighting origin key value is set to the name of an info_lighting that is placed in a lightbox isolated from the rest of the map. In the illustration below, the model to the right has been linked to an info_lighting placed in a small hollow cube with nine light entities, each set to a brightness of 5000.
One possibly-useful feature of this method of manipulating lighting is that it dynamically updates in real time. That is, if the lights in the lightbox are linked to a switch or trigger, or pre-set to pulse, flicker, or so on, the lighting on the model will reflect these changes immediately. This might be used, for instance, to slowly darken modeled terrain to simulate the coming of evening.
