Dota 2 Workshop Tools/Level Design/Basic Construction/Mesh Editing 1
Hammer's geometry tools have undergone a significant overhaul. The usage of brushes is no longer the primary building block to construct levels and instead it is all faces, edges, and vertices. This is very similar to how modeling software works except Hammer is organized and setup in such a way to make geometry construction quick and effective for level designers without the limitations of brushes.
Building Blocks

Start Hammer with the Hammer icon in the Asset Browser. Create a new map with File > New.
The left-hand toolbar contains the basic tool modes, similar to previous iterations of Hammer. Select has several modes of operation and can be cycled through using Spacebar. It is also possible to directly enter these modes using the following shortcuts:
- 1 Vertices
- 2 Edges
- 3 Faces
- 4 Meshes
- 5 Objects
- 6 Groups
Groups
These can contain arbitrary collections of entities and meshes. They can be moved, rotated, and scaled just like a mesh or object can but instead will affect every object in the group.
Objects
Inside of a group contains objects and meshes. In this mode you can select the individual objects or meshes inside a group. Clicking on an entity such as a player_start will select it and you can manipulate the object on its own.
Meshes
Meshes are the closest equivalent to the brushes in the previous iteration of Hammer. A mesh is composed of faces, edges, and vertices.
Faces
Also referred to as polygons or n-gons. A face connects edges together. A face cannot exist without an edge.
Edges
Edges border every face and are connected by vertices. A face can be split into smaller ones by adding edge. Combining or removing edges can create larger faces.
Vertices
The smallest unit of a mesh is the vertex. This is the corner where an edge terminates. In Hammer it is not possible to have a free floating vertex, it must be attached to an edge and a face somewhere.
Not Brushes
Users familiar with the previous iteration of Hammer know the restrictions of brushes. With this new construction method those restrictions are removed. As an example these shapes are all meshes made with the basic construction tools and are valid meshes.
Faces can be removed.
Concave meshes are valid.
Non-flat faces are valid and are converted to triangles when compiled.


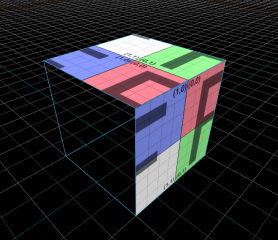
Creating Geometry
Basic Blocks

- Click the Block Tool icon on the left hand side.
- Check that Geometry Type: block is selected in the Tool Properties tab.
- In the 3D view, Looking roughly down on the grid, drag out a rectangle. Depending on how fine the grid is set it will automatically grow into a fully-3D cuboid.
- Drag the red, green and blue controls to adjust its size.
- Press ↵ Enter when done.
Camera Control
- Click on the 3D view and do a ⇧ Shift+Z to expand it to full-size.
- Adjust your view by clicking and holding the
 button on the 3D view. Move the mouse around for a "game-style" mouselook. Release the right mouse button to stop.
 - Again keeping with the game theme, "WASD" controls are present to move the viewpoint around in the world.
Basic Transformations
Transform tools are the basic tools for manipulating meshes. These tools are accessible via the toolbar to the left but are most quickly accessed via keyboard shortcuts:
- Scale E
- Rotate R
- Translate T
Mesh Editing
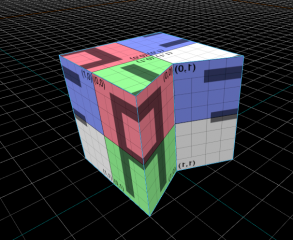
Faces

To create a slightly more interesting mesh, the mesh components can be manipulated.
- Click the mouse-cursor-like Selection tool in the left-hand toolbar, then ensure Faces is selected in the top toolbar.
- Click on one of the faces of the mesh in the 3D view.
- Press Translate, T.
- A translation "gizmo" will appear at the center of the selected face. Drag the arrows and squares on the gizmo to move it around.
To create even more geometry based on existing geometry extrusion can be used to quickly generate more interesting shapes.
- With the face selected and translate mode active, hold down ⇧ Shift and drag a control to extrude the face outwards.
- Do the same with some of the other faces on the mesh.
Edges

The other selection methods can be manipulated in the same manner as above.
- Click the Edges button on the top toolbar.
- Click on one of the edges on your mesh to select it.
- Press T to translate.
Move the edge around. Use this to create some slopes in your mesh.
- You can select multiple things by holding down ⇧ Shift and clicking on subsequent items, or remove things by holding down Ctrl and clicking.
- You can also select multiple things in one go by holding down the
 and dragging the cursor over the components.
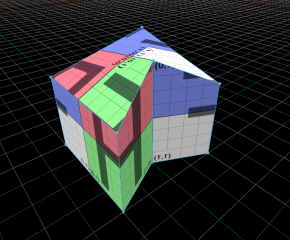
Edge Rings and Loops

It's possible to make this mesh even more complex by manipulating edge rings and loops. Note that a "ring" or "loop" is a continuous set of edges that span the length of the surface of a mesh.
- In Edges selection mode, click one of the edges on the mesh.
- Press G. This should select a edge ring of edges going around the mesh.
- Press Connect for the list of Edge Editing tools on the left.
Note: If the Edge Editing tools are not visible enable the 'Tools Properties' view under 'View -> Toolbars'.
This will create a new loop of edges going through the mid-points of all those previously selected edges, called an edge loop. To select any edge loop, double-click on one of its edges, or press L to generate an edge loop selection from the currently selected edges. It will go through each edge and make a best guess as to which way the loop goes. Some complex meshes will have few useful loops; other meshes will have plenty of loops. You can move that loop around to significantly distort your mesh - a more subtle example would be adding loops along a cylinder in order to add some slight bends to it. You can select one of the new faces to extrude new sections of your mesh.
Rotate and Scale

Continue exploring selecting faces, edges and vertices and translating them around.
Use can also use the rotate and scale tools to further mangle the mesh but yet this is still will be considered a valid mesh shape. There are very few limitations on the shape of a mesh.
Next: Mesh Editing 2