User:Rockn-Roll/Beginner Portal Map Tutorial
Contents
Building your first Portal map with Hammer
Contents
This tutorial provides a step-by-step guide to working with Hammer to create a small 128x128x128 room with some walls where portals can be created and some that cannot. Finally, a player start and the portal gun are added then the map is compiled. Portal can then be started and the map loaded for play.
Tools Summary
Here is a brief description of Hammer tools.
Left Side Toolbar
Right Side Toolbars
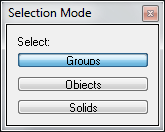
The top tool window is the Selection Mode Bar which controls what object(s) will be selected when clicking on an object. By default groups are selected when any object in a group is selected. Clicking the Objects button means only the object will be selected. Clicking the Solids button means the encompassing solid object will be selected.
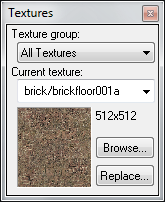
Below the Selection Mode tool window is the Texture Bar window, which shows the currently selected texture.
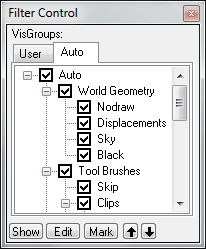
Below that is the Filter Control, which allows selection of what is visible or not visible in the view windows. The only thing listed in the Auto section of a new map will be World Geometry until new groups are created.
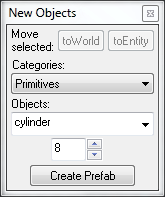
To the right of the Selection Mode window is the Object Bar tool which allows objects to be attached to entities or saved as a Prefab group. This will not be needed in this tutorial, so select View | Screen Elements from the top menu and uncheck Object Bar to save space.
To the right of the New Objects tool is the Manifest Bar tool window which appears to have something to do with Version Control as indicated in the new undocumented Instancing top menu item. Selecting Instancing | Create Manifest causes Hammer to crash, so avoid using it for now. In fact, select View | Screen Elements from the top menu and uncheck Manifest Bar to save space.
Bottom Info Bar
File:Hammer PortalStatusBar.png
At the very bottom of the screen is the Status Bar with the following information listed from left to right: Currently selected object, current cursor location, currently selected object dimensions, zoom level of the active window, whether "Snap" is enabled, and grid size.
Creating a Room
This tutorial will focus on creating a room specifically for Portal. Go to Getting_StartedFor a more detailed general tutorial.
Select File | New from the top menu. Four views will be displayed: one 3D Camera in the top left, and three 2D views; Top (X/Y) in the top right, Right Side (X/Z) in the bottom right, and Front (Y/Z) in the bottom left quadrant. A text label of each view can be displayed by hovering your mouse over the top left corner of each quadrant. The blue-green lines cross at the origin (0,0,0).
Creating a Wall
By default the grid size is 64 units (approx 64 inches) which would be very thick walls like a Castle. Portal consists of walls like a testing lab which are about 8 units thick. So change the grid size to 8 by hovering the mouse over the 2D Top view and pressing the left bracket [ or clicking the Smaller Grid icon ![]() .
.
Also, by default the zoom is set to 0.25. In order to see the entire room the zoom needs to be changed to about 1.0. Press + on the keypad until the zoom changes to 1.07.
This tutorial will create a cube with the dimensions of 128x128x128. These are the dimensions of the inside of the room. The reason we want the inside to be some specific size (and not caring about the outside) is that most textures (the pictures that are used to paint the walls) are 128x128 and making the room that size will allow the edges of the textures to properly line up with the edges of the walls.
Click the Block tool button ![]() on the left toolbar. Move the mouse over to the Top (X/Y) View in the top right quadrant. Then click and hold the left mouse button down on the lower left corner of the white square located to the left and below where the blue-green lines cross and drag the mouse one square up and 18 squares to the right until the dimension labels indicate that it is 8 x 128 as shown below. The 3D view can be displayed by selecting View | Center 3D Views on Selected from the top menu. The 2D views can be adjusted by holding the space bar down and pressing the left mouse button and moving the mouse around.
on the left toolbar. Move the mouse over to the Top (X/Y) View in the top right quadrant. Then click and hold the left mouse button down on the lower left corner of the white square located to the left and below where the blue-green lines cross and drag the mouse one square up and 18 squares to the right until the dimension labels indicate that it is 8 x 128 as shown below. The 3D view can be displayed by selecting View | Center 3D Views on Selected from the top menu. The 2D views can be adjusted by holding the space bar down and pressing the left mouse button and moving the mouse around.
Notice that Hammer created a wall that is 64 units high and aligned the bottom of the wall with the horizontal blue-green line. Move the mouse down to the Side (X/Z) view in the bottom right quadrant and use the drag handles to move the bottom of the wall down one square below the horizontal blue-green line, and drag the top until it is 128 units tall.
Now, Press Enter to create the Wall. The 2D views will change from a white dotted line to red lines, and the 3D Camera view will show the wall as a yellow line wireframe. By convention this wall is now called a [Brush]. Brushes can be used to build larger objects. This wall will be copied and used to build the other 3 walls, ceiling, and floor.
Copying and Rotating a Wall
Click the Selection Tool button ![]() . Since the wall was already selected the 2D views change to red/yellow dashed lines. Now, create the back wall. Move the mouse to the Top (X/Y) view in the top right quadrant and hold the Shift key down and press the left mouse key down onto the wall and drag the wall up 16 grid blocks (128 units) as shown below. Be sure to release the mouse key before releasing the shift key otherwise Hammer will move the front wall instead of making a copy.
. Since the wall was already selected the 2D views change to red/yellow dashed lines. Now, create the back wall. Move the mouse to the Top (X/Y) view in the top right quadrant and hold the Shift key down and press the left mouse key down onto the wall and drag the wall up 16 grid blocks (128 units) as shown below. Be sure to release the mouse key before releasing the shift key otherwise Hammer will move the front wall instead of making a copy.
For the left wall the copy will need to be rotated. As before, move the mouse to the Top (X/Y) view in the top right quadrant and hold the Shift key down and press the left mouse key down onto the wall and drag the wall up between the front and back walls. Then right click on the wall and select Transform from the popup menu or press Shift + M. Enter 90 for Z to spin the wall around the Z axis then click OK. Now, move the wall into position as shown below.
The right wall can be copied from the left wall, or by rotating a copy of the front wall...your choice. The floor can be created by rotating a copy of the front wall about the X axis. As before, drag the front wall up between the front and back walls. Then right click on the wall and select Transform from the popup menu or press Shift + M. Enter 90 for X to spin the wall around the X axis then click OK. Now, in the Side (X/Z) view in the bottom right quadrant move the wall into position as shown below.
Do the same for the Ceiling or use a copy of the floor to complete the cube.
Applying Textures
Now to paint the walls. We only care about the inside walls of the room because nobody is going to see the outside. Textures are applied to the surface of brushes, so we need to select a wall from the inside of the cube. Use the 3D Camera view to do this. Any easy way to get inside the room is to select the back wall in the top view then select View | Center 3D Views on Selection from the top menu.
Before going inside: File:Hammer .png
After going inside: File:Hammer .png
Let's make the back wall the default texture that allows portals. In the Texture tool in the right tool area select concrete/concrete_modular_wall001_gradient00 or click the Browse button and enter a Filter of 'concrete/concrete_modular' to see a selection of textures that would work then double click to select it. Click the Apply Current Texture tool button from the left toolbar. To see the texture select View | 3D Textured Polygons from the top menu...the wall will currenlty look pink because it's selected. If you still see a wireframe then move the Camera view out by pressing D then select View | 3D Textured Polygons again.
Let's make the floor allow portals too. Select the floor by moving the mouse over the 3D Camera view and holding the space bar down and holding the left mouse button down and moving the mouse backward which causes the camera to tilt down. Then left click on the floor to select it. Use the Texture tool from the right toolbar to select concrete/concrete_modular_floor001c or click the Browse button and enter concrete/concrete_modular and select a texture. Then click the Apply Current Texture tool button from the left toolbar.
Select the other walls and ceiling together by holding the CTRL key down while selecting them and apply a metal texture such as metal/metalwall048b since most metal textures do not allow the creation of Portals on them.
Adding player start and the Portal Gun
Now we need to choose where the player will spawn...preferably with the player standing on the floor with the Portal Gun in hand. Click the Entity tool from the left toolbar and click inside the room somewhere then press ↵ Enter to create the player spawn point. The player will not be pointed in the desired direction. Rotate an entity the same as how the walls were rotated...click the Selection Tool from the left toolbar, right click on the entity and select Transform from the popup menu, then enter a Z value of 90 and click OK.
Finally, we need to put the Portal Gun at the players feet. Click the Entity tool again then click right in front of the player spawn. By default it will be info_player_start, but we already created one of those. We need to change the object, so we need that Object Bar that we turned off in the previous section by selecting View | Screen Elements from the top menu then selecting Object Bar. Change the Object to weapon_portalgun then press ↵ Enter. If you spin the 3D Camera around you can see the player...yes...it's Gordon Freeman, but it will be replaced with the Portal girl when the map loads up in Portal.
Adding a Light
By default a map will be lit by ambient light so there wouldn't be any nice shadows and will seem to be overly bright. Click the Entity tool again if it is not currently selected then click in the center of the room in the Top (X/Y) view and move the entity to the ceiling, then change the Object to light and press ↵ Enter.
Compiling the map and loading it into Portal
Select File | Save from the top menu and give the map a name you will remember. Select File | Run Map. Click OK to accept the defaults and the map will compile...a dialog window will open to display the progress. If the map succeeds in compiling then Portal will launch and load the map. When the map loads shoot a portal onto the back wall directly in front of you, and down on the floor...if you aim the floor portal as far to the edge of the back wall as possible then you will not fall through and can look down and turn around to view the player model at all angles. In the future, you can check "Don't run the game after compiling" so you can have Portal already running and load the map using the developer console.


