Glass Light (Portal 2)

Glass Lights, more commonly known as Light Strips in Portal 2 replace the Recessed Lights from the original Portal. They are used in almost every Portal 2 test chamber and often are the main source of lighting along with Observation Rooms. In this tutorial, you will learn how to create these light strips for your test chamber.
Contents
Instances
This is often much easier than creating every light strip manually. Create a hole to place the instance in. If your walls are thin, you will have to cover the sides in order to seal leaks.
There are various instances in the instances/lights folder. The relevant instances begin with light_panel_.
Manual Creation
Step 1
Create a standard room.
Step 2
Cut a hole, 128 units wide, 32 units high, into the surfaces where you want your light strip(s) to go.
Step 3
Create a solid, also 128 units wide and 32 units high. Move it inside the hole you just cut, but retract it into the wall (watch out for leaks). Texture the face pointing inside the room with lights/light_panel_cool (or the neutral or warm variants). Texture the remaining faces with tools/toolsnodraw.
Step 4
Create a prop_static. Set its world model to models/props_lab/glass_lightcover.mdl and set 'Disable Shadows' to 'Yes'. Use it to cover up the hole inside the wall and rotate as needed.
Step 5
Create another solid, also 128 units wide, 32 units high, and 2 units thick. Move it on top of your light strip. Texture all faces with tools/toolsinvisible. Tie this brush to a func_portal_bumper.
Step 6
Another job well done. Rinse and repeat.
Editing Brightness
It is possible to edit the brightness of the light by selecting the Texture Application (Shift+A) and adjusting the "Texture scale" values of the light texture. The higher the numbers, the dimmer the light. For example, 2.0 is much darker than 0.25.
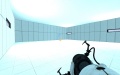
Three lights in a basic room with a texture scale of 0.25.
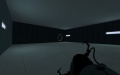
Same room, but with the scale turned up to 2.0.

