Creating A Dota-Style Map
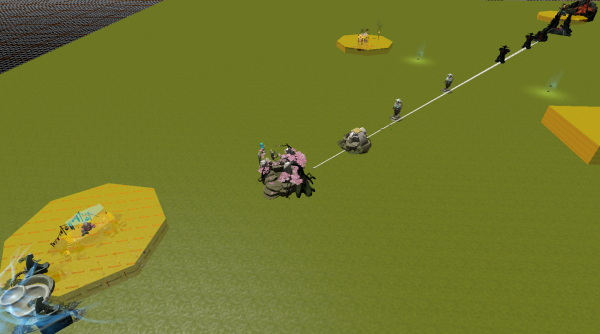
We'll create a very basic one-lane Dota-style map that exercises the gameplay objects which are used in the classic Dota map. By the end of this tutorial, you should have a map that resembles the dota_pvp addon map named simple_dota_map_example.vmap, you should do the Hammer: Getting Started tutorial.
Contents
Launch the Workshop Tools
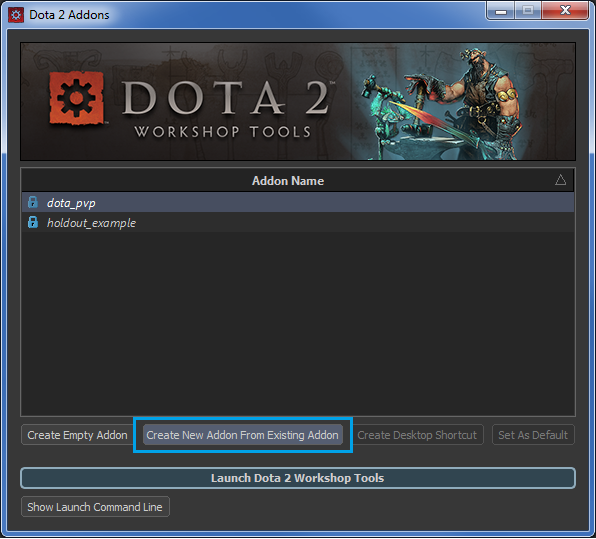
When you launch the Workshop Tools, select dota_pvp and choose Create New Addon From Existing Addon. This will make a writable copy of dota_pvp's write-protected files so that you can use them as a starting point. The dota_pvp addon also includes a script file named addon_game_mode.lua located in .../[your_addon_name]/scripts/vscripts. This file contains a line of code that enables tower invulnerability, which we'll need.
Open the Reference Map
Before you make your own map, first open the reference map simple_dota_map_example.vmap, which is located in dota_addons/[your_addon_name]/maps. It's a simple, one-lane map that contains fountains, ancients, barracks, towers, shops, rune spawns, a Roshan spawn, miscellaneous Roshan entities, and a neutral camp. If you encounter any problems in the rest of the tutorial, examine the entities in this map to see what their properties and positions are supposed to look like.
Create Your Map
Create a new map in Hammer and generate a tilegrid by switching to the Tile Editor tool with ⇧ Shift+C. Save your map now and remember to save it regularly as you go through this tutorial. For this map, we'll be using mostly prefabs and a few point entities and mesh entities.
Basic Entities
In the Assets pane, click the Prefabs tab. Drag the prefabs basic_entities_radiant and basic_entities_dire onto your tilegrid. The Radiant prefab contains the core game entities, so you won't need to use the basic_entities prefab that includes both Radiant and Dire playerstarts. Place the Radiant prefab where you want your Radiant base and the Dire prefab where you want your Dire base -- you'll want a large distance between the two to ensure you've got enough space for ancients, barracks, and towers.
The advantage of using this pair of basic entity prefabs is that the Radiant and Dire playerstarts are in two distinct prefabs, so you don't have to do any prefab collapsing to get your two teams of players to spawn in their own base.
Ancients
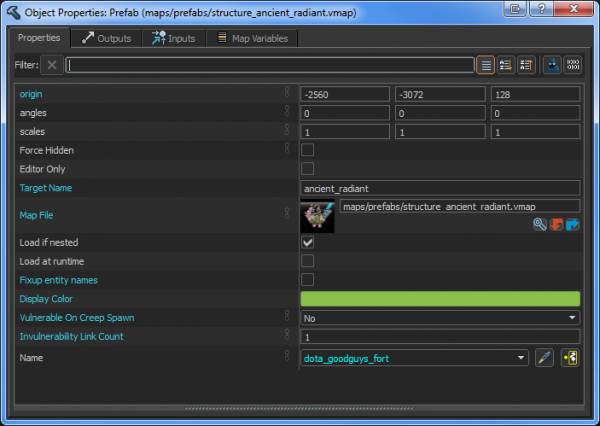
Drag the prefab structure_ancient_radiant into your map and place it near the basic_entities_radiant prefab so it's near your Radiant playerstarts. If you open the structure_ancient_radiant's properties (Alt+↵ Enter), you see that it has its Name set to "dota_goodguys_fort", which is a string that Dota2 looks for.
Set its Target Name to "ancient_radiant", so that we can have other structures refer to it. Set Vulnerable On Creep Spawn to "No", because later we're going to use entity i/o to disable invulnerability on our structures. Finally, set Invulnerability Link Count to 1.
Do the same for the Dire ancient prefab by dragging in structure_ancient_dire, placing it near basic_entities_dire, giving it the Target Name "ancient_dire", setting Vulnerable On Creep Spawn to "No", and Invulnerability Link Count to 1.
Towers
Your map is going to be a single lane composed of two Radiant and Dire towers. Let's start by making a Radiant tier 1 tower. In the classic Dota map, the outer-most towers in a lane are called tier 1 towers, and the towers closer to the base are progressively higher tier.
Radiant Tier 1 Tower
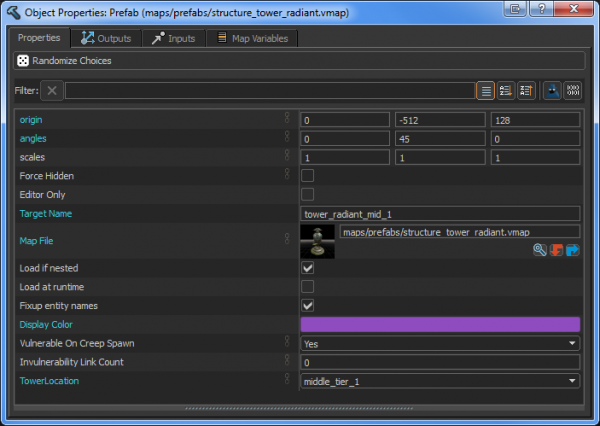
Drag the prefab structure_tower_radiant into your map and give it these settings:
- Target Name = "tower_radiant_mid_1"
- TowerLocation = "middle_tier_1"
The Target Name is what we'll be referencing when we hook up the structures via entity i/o. TowerLocation = "middle_tier_1" signifies that this is our middle lane tier 1 tower. TowerLocation's setting tells the prefab to assign a particular name to this tower behind the scenes, which the game logic looks for (in this case, "npc_dota_goodguys_tower1_mid").
Radiant Tier 2 Tower
Drag another structure_tower_radiant prefab into your map, this one will be our tier 2 tower. Give it these settings:
- Target Name = "tower_radiant_mid_2"
- Vulnerable On Creep Spawn = "No"
- Invulnerability Link Count = "1"
- TowerLocation = "middle_tier_2"
Vulnerable On Creep Spawn = "No" means that the tower is invulnerable until we trigger it to become vulnerable. Our tier 1 tower had this set to the default "Yes".
Dire Tier 1 Tower
Drag the structure_tower_dire prefab into your map and create your Dire tier 1 tower using these settings:
- Target Name = "tower_dire_mid_1"
- TowerLocation = "middle_tier_1"
Dire Tier 2 Tower
Drag another structure_tower_dire prefab and create your Dire tier 2 tower:
- Target Name = "tower_dire_mid_2"
- Vulnerable On Creep Spawn = "No"
- Invulnerability Link Count = "1"
- TowerLocation = "middle_tier_2"
Entity I/O - Part 1
Let's set it up so that when a tier 1 tower is destroyed it removes the invulnerability buff on the tier 2 tower.
Radiant Tier 1 Tower Output
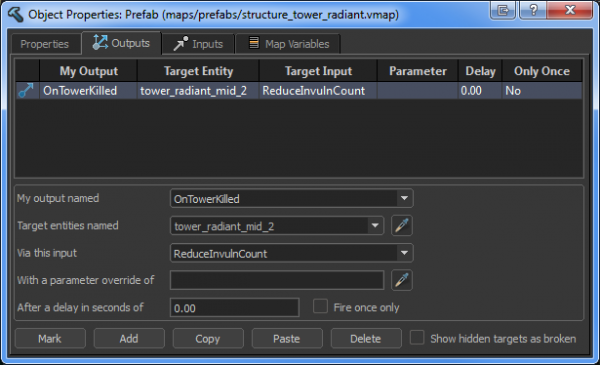
Select your tier 1 Radiant tower, open its properties (press Alt+Enter while the entity is selected), and in the Outputs tab add a new output:
- My output named: "OnTowerKilled"
- Target entities named: "tower_radiant_mid_2"
- Via this input: "ReduceInvulnCount"
Now when the tower dies (OnTowerKilled), it will send a ReduceInvulnCount output to your tier 2 tower ("tower_radiant_mid_2"), which removes the tier 2 tower's invulnerability buff.
(I.e. Reduces the "Invulnerability Link Count" from 1 to 0.)
Dire Tier 1 Tower Output
Select your Dire tier 1 tower and add this output to it:
- My output named: "OnTowerKilled"
- Target entities named: "tower_dire_mid_2"
- Via this input: "ReduceInvulnCount"
Barracks
Radiant Middle Barracks
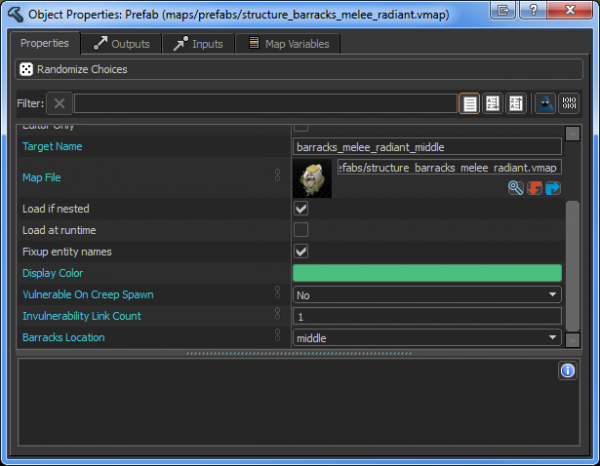
Drag the prefab structure_barracks_melee_radiant into your map and place it behind your Radiant tier 2 tower. Give it these properties:
- Target Name = "barracks_melee_radiant_middle"
- Vulnerable On Creep Spawn = "No"
- Invulnerability Link Count = "1"
- Barracks Location = "middle"
Dire Middle Barracks
Drag in structure_barracks_melee_dire and set it up in a similar way:
- Target Name = "barracks_melee_dire_middle"
- Vulnerable On Creep Spawn = "No"
- Invulnerability Link Count = "1"
- Barracks Location = "middle"
Creep Spawners and Paths
Switch to the Entity Tool with ⇧ Shift+E.
Radiant Creeps
We'll make the Radiant creeps first. We'll make them spawn in, path to a First Waypoint, then proceed down the lane to a Second Waypoint that we'll have placed near the Dire ancient.
Place the following entities near your Radiant melee barracks and give them these properties to set up your Radiant middle-lane creeps:
Creep Spawner
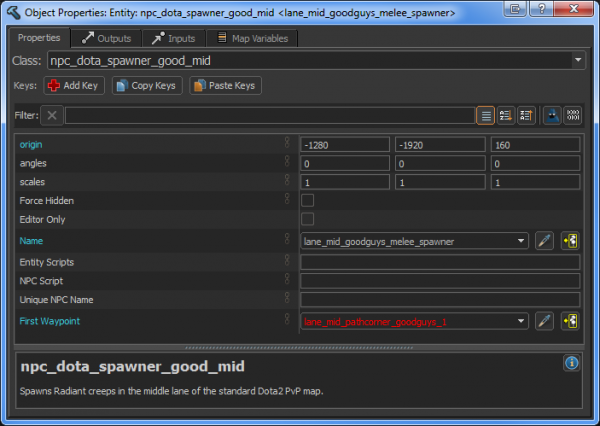
Place a npc_dota_spawner_good_mid entity. This actually spawns the creeps. Note that the name you put in the First Waypoint field will be red (which means the entity referred to does not exist). This will turn white when you create the First Waypoint in the next step.
- Name = "lane_mid_goodguys_melee_spawner"
- First Waypoint = "lane_mid_pathcorner_goodguys_1"
First Waypoint
Place a path_corner. The path_corner entity type defines the path that the creeps follow. Your spawner entity knows to path to this path_corner because it has its First Waypoint field linked to it.
- Name = "lane_mid_pathcorner_goodguys_1"
- Next stop target = "lane_mid_pathcorner_goodguys_2"
Second Waypoint
While in Translate Tool T, make another path_corner by dragging ⇧ Shift+![]() . Place this one next to the Dire's ancient. You're just making a very simplified, straight middle lane, so this second waypoint will be the final waypoint for your Radiant creeps. Note that if you want to make creep paths with some twists and turns, you'll need to link together more path_corners.
. Place this one next to the Dire's ancient. You're just making a very simplified, straight middle lane, so this second waypoint will be the final waypoint for your Radiant creeps. Note that if you want to make creep paths with some twists and turns, you'll need to link together more path_corners.
Since you duplicated your path_corner, Hammer knows to change your next one's Name property to "lane_mid_pathcorner_goodguys_2". Now your Radiant creeps will be able to spawn, move towards the first path_corner ("lane_mid_pathcorner_goodguys_1"), and then continue to its Next stop target, which is "lane_mid_pathcorner_goodguys_2".
Staging Node
Place an info_target entity. The info_target entity is a staging spot that allows creeps to be initialized at different times for performance gain. The only purpose of this entity is to reduce hitching when all the Radiant and Dire creeps spawn (every :00 and :30 on the clock). You don't need to worry about where you place these staging nodes, because the creeps can't be interacted with until they've been spawned in by the npc_dota_spawner_good_mid entity referred to above.
- Name = "npc_dota_spawner_good_mid_staging"
Dire Creeps
Now create the Dire creeps:
Spawner
- Name = "lane_mid_badguys_melee_spawner"
- First Waypoint = "lane_mid_pathcorner_badguys_1"
First Waypoint
- Name = "lane_mid_pathcorner_badguys_1"
- Next stop target = "lane_mid_pathcorner_badguys_2"
Second Waypoint
- Name = "lane_mid_pathcorner_badguys_2"
Staging Node
- Name = "npc_dota_spawner_bad_mid_staging"
Entity I/O - Part 2
Next, let's set up entity logic so that destroying tier 2 towers toggles off invulnerability on barracks and ancients. This is how the structures in the classic Dota map work.
Radiant Tier 2 Tower Outputs
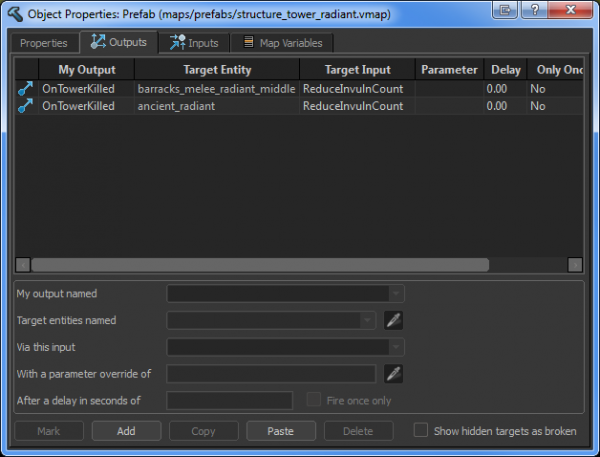
Select the tier 2 Radiant tower, open its Outputs tab and give it these two outputs:
- My output named: OnTowerKilled
- Target entities named: "barracks_melee_radiant_middle"
- Via this input: "ReduceInvulnCount"
- My output named: OnTowerKilled
- Target entities named: "ancient_radiant"
- Via this input: "ReduceInvulnCount"
This means that when the Radiant tier 2 tower is destroyed, it will remove the invulnerability buff on the Radiant barracks as well as the Radiant ancient.
Dire Tier 2 Tower Outputs
Do the same for the Dire tier 2 tower:
- My output named: OnTowerKilled
- Target entities named: "barracks_melee_dire_middle"
- Via this input: "ReduceInvulnCount"
- My output named: OnTowerKilled
- Target entities named: "ancient_dire"
- Via this input: "ReduceInvulnCount"
Fountain
Drag the prefab structure_fountain_radiant into your map and place it next to your basic_entities_radiant prefab. This is the Radiant fountain -- you don't need to change any of its properties for it to work as expected because the prefab has Team Number set to "Good Guys" and Unit Name set to "dota_fountain". Bring in the Dire fountain by dragging the prefab structure_fountain_dire into your map and placing it near your basic_entities_dire prefab.
Shops
Shop prefabs can be set to any Shop Type -- "Home", "Side", or "Secret". Drag one of the "shop_" prefabs into your map, place it next to your Radiant fountain and ensure its Shop Type is set to "Home". Do the same for the Dire base.
Place a shop_keeper_radiant prefab on the Radiant side of your map and a shop_keeper_dire prefab on the Dire side. These default to Shop Type "Secret", which is what we'll use.
Runes
Drag two rune prefabs into your map and place them wherever you want a rune to have a chance to spawn. Note that you can have more than two rune spawners in a map.
Neutral Camp
Drag the neutral_camp prefab into your map. This prefab contains the neutral camp spawner as well as its associated trigger mesh. The trigger mesh determines whether the camp is blocked by players, wards, units, etc.
- Set both the Volume Name (in spawner) and the Volume Name (in trigger) variables to "neutral_camp_01" (the Volume Name (in trigger) value will be red due to prefab behavior, but everything will still function properly). Now both the spawner and the trigger entities in the prefab are named the same, so this particular neutral spawn location has its blocked/clear state set by this particular trigger mesh.
- Set the Camp Type to "Easy", "Moderate", "Hard", or "Ancient".
Your neutral camp is now functional and is just missing neutral camp art, which you can add using the Tile Editor.
Roshan
Spawn Roshan
To add Roshan to your map, switch to the Entity Tool with ⇧ Shift+E and place an npc_dota_roshan_spawner in your map. This entity spawns Roshan.
Make Roshan Attackable
Heroes cannot right-click attack Roshan except when they're standing inside a special region (spells are not constrained in this way and can be cast on Roshan from anywhere).
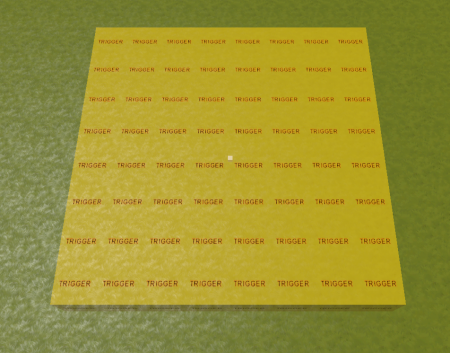
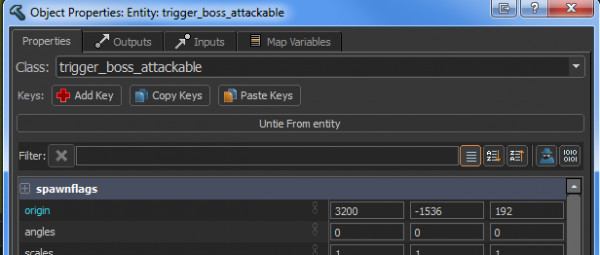
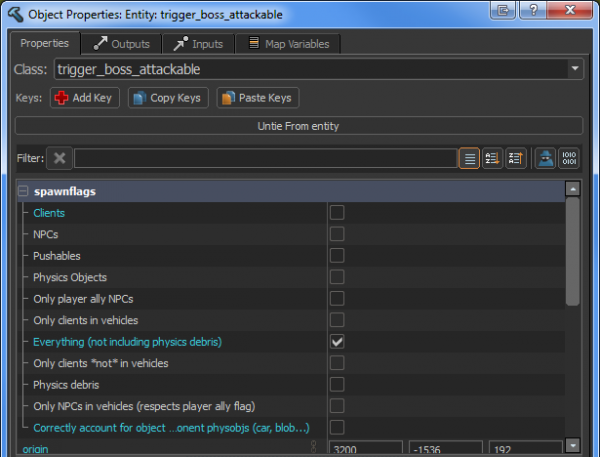
To make a region in which Roshan is attackable, switch to Block Tool with ⇧ Shift+B and create a mesh with a trigger material on it, then convert it to a mesh entity with Ctrl+T. Make it a trigger_boss_attackable. Open its spawnflags by clicking the + symbol next to that field (or double-clicking the spawnflags row), then tick the box next to Everything (not including physics debris), and untick both Clients and Correctly account for object mass....
Adjust the bounds of this trigger_boss_attackable mesh to define where you want players to be able to attack Roshan with right-click physical attacks.
Block Vision Around Roshan
If you want to prevent players from being able to see into and out of the Roshan pit, you can place vision blockers around it. Switch to Entity Tool with ⇧ Shift+E and place a ent_fow_blocker_node near your npc_dota_roshan_spawner entity.
Activate gridnav view with Ctrl+Q, then switch to Translate Tool and move the ent_fow_blocker_node to the center of one of the gridnav squares. You'll want your grid-snap set to 32 units for this.
Switch your grid-snap up to 64 units and duplicate the ent_fow_blocker_node using ⇧ Shift and an arrow key, eg. ⇧ Shift+←. Make a loop of these entities around your Roshan spawner, ensuring you've got one node per gridnav square. This creates artificial Fog of War around Roshan -- you've got to walk to the other side of a node to see what's behind it.
For the sake of visibility, turn off gridnav view with Ctrl+Q before moving on to the next section.
Prevent Ward Placement
You can prevent wards from being placed on certain spots by using a special trigger mesh. The classic Dota map uses these to prevent wards from being placed in undesired spots like cliff edges, inside models (e.g. shopkeepers), or in the Roshan pit.
Switch to Block Tool with ⇧ Shift+B and make a mesh that approximately covers the area covered by your ent_fow_blocker node entities. Use Ctrl+T to convert it to a mesh entity and make it a trigger_no_wards. Open its spawnflags, then tick the box next to Everything (not including physics debris), and untick Clients and Correctly account for object mass....
Compile and run the map
You now have all the core game-mode objects used in the standard Dota PvP map. If you wish to make more lanes, just refer to the dota_pvp_tiled.vmap file to see the names used by the top and bottom lane's towers, barracks, and creep entities.
Save your map, then press F9 to open the Build dialog, make sure all the checkboxes are ticked, and click Build. If your minimap fails to show up the first time, reload your map with the console command "map [your map name]" and do "jointeam good".
